Extend Access
Extend Access allows the Admin to change the course access expiration date to a course (single or in a group) on an individual user basis. When using Course Access Expiration, a user’s access to the course will automatically expire X days after enrollment.
However as a LearnDash admin, you might sometimes need to give a student a bit more time to complete a course. That’s where Extend Access comes in handy. It lets you change the expiration date for a course, either for individual students or for an entire group.
This guide will walk you through how to extend access for one or multiple users using the Extend Access feature.
Table of Contents [hide]
- 1 How to Extend Access to a Course
- 2 How to Extend Access in a Group
- 3 View a User’s Course Access Expiration
- 4 FAQ
How to Extend Access to a Course
First, let’s look at extending access for a single course:

To extend a user’s access to a course:
- Make sure you’ve got Course Access Expiration turned on for the course you want to adjust.
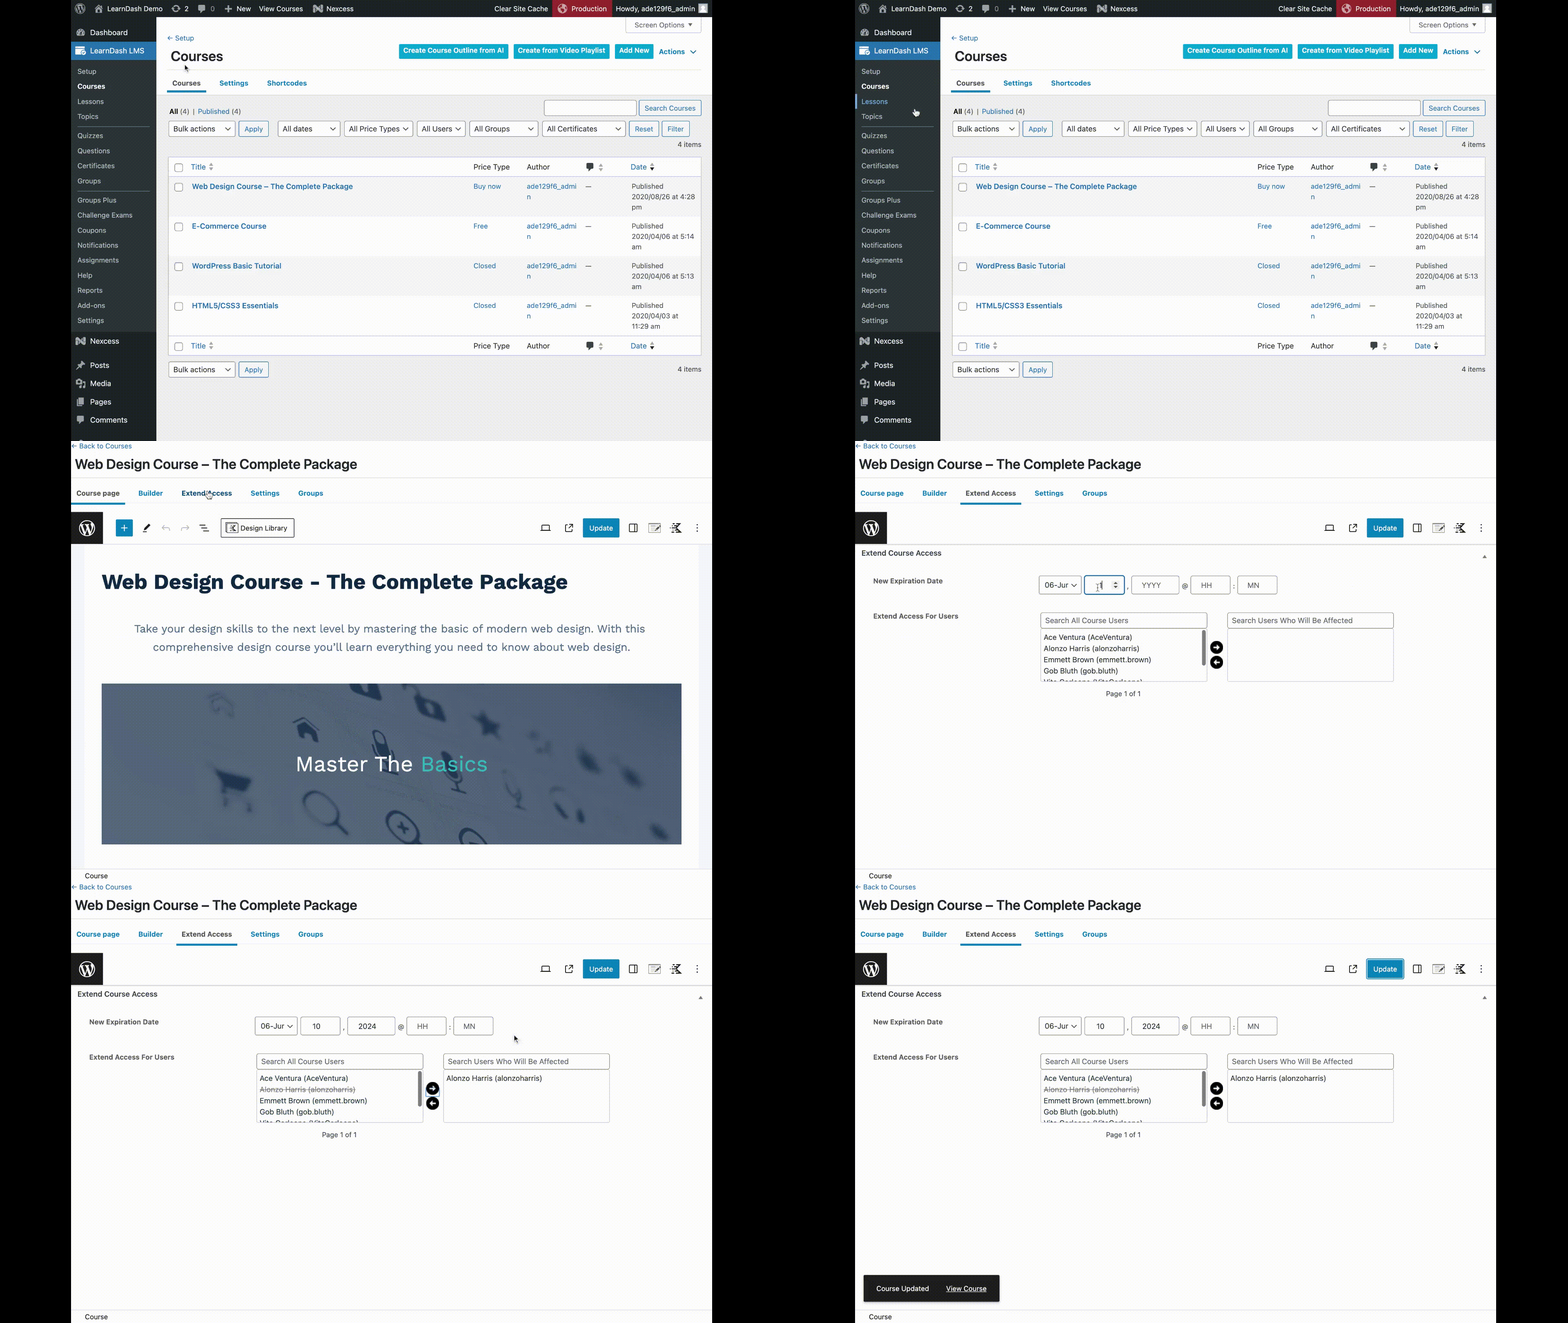
- Head over to LEARNDASH LMS > COURSES and pick the course you’re working with.
- Click on the EXTENDED ACCESS tab.
- Now, enter the new date when you want the course to expire.
- On the left side, you’ll see a box with user names. Find the student (or students) you want to give more time to and highlight their name(s).
- Click the left arrow to select the user(s) who will be affected and to move those names over.
- Finally, hit the UPDATE button at the top of the page.
Course with or without an End Date – And you’re done! Even if the course has an end date, this extension will override it. Your student can now access the course even after the original expiration date.
How to Extend Access in a Group
Now, what if you want to extend access for a whole group of courses? Here’s how to proceed:
To extend a user’s access –
- Again, make sure Course Access Expiration is on for the courses you’re dealing with.
- This time, go to LEARNDASH LMS > GROUPS and select your group.
- Click on the EXTENDED ACCESS tab.
- Enter the new expiration date.
- On the right side, you’ll see a box with course names. Highlight the ones you want to extend.
- Click the left arrow to select those courses.
- Now, on the left side, highlight the students you want to give more time to.
- Click the left arrow to select those students.
- Hit that UPDATE button at the top of the page.
NOTE – If your group has an end date, students will only be able to access the courses until that group end date, even with the extension. If there’s no group end date, they can access the courses normally with the new expiration date.
Groups without an End Date – The extension will override the expiry date (if any), and the user can access the course normally
Groups with an End Date – The extension will override the expiry date (if any) but not the end Date. So, the user will be able to access the course only if the group is still ongoing.
View a User’s Course Access Expiration
To view an individual user’s course expiration date:
- Go to the USERS > ALL USERS page…
- Click on the username of the user you’d like to view
- Scroll down to ‘Course Progress Details’
- Look to the right of the course details, and you’ll see the access expiration date

FAQ
Can I extend access to an individual user in a Group?
Absolutely! But there’s a catch. If your group has an end date, you can extend access to the courses, but the student can only access them while the group is still active. You can’t extend access beyond the group end date.
If your group doesn’t have an end date, it’s simpler. The extension will override any course expiry date, and the student can access the course as normal.
Remember, Extend Access is all about flexibility. Use it to give your students the time they need to succeed.