Instructor Role
Table of Contents
- 0.1 Overview
- 0.2 Installation, Activation, and Prerequisites
- 0.3 Features: Instructor Dashboard
- 0.4 Features: Instructor Dashboard Menu
- 0.4.1 Note
- 0.5 Features: Instructor Overview Page
- 0.6 Features: Adding Instructors
- 0.7 Features: Multiple Instructors
- 0.7.1 Sharing a Course with an Instructor
- 0.7.2 Accessing a shared course
- 0.8 Features: Instructor Commissions
- 0.8.1 Setup Instructor Commissions
- 0.8.2 Commission Reports
- 0.8.3 Disable Commission Reports
- 0.9Features: Selling Courses Through WooCommerce
- 0.9.1 How to Create a WooCommerce Product in The Instructor Dashboard
- 0.9.2 Features: Set up Paypal Payouts for Instructors
- 0.9.3 Prerequisites for using PayPal Payouts
- 0.9.4 How to request access to PayPal Payouts
- 0.9.5 Activating Payouts
- 0.9.6 Creating a new API Application
- 0.9.7 Configuring Instructor Payout Settings
- 0.10 Pay Instructor Commissions using Payouts
- 0.10.1 Important Notes
- 0.11 Features: Instructor Profile
- 0.11.1 How to Setup the Profile Page
- 0.11.2 Additional Information
- 0.11.2.1 Profile Image
- 0.11.2.2 Social Account links
- 0.11.2.3 Introduction Section
- 0.12 Features: Profile Introduction Sections
- 0.12.1 Configurations
- 0.12.2 Add New Section
- 0.12.3 Edit Existing Section
- 0.12.4 Section Configuration Fields
- 0.12.4.1 Title
- 0.12.4.2 Image
- 0.12.4.3 Meta Key
- 0.12.4.4 Data Type
- 0.12.4.5 Icon
- 0.13 Features: Create Learning Content And Quizzes
- 0.14 Features: Reporting
- 0.14.1 View Course Reports
- 0.14.2 Export Course Reports
- 0.15 Features: Instructor Notifications
- 0.16 Features: Email Settings
- 0.16.1 Review Emails
- 0.16.2 Quiz Completion Emails
- 0.16.3 Instructor Course Purchase Emails
- 0.17 Features: Review Instructor Course Updates
- 0.17.1 Enable Course Review
- 0.17.2 Review Process
- 0.17.3 Send Course for Review
- 0.17.4 Approve Changes
- 0.17.5 Review and Approval Notification Emails
- 0.18 Features: Instructor Groups Access
- 0.19 Features: Instructor Comments Access
- 0.20 Features: Student Teacher Communication
- 0.20.1Pre-requisites
- 0.21 Settings
- 0.21.1 Communicate with Instructors
- 0.21.2 Sending new Doubts
- 0.21.3 Replying to Doubts
- 0.21.4 View all Doubts
- 1 Features: Student Teacher Communication
- 1.0.1 Pre-requisites
- 1.0.2 Settings
- 1.0.3 Communicate with Instructors
- 1.0.4 Sending new Doubts
- 1.0.5 Replying to Doubts
- 1.0.6View all Doubts
- 2 Multiple Instructors Shortcode
- 2.0.1 Course Page
- 2.0.2 Course Grid
- 2.1 Features: Instructor Dashboard Settings
- 2.2 Features: Color Schemes
- 2.2.1 Header Settings
- 2.2.2 Setting Image Logo
- 2.3 Features: Commission Logs
- 2.3.1 How Commission Logs are recorded
- 2.3.2 Edit Commission Logs
- 2.3.3 Delete Commission Logs
- 2.4 Navigation Settings
- 2.4.1 The URLs to access
- 2.4.2 Instructor Dashboard Menu
- 2.4.3 Instructor Login Redirect
- 2.4.4 Add the Instructor dashboard link to the primary menu
- 2.4.5 Preview Settings for the Admin
- 2.4.6 Profile links
- 2.4.6.1 As an Admin:
- 2.4.6.2 As an Instructor
- 2.5 Overview settings
- 2.5.1 All Block Hidden Message settings
- 2.5.2 Reset settings
- 2.5.3 Default settings
- 2.6 The Frontend Course Creator
- 2.6.1 Activating Frontend Course Creator (FCC)
- 2.6.2 Settings
- 2.6.2.1 Enable Frontend Course Creator
- 2.6.2.2 Disable LearnDash’s Backend Course Creator for Instructors
- 2.6.2.3 Appearance Settings
- 2.6.3 Accessing the Frontend Course Creator
- 2.6.4 Using the Frontend Course Creator
- 2.6.4.1 Create a Course
- 2.6.5 Edit a Course
- 2.6.6 The Frontend Builder
- 2.6.7 Organizing the course structure
- 2.6.8 Adding and Editing Lessons/Topics
- 2.6.9 Editing existing lessons and topics
- 2.6.10 Course Settings
- 2.6.11 Limitations
- 2.7 The Frontend Quiz Creator
- 2.7.1 Activating Frontend Quiz Creator
- 2.7.2 Settings
- 2.7.2.1 Enable Frontend Course Creator
- 2.7.3 Accessing the Frontend Quiz Creator
- 2.7.4 Using the Frontend Quiz Creator
- 2.7.4.1 Create a Quiz
- 2.7.4.2 Edit a Quiz
- 2.7.5 Quiz Builder
- 2.7.6 Organizing the Quiz questions
- 2.7.7 Create New Question or Edit the Question
- 2.8 Frontend Dashboard: Installation Guide
- 2.8.1 Configuring the Frontend Dashboard using Onboarding Wizard
- 2.8.1.11 Welcome Screen
- 2.8.1.22 Frontend Dashboard Configuration
- 2.8.1.33 Customize Frontend Dashboard and publish the page
- 2.8.2 Deleting the Frontend Dashboard Page
- 2.8.3 Creating a new Frontend Dashboard page
- 2.8.3.1 Quick Link: Create a new dashboard page
- 2.8.4 Create the Frontend Dashboard page from scratch using Gutenberg Editor
- 2.8.4.1 Create a new page
- 2.8.4.2 Add Frontend Dashboard pattern
- 2.8.5 Add Instructor Dashboard Blocks Individually
- 2.8.5.11 Dashboard Builder block
- 2.8.5.22 Create Dashboard Tab:
- 2.8.5.33. Add Instructor Blocks:
- 2.8.6 Set as default Instructor Frontend Dashboard
- 2.8.1 Configuring the Frontend Dashboard using Onboarding Wizard
- 2.9 Frontend Dashboard for Instructors: Gutenberg Blocks List
- 2.9.1 Dashboard Tabs
- 2.9.2 How it Works:
- 2.10 Instructor Overview for LearnDash
- 2.10.1 Courses for LearnDash
- 2.10.2 Quizzes for LearnDash
- 2.10.3 Instructor Settings for LearnDash
- 2.10.4 Products For LearnDash
- 2.10.5 Commissions For LearnDash
- 2.10.6 Assignments For LearnDash
- 2.10.7 Essays For LearnDash
- 2.10.8 Comments For Learndash
- 2.10.9 Quiz Attempts For Learndash
- 2.10.10 Course Reports For LearnDash
- 2.10.11 Course Reports
- 2.10.12 Learner Reports
- 2.10.13 Groups For LearnDash
- 2.10.14 Group Creation and Editing
- 2.10.15 Groups Dashboard
- 2.10.15.1 Overview
- 2.10.15.2 Courses
- 2.10.15.3 Learners
- 2.10.15.4 Course Progress
- 2.10.16 Certificates For LearnDash
- 2.10.17 Certificate Builder Integration
- 2.11 How to Customize the Frontend Dashboard (Gutenberg Editor and Global settings)
- 2.11.1 Customize the Frontend Dashboard via Gutenberg Editor
- 2.11.2 Page Template Settings
- 2.11.3 Dashboard Tab Settings
- 2.11.3.1 Add content above or below the dashboard block
- 2.11.3.2 Typography and Color Settings
- 2.11.3.3 Page Speed Settings
- 2.11.3.4 Primary CTA option
- 2.11.4 Instructor Overview block settings
- 2.11.5 Global Settings
- 2.11.5.1 Frontend Dashboard Page Settings
- 2.11.5.2 Menu Settings
- 2.11.5.3 Overview Page Settings
- 2.11.5.4 Appearance Settings
- 2.11.6 Recreating the Frontend Dashboard
- 2.12 How to disable the Backend dashboard(WP) for Instructors
- 2.12.1 Disabling Backend Access:
- 2.12.2 Instructor Dashboard Link:
- 2.13 Introducing Frontend Dashboard
- 2.13.1 Frontend Dashboard
- 2.13.2 Instructor Frontend Dashboard Tabs
- 2.13.3 Frontend Instructor experience to create and manage courses:
- 2.13.4 Completely block access to the Backend
- 2.13.5 Personalize the dashboard to match your Brand and Site’s look and feel
- 2.13.6 Customize and Extend the Frontend Dashboard to create a dashboard tailored to your business needs
- 2.14 Elementor Compatibility
- 2.14.1 Editing Course Content
- 2.14.2 Switching Back to Normal WordPress Editor
Overview
The Instructor Role gives you the power to add multiple course authors without compromising site security. Learn how you can leverage this powerful tool by creating roles with restricted back-end access to Course Authors, making content creation and management easier, and your site safer.
Installation, Activation, and Prerequisites
Before getting started with Instructor Role, please ensure you have the LearnDash LMS plugin installed and activated, that your site meets or exceeds our prerequisites, and you have the add-on properly installed and activated.
Features: Instructor Dashboard

The Instructor Dashboard is a dedicated dashboard designed for instructors (Teachers). When logged in, instructors are automatically redirected to this dashboard. Whether creating courses, checking reports, approving assignments or customizing quizzes, instructors can find all the tools they need in one place. Each dashboard is instructor-specific, and will only display the data of the courses that individual has created or shared. The URL to access your Instructor Dashboard is the same as your WP Dashboard URL, but is completely secure and restricted to only allow access to instructor-specific pages.
Features: Instructor Dashboard Menu
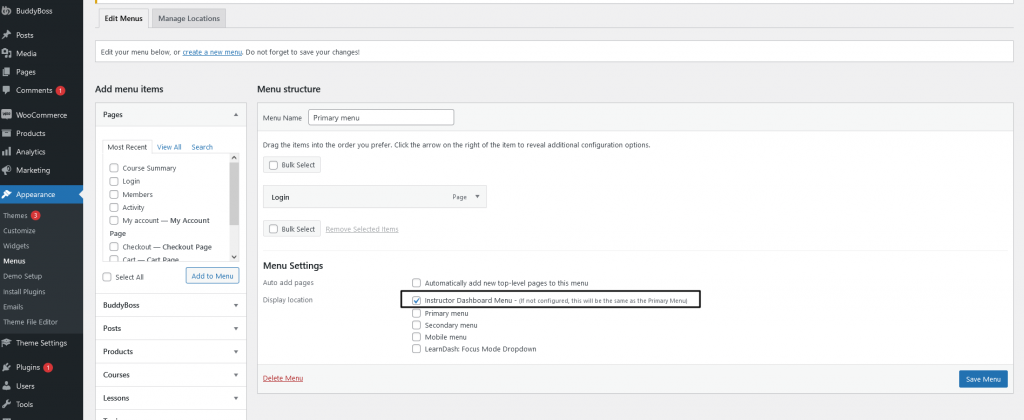
The Instructor Dashboard has a top menu similar to the primary menu displayed on the front end of the website. But you may wish to display a different top menu for the instructors on the Instructor Dashboard menu. You can enable different menus by using the Instructor Dashboard Menu setting under the Appearances ➞ Menus section as shown below.
Note
A feature was included in the Instructor Role update v4.2.1 in which the Instructor Dashboard Menu will default to the Primary Menu of your site. This is to make sure the Instructor can still navigate to the other pages of the site from within their dashboard.
To revert back to an older menu or create an entirely new menu for your Instructor Dashboard, navigate to Appearance > Menus > Create New Menu, add the menu items you wish to show on the Instructor Dashboard, and then select the display location as ‘Instructor Dashboard Menu’ as shown in the screenshot above.
Features: Instructor Overview Page

An instructor can see all the basic information about their courses at a glance from the Instructor Overview page.
- Number of Courses created by the instructor
- Number of Students registered for the instructor’s courses
- Earnings calculated based on the commission settings set by the administrator and the courses sold.
- Course-specific report to check student progress.
- Submissions table to check the essay and assignment submissions made by students.
Features: Adding Instructors
Now that you are familiar with the Dashboard, you have the ability as an Admin to add Instructors to your website. You can add instructors to your website in various ways:
1. Creating New Instructors – To create an instructor, Create a new user from the WP Dashboard and set the user’s role as ‘Instructor’, and save.
2. Making an existing user an Instructor – To change an existing user’s role to an instructor, edit the user’s profile and change the user’s role to ‘Instructor’ and save the changes made.
3. Instructor Registration Form – If you wish to register instructors on your website using a form, you can check out this article to learn more about it and it will help you register Instructors using forms on your website.
Features: Multiple Instructors
Collaborate with other instructors to create comprehensive, well-rounded LearnDash courses faster.
Sharing a Course with an Instructor
Are you looking to have more than 1 Instructor managing a course? This will help you collaborate with other instructors in your team to create your LearnDash courses faster and better.

To add Multiple Instructors to your website, you can follow the steps below:
- Edit a course you wish to share or collaborate on, or create a new one.
- On the course edit page, below the content area, look for the Share Course dropdown as shown.
- Once clicked on it, a list of all Instructors on the website will be displayed
- Select the Instructors you wish to collaborate on the course with.
- Once the instructors have been selected, Save the course.

The course can be either shared by an Admin or an Author with all the other Instructors.
Accessing a shared course

Once the course is shared the Instructor can log in and check for the same under their courses tab. The shared courses appear similar to other courses on the listing page, one can differentiate by looking at the author.

Co-instructors can create new or edit existing lessons, topics, quizzes, and questions in a shared course and perform all other actions to configure course settings on the course edit page as the owner instructor can, but they are not allowed to trash the course.
Also, Co-instructors are not allowed to further share a shared course with other instructors.
Features: Instructor Commissions
Instructor Commissions gives you the power to set a percentage of commissions earned for your instructors, along with a robust reporting system to help manage commissions and payments.
Setup Instructor Commissions
To set instructor commissions, head over to LearnDash LMS → Instructor menu. There, you should be able to see a list of all the instructors on your LearnDash e-learning website. You can then set a commission percentage for each instructor and update the changes. An administrator can set a commission percentage for each instructor.

Commission Reports
A report accessible by the Admin to view a list of the commission amount earned by the Instructor for each course sold. Select an instructor and click ‘Submit’. You should be able to view a list of the commission amount earned by the instructor for each course sold. Instructor commission reports provide you with a summary of instructor commissions earned. To view these reports, go to LearnDash LMS → Instructor Commission → Commission Report.

Note: The ‘Pay’ button does not ensure the payment is made. It is just a means to update the data once you have made the payment.
The Paid Earnings are the commission amount, you have paid an instructor. And the Unpaid Earnings provides the pending amount which has to be paid. Once the payment is made to the instructor (through PayPal, or offline), Admin can update the Paid Earnings by clicking on the Pay button, and entering the paid amount.
You can also export commission reports by heading to LearnDash LMS → Instructor Commission → Export.
Disable Commission Reports
There, you should be able to see a list of options, check the Disable Instructor Commission Feature option. To disable Instructor Commissions, head over to LearnDash LMS → Instructor → Settings.
Features: Selling Courses Through WooCommerce
Now since the Instructors can create courses, you can avail Instructors to sell their courses on your website using Woocommerce too. Instructors can sell their courses as products through WooCommerce and earn commissions. To enable instructors to create and sell courses and WooCommerce products, the following plugins are required to be installed and activated.
1. WooCommerce 3.0.x
2. LearnDash WooCommerce Integration
How to Create a WooCommerce Product in The Instructor Dashboard
Follow the steps below to create a product in WooCommerce:
- From the Instructor Dashboard, go to Products → Add New
- Enter the Product Title and the Pricing details.
- Do not forget to add a Course.
- Once all the information has been added and you are ready to make the product live, Publish it.

Communicate with Instructors
Once you have all the settings properly configured, the students will be able to communicate with the course instructors for any course lesson or topic from the lesson or topic page itself.
Sending new Doubts
A user can send a new doubt related to a lesson/topic of a course from the button at the bottom right corner

After clicking on the button, click on the Send your doubts button to send a new doubt.

This will open up a new pop-up box for students to write the subject and description of their query along with the related lesson and topic. The lesson and/or topic will be pre-selected for the current lesson/topic.
Send new doubt modal
Click on Send to send your doubt to the instructor.
Replying to Doubts
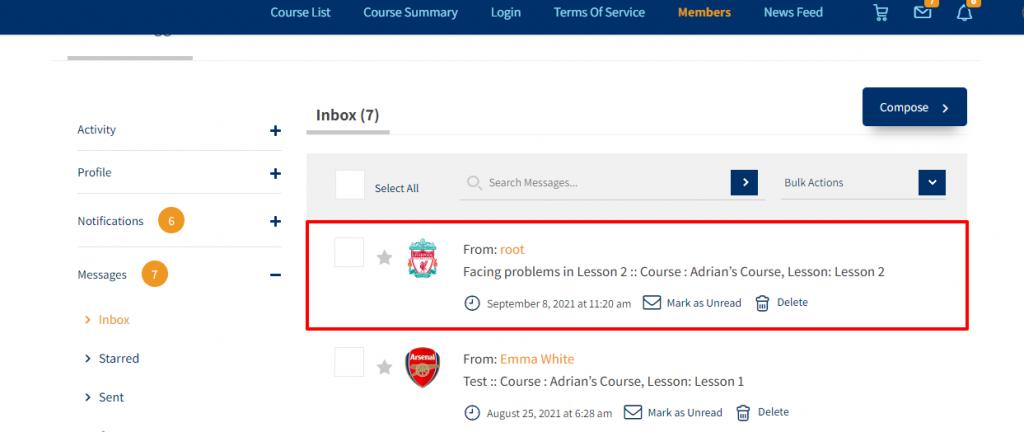
Instructors will be able to see all the doubts in the Buddypress private message inbox. They can send replies to user doubts from there.
Buddypress Private Message Inbox
Users can then View the instructor’s reply and continue the conversation from the lesson/topic page itself.
View and reply to instructor doubts from the lesson/topic page
Students can also have multiple doubts about the same lesson/topic. Clicking on the bottom right button will open a list of all threads for the current lesson/topic.
Click on the thread to load the conversation in the pop-up box.

View all Doubts
Users can also see a list of recent doubts across all courses from the header.
Clicking on a thread here will take the user to the Buddypress private message inbox.
Multiple Instructors Shortcode
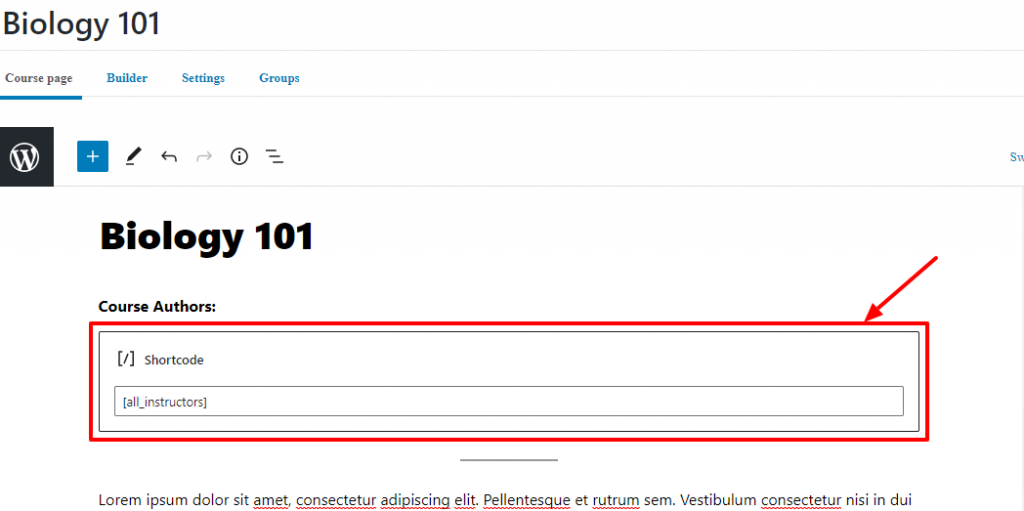
The multiple instructors shortcode is helpful in displaying all the instructors specific information on the course page.
[all_instructors] : displays a list of all course instructors with their avatar and names along with a link to the author profile page.
[all_instructors display_img=0] : controls whether to display the instructor image or not. If the parameter is not specified it will always display the instructor image.
[all_instructors size=32] : controls the size of the instructor avatar image to be displayed in pixels. If the parameter is not specified it would always display the instructor image of 32×32 pixels
[all_instructors display_name=0] : controls whether to display the instructor name or not. If the parameter is not specified it would always display the instructor name.
[all_instructors visible=3] : controls how many instructors to display on the page. If the parameter is not specified it would always display at most 2 instructor details.
[all_instructors exclude_author=1] : If you only wish to display the names of the shared course instructors then set this parameter value to 1. If the parameter is not specified it will display all course instructor details.
[all_instructors course_id=36] : To use the shortcode on any other pages, make use of the course_id parameter to specify the relevant course
Course Page
Add the below shortcode to the course content to display all its related course instructors on the course page.

Course Grid
If you are using the LearnDash Course Grid add-on then you can make use of the following code snippet to display the instructor list on the course list page.
if ( ! function_exists( 'ir_custom_add_instructor_details' ) ) {
	/**
	 * Add course instructor details in course list
	 *
	 * @param array $data
	 * @param object $post
	 * @param array $shortcode_atts
	 * @param int $user_id
	 *
	 * @return string
	 */
	function ir_custom_add_instructor_details( $data, $post, $shortcode_atts, $user_id ) {
		if ( learndash_get_post_type_slug('course') == $post->post_type ) {
			$instructor_data = '<div style="padding: 10px;">'.do_shortcode( "[all_instructors course_id='{$post->ID}']") . '</div><div class="caption">';
			$data = str_replace( '<div class="caption">', $instructor_data, $data );
		}
		return $data;
	}
	add_filter( 'learndash_course_grid_html_output', 'ir_custom_add_instructor_details', 10, 4 );
}
Features: Instructor Dashboard Settings
After the major release of v4.0.0+, the Admin Customizer has been removed and replaced with a new and improved Instructor Dashboard layout.

Additionally, a new menu setting is available in the Appearance menu for Administrators called the Instructor Dashboard Settings

Admins can use these various settings to customize the Instructor Dashboard view.
Features: Color Schemes
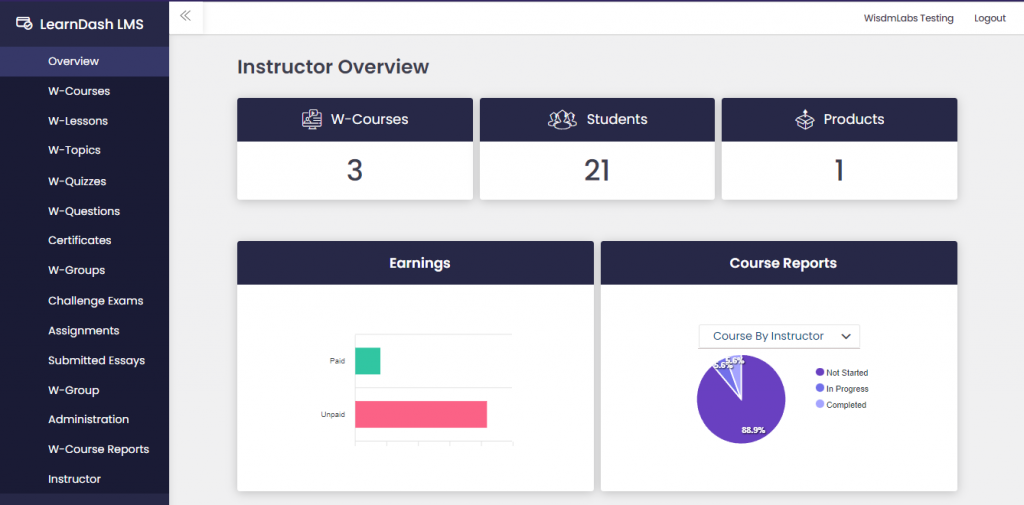
Also, in the Instructor Role v4.1.0+ onwards, the plugin gives you as Administrators a new feature to set color schemes for their Instructor Dashboard too.
The color schemes provide a list of basic presets along with a custom preset giving an option to choose your own colors for certain instructor dashboard areas and elements.
Once you visit the page, you can scroll and Toggle the Color Schemes to enable them

- Select a preset for your instructor dashboard and click on Save.
- Or, Choose your own colors by making use of the custom preset and then set the colors for the different sections and elements on the instructor dashboard.

Header Settings
Configure whether or not to display your logo or some text on the instructor dashboard from the header settings section. You have various options to either set the Logo as an Image or Text.
Setting Image Logo
Select Image as the header type and upload your Logo image


Screenshot for Instructor Dashboard Settings Menu
- Toggle the Color Schemes to enable them

- Select a preset for your instructor dashboard and click on save.
- Choose your own colors by making use of the custom preset and then setting the colors for the different sections and elements on the instructor dashboard.
Screenshot for Custom Preset options
Features: Commission Logs
Commission logs help you as an admin keep track of the payments you have made to your instructors. Along with recording the logs you can also edit, delete and export the commission logs.
How Commission Logs are recorded
An important note first, the commission logs are only recorded and the below actions are only performed on manual commission recorded. Once an admin records a manual commission payment , the payouts transaction history table at the bottom will record the commission payment log in the manual tab.

Now, you can also add notes while recording a commission payment.

The admin will be able to see the notes along with the other details in the manual payouts logs table.
Edit Commission Logs
The admin can edit an existing commission log entry by clicking on the pencil icon in the actions column against the commission log. This will open a modal where you can edit the date, amount and notes for that specific commission log. Following are the restrictions when adding/editing a commission log:
- The amount cannot be more than what the instructor is owed.
- The note length cannot exceed a character limit of 255 characters.
- You cannot choose any future dates.

After updating the fields click on Submit to update the commission log.
Delete Commission Logs
To delete a commission log entry click on the cross mark in the actions column against the commission log. This will open a confirm box. To confirm the deletion of the commission log click on OK or click on Cancel to cancel it.
Navigation Settings
After various updates, we have added a bunch of settings in the Instructor Role Menu that make navigating around the plugin pages easier for both the admin and the Instructor.So, we request you to go through this article below and address the changes the plugin has to offer and how it can benefit each and every one of you.
The URLs to access
-
Instructor Dashboard: {SITE_URL}/instructor/wp-admin/admin.php?page=ir_instructor_overview
Example: https://instructorrole.wisdmlabs.com/wp-admin/admin.php?page=ir_instructor_overview
-
Instructor Profile: {SITE_URL}/instructor/{user_display_name}
Example: https://instructorrole.wisdmlabs.com/instructor/emma/
Instructor Dashboard Menu
The Instructor Dashboard Menu can be set up from here. After the plugin is installed for the first time, the Instructor Role plugin, the Instructor Dashboard Menu, and the Primary Menu of the site will be synchronized and the Instructors will see the Primary Menu of your site on the Instructor Dashboard. This synchronization will take place for the themes listed below:
- Kadence
- BuddyBoss Theme
- Twentwentyone
- Twentytwenty
Instructor Login Redirect
The administrator may now choose where the instructor will land after logging in successfully.
This Setting allows the Admin to select any page on the site where the Instructor will be redirected post login.When the plugin is first activated and installed, this setting is “checked” on by default and it will redirect the Instructors automatically to the Dashboard by default.And, If you are handling redirections from another third-party plugin or want the default WordPress login behavior to be followed, you can simply disable the Setting from ‘LearnDash LMS’ > ‘Instructor’ > ‘Settings’ > ‘Instructor Login Redirect’.
Add the Instructor dashboard link to the primary menu
The above image also displays a Setting, “Add the Instructor Dashboard Link to the Header Menu”.This will display the “Instructor Dashboard” link on the Primary Header Menu of your site and will be visible only to your Instructors.
The following themes that support this feature are:
- Kadence
- BuddyBoss Theme
- Twentwentyone
- Twentwenty
- eLumine
The Admin can also Preview the Instructor’s Dashboards and Profiles right from the WordPress Dashboard. Navigate to ‘LearnDash LMS’ > ‘Instructor’ > Instructors Tab and for each Instructor, you will see the 2 links
- View Instructor’s Profile: This will open the respective Instructor’s Profile in a new tab. So, make sure you switch on the ‘Instructor Profile’ Setting from the Profile Tab in the same area to make sure the admin can easily preview the Instructor’s Profile.
-
View Instructor’s Dashboard: This will allow Admin to temporarily log in as the Instructor and you can then visit the respective Instructor’s Dashboard to preview it and check how things are set up.
The Admin can also switch back by clicking on the “Switch to Admin” Link while on the Instructor Dashboard as shown below.
Profile links
The link to the Profile Page of an Instructor is displayed in multiple locations that makes it convenient for both the admin and Instructor to visit the Profile Page.
As an Admin:
The admin can also view the profile of an Instructor from the Edit User Page under ‘Users’ > ‘All Users’ > ‘Edit User’ (for a user who is an Instructor) on the WordPress dashboard and as shown below the admin can visit both – the dashboard and profile’ of that respective Instructor.
As an Instructor
The Instructors on your site can also visit their own Profile by clicking on on the “Profile Tab” on their Instructor Dashboard and link to View their own Profile will be displayed there as shown below.
Overview settings
- Course block
- Student block
- Products block
- Earnings block
- Course Reports block
- Submissions block
All Block Hidden Message settings
What we see below is the default message that is shown when all the blocks are disabled. We provide functionality to edit this default message

Reset settings
The default behaviour permits all overview blocks to be active/on, and the default dashboard input message is empty (‘no content to display’ in the overview settings).
Default settings

The Frontend Course Creator
The Frontend Course Creator allows the Administrators and Instructors to create and edit a LearnDash course on the frontend of the website.
Activating Frontend Course Creator (FCC)
- Admin can activate/deactivate FCC from WP dashboard → LearnDash LMS → Instructors → Frontend Course Creator
- Frontend Course Creator Setting Tab

Important: In order for the Frontend Course Creator to function, your permalink structure must be set to pretty permalinks (i.e anything except plain permalink structure), and you must save the permalink settings again after enabling the Frontend Course Creator.
Settings
Enable Frontend Course Creator

Enabling this setting will add an “Edit via Frontend Course Creator” option in the course edit menu (Image below) and add a button “Add new via Frontend Course Creator” beside the LearnDash’s Add New button

Disable LearnDash’s Backend Course Creator for Instructors

- Enabling this setting will Remove the Edit and Add New option for the default LearnDash Course Builder and Rename the Frontend Course Creator actions as Edit and Add New
- This setting will appear and be enabled by default when the primary setting (Enable Frontend Course Creator) is enabled.
Appearance Settings
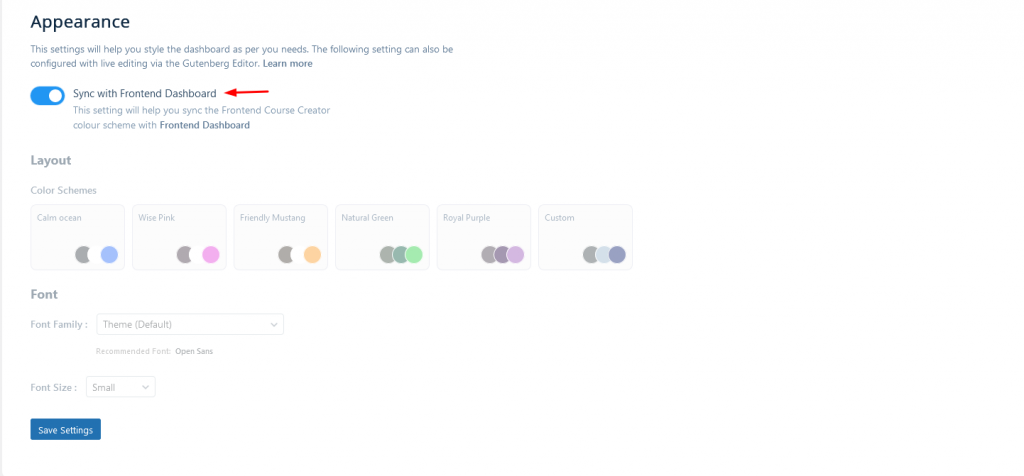
- The Sync Button is a powerful new feature in our product that allows you to synchronize your frontend dashboard’s color themes, font size, and font family with the Frontend Course Creator (FCC) color theme.
- This feature ensures a consistent look and feel for your dashboard, and if enabled, it will automatically apply the synchronization whenever the frontend dashboard is updated or you save your settings on the Frontend Course Creator Setting’s page.
- When the Sync Button is turned ON, any Color or Font updates made to your Frontend dashboard will trigger automatic synchronization with the Frontend Course Creator’s color theme, font size, and font family. This ensures that your dashboard’s color theme remains compliant with Frontend Course Creator without manual changing it.
- This setting will appear and be enabled by default when the primary setting (Enable Frontend Course Creator) is enabled.
Accessing the Frontend Course Creator
As per the above-configured settings, the Instructors /Admins can create/edit a course from
- The instructor can go to the Instructor Dashboard → Courses → Edit Via Frontend Builder / Add new via Frontend Builder
- The administrator can go to WP Dashboard → Course →Edit Via Frontend Builder / Add new via Frontend Builder
Using the Frontend Course Creator
Create a Course
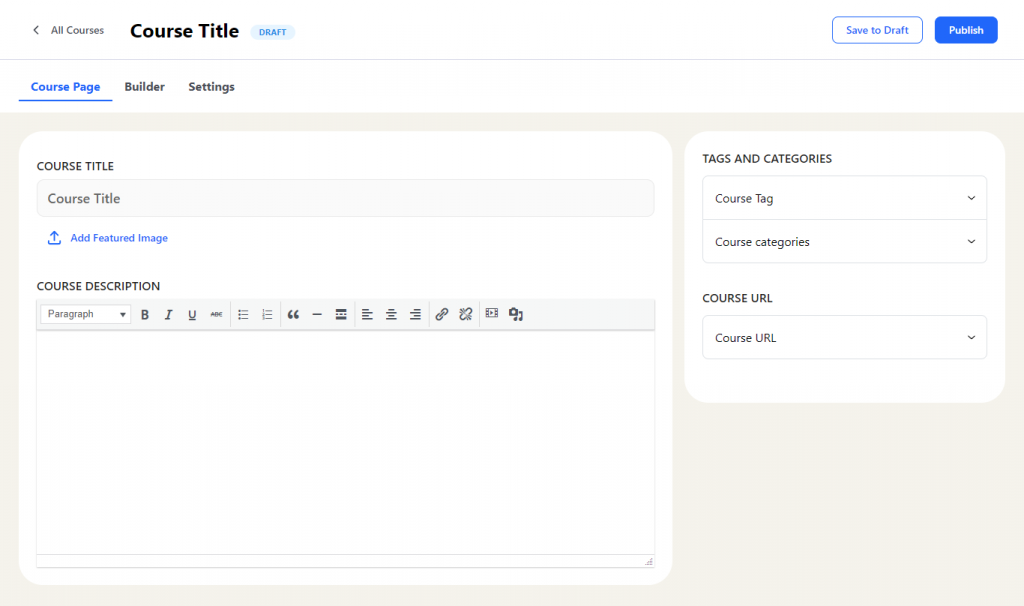
- You can create a new course by clicking the Add new via Frontend Course Creator Button
- This will make a draft course and take you to the frontend course creator to add all the content and configure the settings to create the course.
-
Frontend Course Creator is now Elementor Compatible,
that allows administrators and instructors to access the Elementor editor directly from the frontend of your course creation platform. This feature provides a seamless and user-friendly way to create, edit, and manage course content while limiting backend access and still providing full Elementor support.
Edit a Course
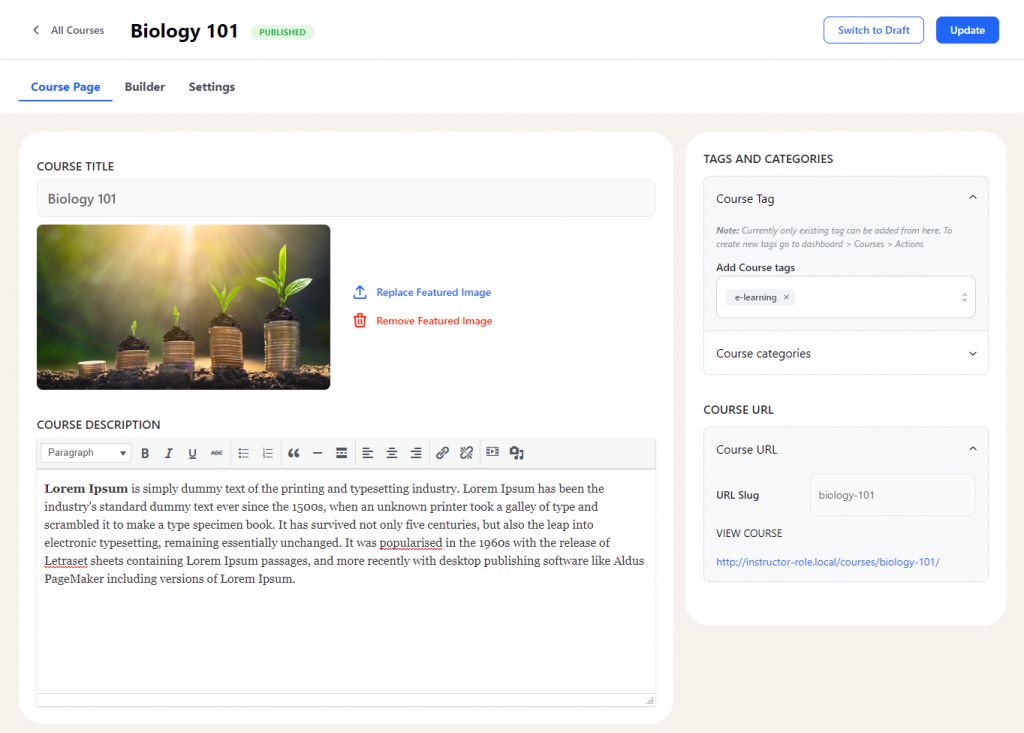
To edit a course using the Frontend Course Creator you can click the Edit via Frontend Course Creator Link by hovering over the course title on the course listing page.
The Frontend Builder
The Frontend Builder allows
- Organizing the course structure
- Adding new lessons and topics or using existing lessons and topics to create a course
- Adding existing quizzes to the course.
- Note: Currently, new quizzes cannot be created directly from the frontend course creator. You will have to create a course using LearnDash’s backend Quiz builder and add those later in the course from here
Organizing the course structure
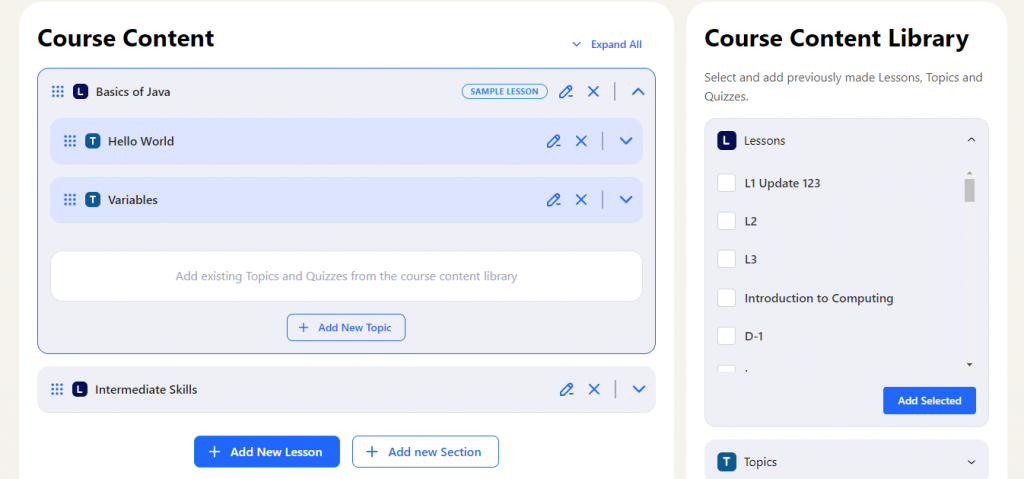
Adding and Editing Lessons/Topics
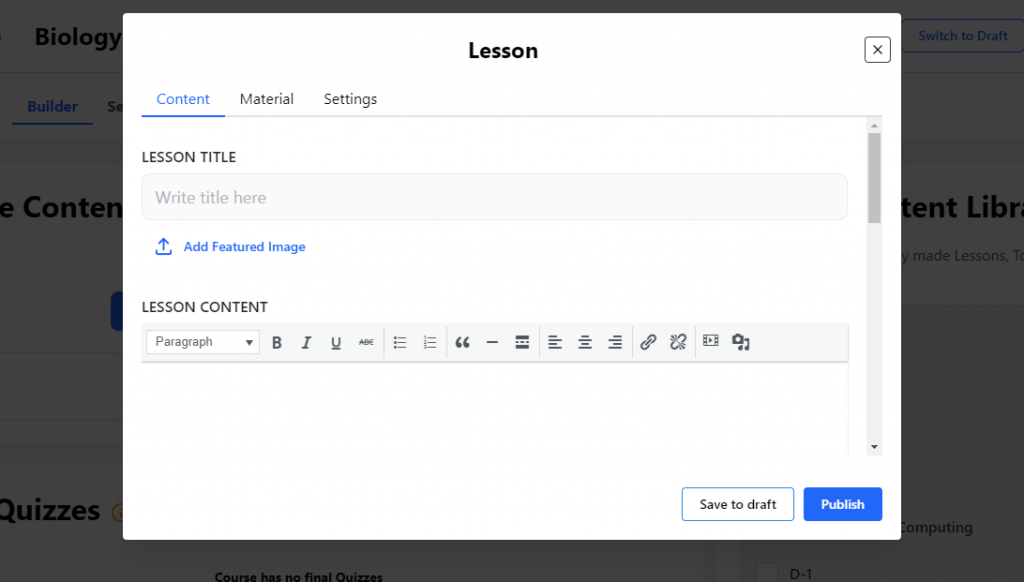
Editing existing lessons and topics

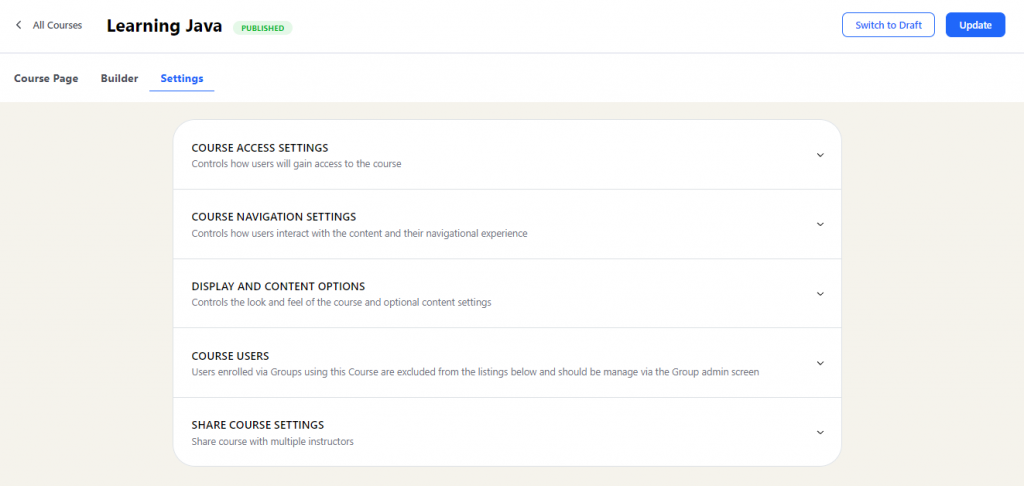
Course Settings
All the LearnDash course settings for configuring a course are available in the Frontend Course Creator. To know more about the setting refer here
Limitations
All the following limitations will be resolved in the upcoming release soon!
- New quizzes and questions cannot be created directly from the frontend course creator, only existing quizzes can be added to the course via the frontend course creator. You will have to first create a Quiz from Learndash’s Quiz builder to add it to the course via the frontend course creator
- For Courses, Lessons, and Topics new categories and tags cannot be directly created by the frontend course creator. You can create the course tags and categories from the Courses listing page > Actions
- Multiple Instructors: If the admin is not the course author then they cannot assign multiple instructors for the course via the frontend course creator, only the course authors – be it an admin or the instructor who create the course – will be able to do it.
The Frontend Quiz Creator
The Frontend Quiz Creator allows the Administrators and Instructors to create and edit LearnDash quizzes on the frontend of the website.
Activating Frontend Quiz Creator
- The Frontend Quiz Creator depends on the Frontend Course Creation (FCC) setting.
- Admin can activate/deactivate FCC from WP dashboard → LearnDash LMS → Instructors → Frontend Course Creator

Important: In order for the Frontend Course and Quiz Creator to function, your permalink structure must be set to pretty permalinks (i.e anything except plain permalink structure), and you must save the permalink settings again after enabling the Frontend Course Creator.
- In case you already had the Frontend Course Creator settings enabled, you may still have to save your permalinks again after the Frontend Quiz Creator update.
Settings
Enable Frontend Course Creator

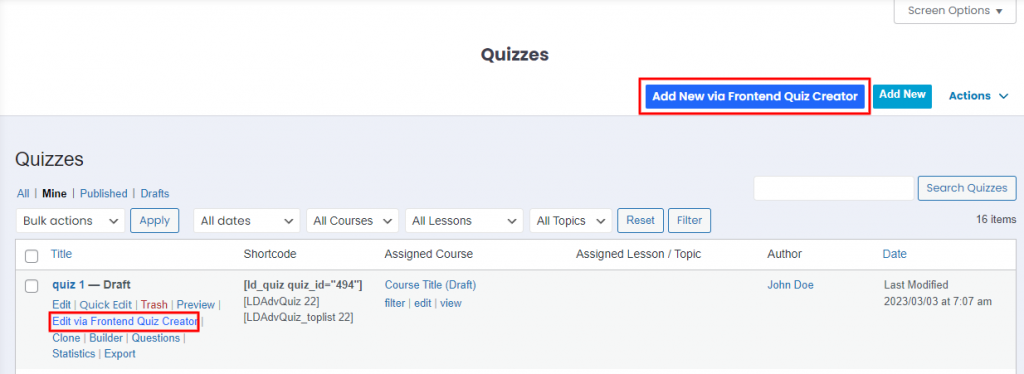
Enabling this setting will add an “Edit via Frontend Quiz Creator” option in the quiz edit menu (Image below) and add a button “Add new via Frontend Quiz Creator” beside LearnDash’s Add New button
Accessing the Frontend Quiz Creator
As per the above-configured settings, the Instructors /Admins can create/edit a quiz
- From the Quiz Listing page
- The instructor can go to the Instructor Dashboard → Quizzes → Edit Via Frontend Quiz Creator / Add new via Frontend Quiz Creator
- The administrator can go to WP Dashboard → Quizzes →Edit Via Frontend Quiz Creator / Add new via Frontend Quiz Creator
- From the Frontend Course Creator while creating/editing a course
- Go to the builder tab in the Course creator and click on Add New Quiz or edit existing quizzes added to the course content
Using the Frontend Quiz Creator
Create a Quiz
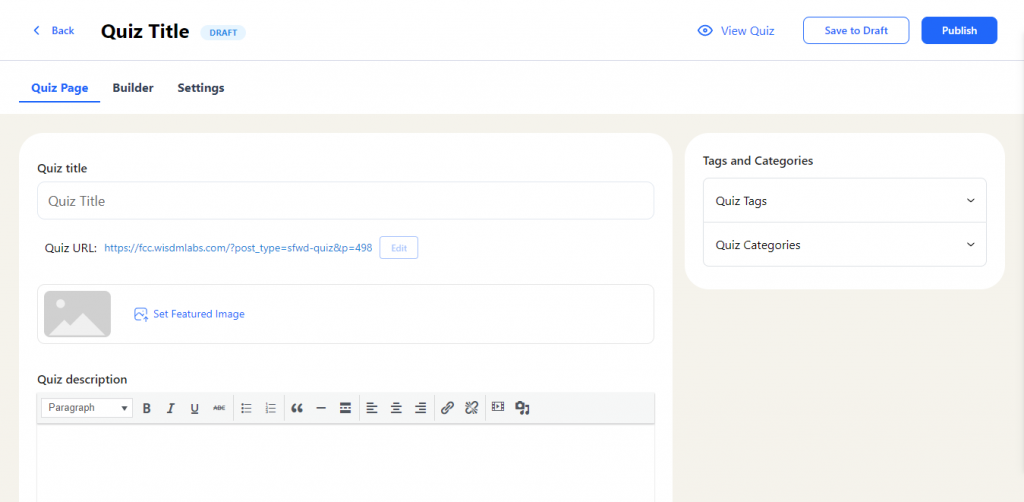
- To create a new quiz click on the Add new via Frontend Quiz Creator Button on the Quizzes listing page
- This will make a draft quiz and take you to the frontend quiz creator to add all the content and configure the settings to create the quiz.
- As shown below you can also create a new quiz from the Frontend Course Creator while creating/editing a course by clicking on the Add New Quiz Button
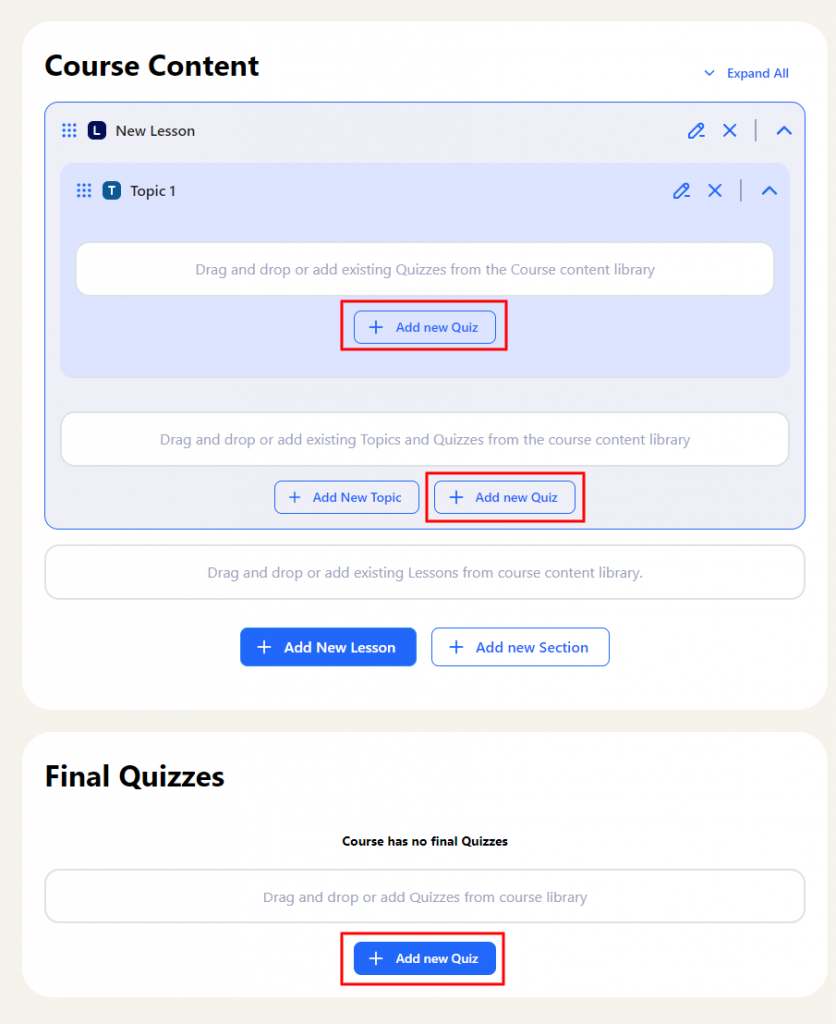
- On clicking the button, a new modal will open to enter the name of the Quiz.

-
After clicking on Add, a new quiz will be added to the builder, and the frontend Quiz Creator will open in a new tab
to edit the new quiz.
Edit a Quiz
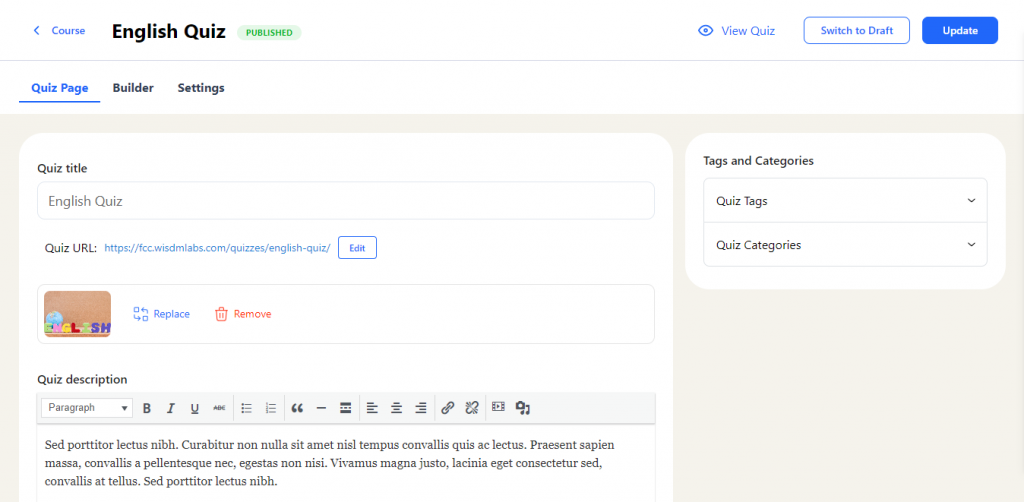
To edit a quiz using the Frontend Quiz Creator you can click the Edit via Frontend Quiz Creator Link by hovering over the quiz title on the quiz listing page.
Quiz Builder
The quiz builder allows
- Organizing the quiz questions
- Adding new questions or using existing questions to create a quiz
Note: Currently, Single choice,Multiplechoice, Fill in the blank, Assessment (survey), and Essay (open-answer) question types can be created and edited from the Frontend Quiz Builder. All other types of existing questions can be added via the Question library but such questions cannot be created/edited via the Frontend quiz creator as of now. In the upcoming releases support for all question types will be added soon
Organizing the Quiz questions
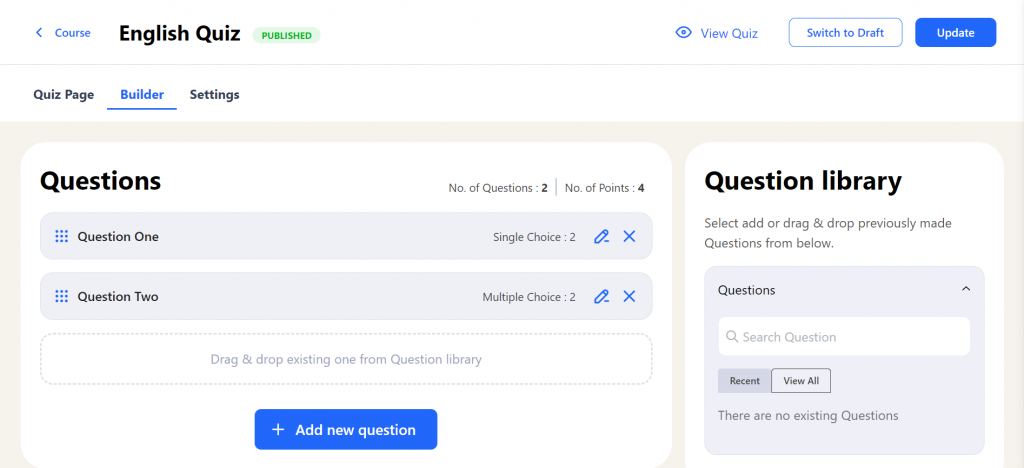
You can manage questions from the Quiz Builder Tab and perform the following actions
Create New Question or Edit the Question
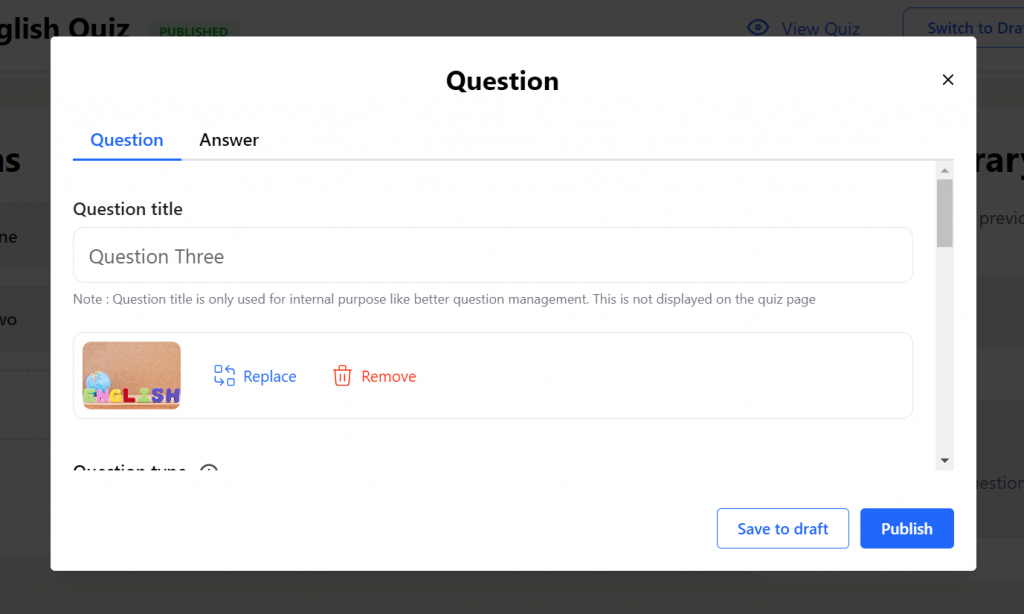
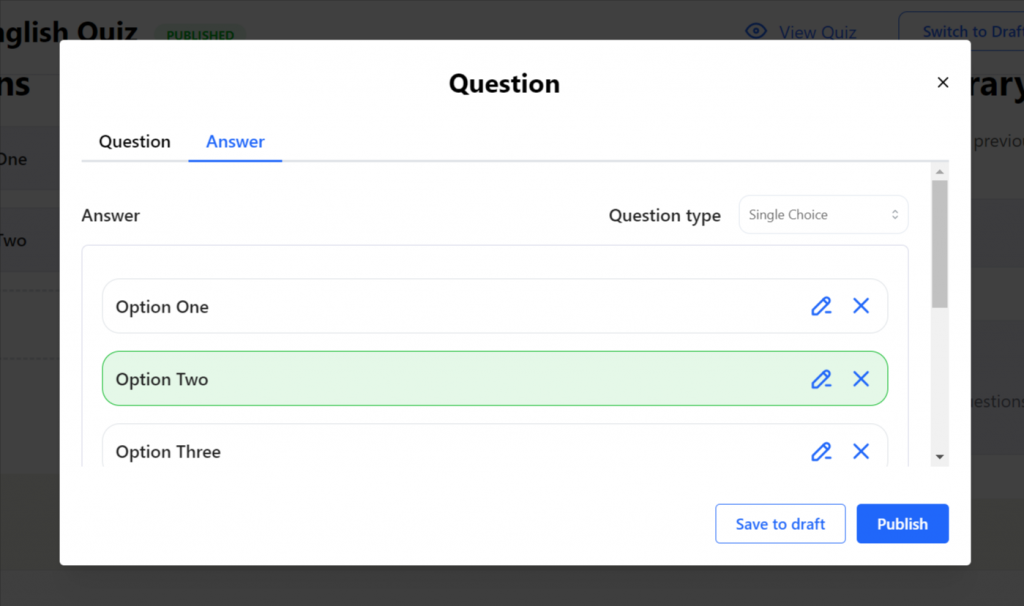
- You can create a new question by clicking on Add New Question button.
- A modal opens up to configure the Question and Answer settings.
Frontend Dashboard: Installation Guide
The frontend dashboard is a newly launched dashboard for Instructors and Admins to access LearnDash and other functionalities in our plugin from the frontend of the site without the need of providing instructors any backend access. This dashboard serves as an alternative to the current Instructor dashboard which is a simplified and access restricted version of the WP Dashboard in the backend
The frontend dashboard is Gutenberg block based dashboard that comes with a powerful dashboard builder block making it fully customizable and extendable. Don’t worry even if you have disabled the Gutenberg Editor you can still use our global settings (link to the global settings in this doc) to customize the frontend dashboard. The frontend Dashboard comes with four tabs:
- Overview – A quick snapshot of your Courses and Learners and their submissions
- Courses – A courses listing through which you can create a new course or edit a course using our Frontend Course Creator
- Quizzes – A quizzes listing through which you can create new Quizzes or edit new quizzes using our Frontend Course Creator
- Products – A products tab for instructors and administrators gives a fresh tab view for their WooCommerce products.
- Commissions – A Commission tab for Instructor gives a detailed view of the instructor commissions and payout logs.
- Assignments: The Assignments Block provides a unique and simpler view for your assignment submissions to help you manage them with ease.
- Essays: The Essays Block provides a unique and simpler view for your student essay submissions to help the admin and instructor manage essay submissions better.
- Comments – The Comments block allows users to efficiently manage and navigate comments across courses, lessons, topics, quizzes, essays, and assignments.
-
Quiz Attempts – The Quiz Attempts block allows user to
( instructors or administrators) easily access and review all student quiz attempts directly.
- Settings – A settings tab for instructors to configure their profile info and Paypal info for payouts
All the other LearnDash and Instructor Role functionalities for Instructors are coming soon to the frontend dashboard. Currently, the frontend dashboard seems like a best option – instead of the Backend(WP) Instructor dashboard. Let’s see below how you can configure and setup a frontend dashboard for the instructors and admin
Configuring the Frontend Dashboard using Onboarding Wizard
Let’s get started with the installation process after you have installed or updated your Instructor Role for LearnDash plugin
1. Welcome Screen
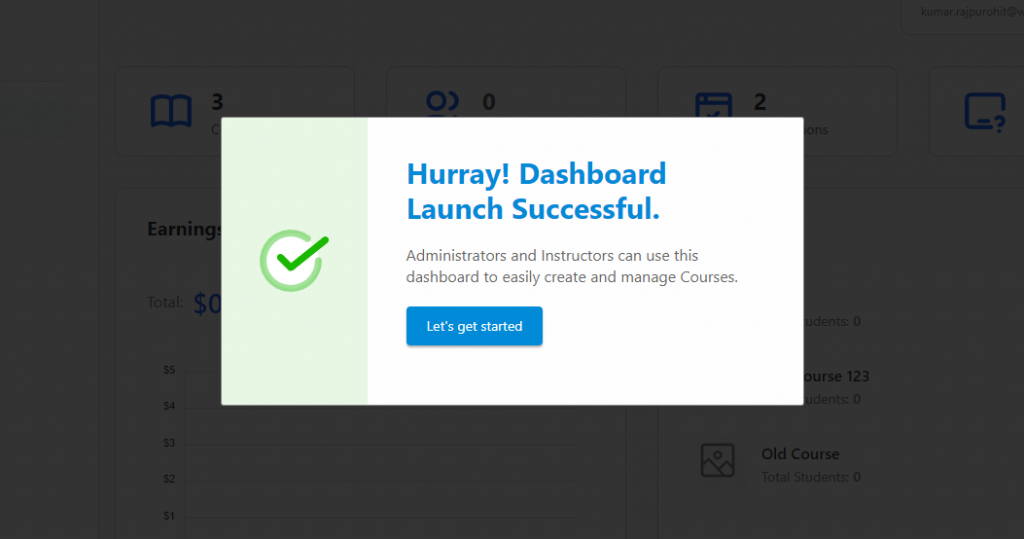
Upon installation or updating the plugin, you will be greeted with dashboard onboarding pop-up to set up your frontend dashboard. Click on the “Configure” button to proceed.
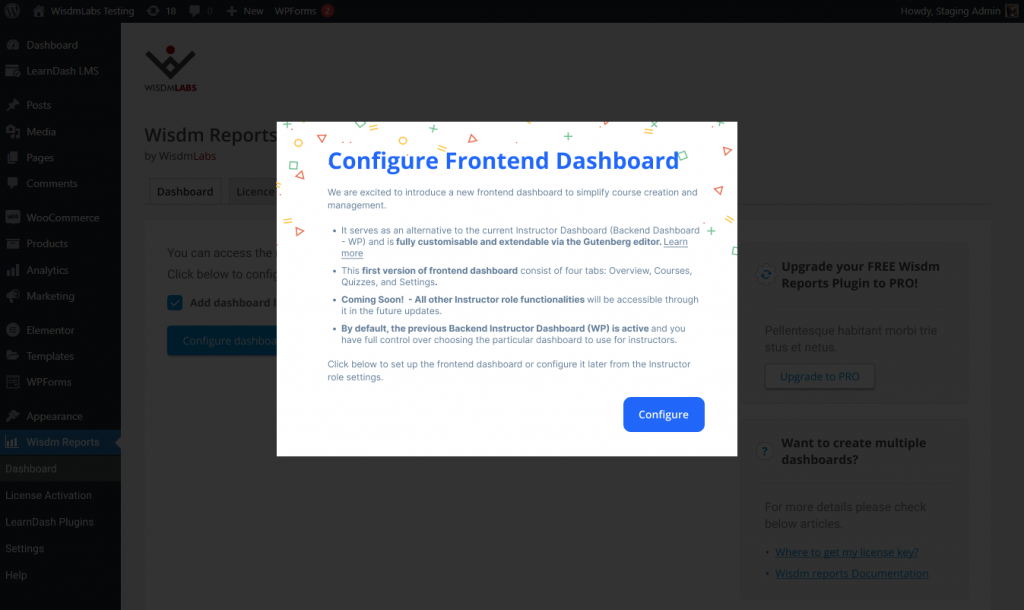
Even if you close the welcome pop-up, you can configure Frontend Dashboard by going to LearnDash LMS > Instructors > Frontend Dashboard
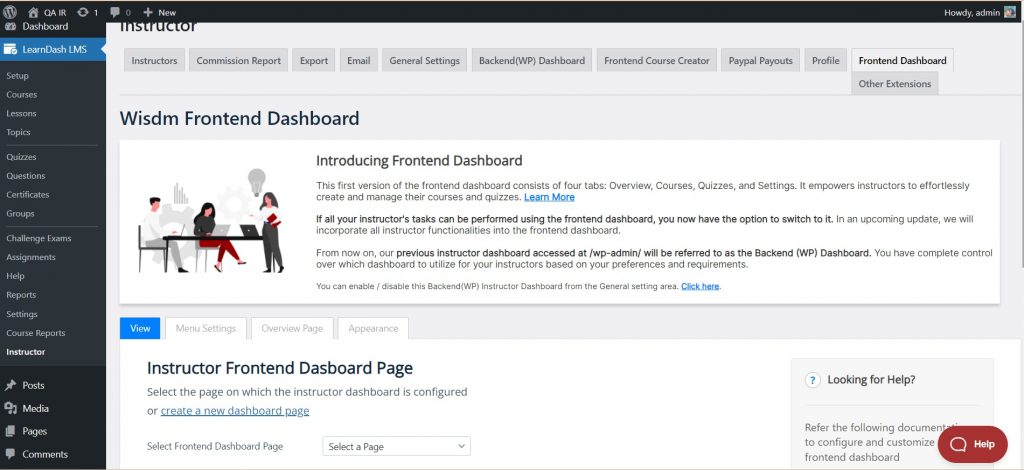
2. Frontend Dashboard Configuration
You will be directed to the Frontend Dashboard Configuration page.
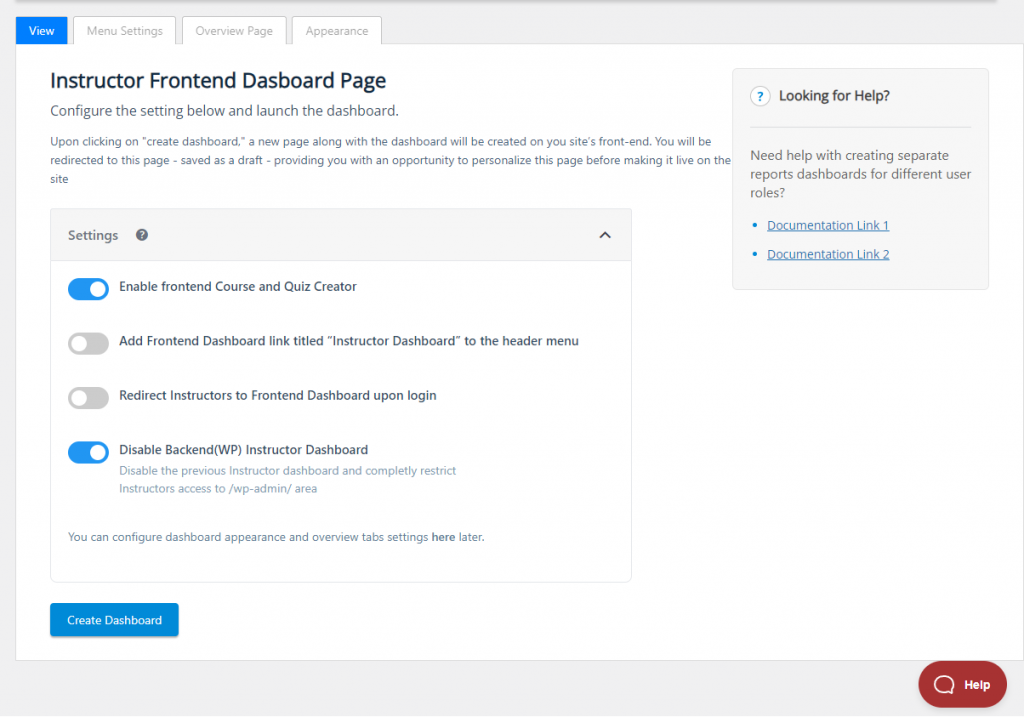
Here, you can configure various settings related to the Frontend Dashboard, including:
- Enabling Frontend Course and Quiz Creation – This will allow the instructors and admin use the Frontend Course Creator and Quiz creator via the frontend dashboard. If this is disabled the Instructors and Admins won’t be able to create/edit courses and quizzes from the frontend
- Adding a link to the frontend dashboard in the primary menu for instructors – A link titled “Instructor Dashboard” will be added to the header of your site. It will redirect users to the frontend dashboard if the Backend (WP) Instructor Dashboard (refer below) is disabled, or else it will redirect the users to the Backend (WP) Instructor Dashboard
- Setting up a redirect to the frontend dashboard upon login – Seamlessly guide instructors to their frontend dashboard upon login, eliminating the need for backend access and ensuring a focused and user-friendly experience
- Disabling the Backend (WP) Instructor Dashboard – This will completely restrict the access of the Instructors to the backend of your site. The Instructor will not be able to access their Backend (WP) Instructor dashboard and will be redirected to the homepage of the site if they tried to access their backend dashboard at www.your-site-name .com/wp-admin.
Don’t worry even if you want to change any of these settings later, you can do so by going to the General setting tab or the Frontend Course Creator tab under LearnDash LMS > Instructors > General Settings
Take your time to configure these settings according to your preferences. Once you’re done, click on the “Create Dashboard” button to create a new page for the frontend dashboard. A new page will be created automatically and saved in your draft.
3. Customize Frontend Dashboard and publish the page
You will be taken to the next step depending on the whether Gutenberg editor is disabled on your site.
If you have not disabled Gutenberg editor on your site then you can take advantage of the powerful page builder to edit the dashboard page along with accessing all the customization settings provided with our frontend dashboard
Once you click on “Create Dashboard”, you will be directed to the new dashboard edit page. Here, you will find a default preset Frontend Dashboard Gutenberg Blocks pattern already added to the page
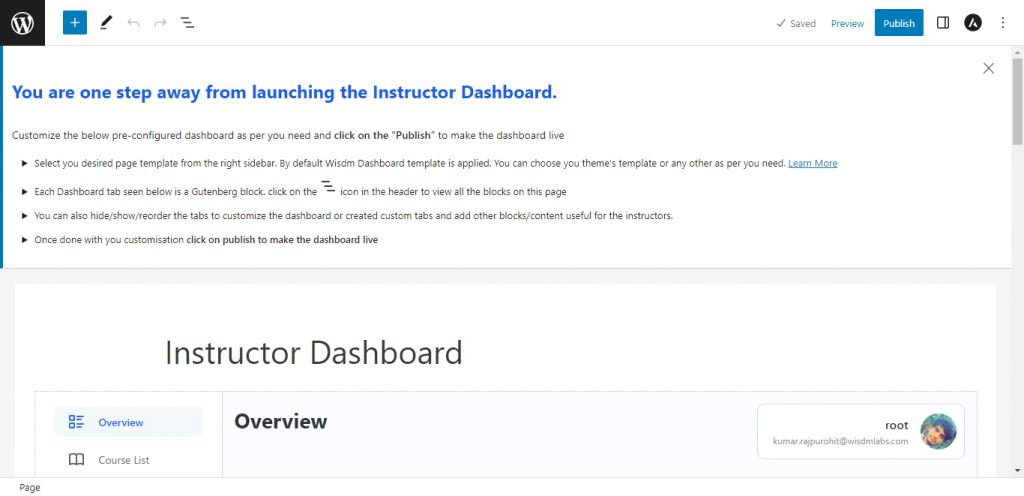
Feel free to customize the frontend dashboard Gutenberg blocks (Refer here to learn about how to Customize the dashboard in detail) as per your requirements. Below is a quick overview of different customization settings
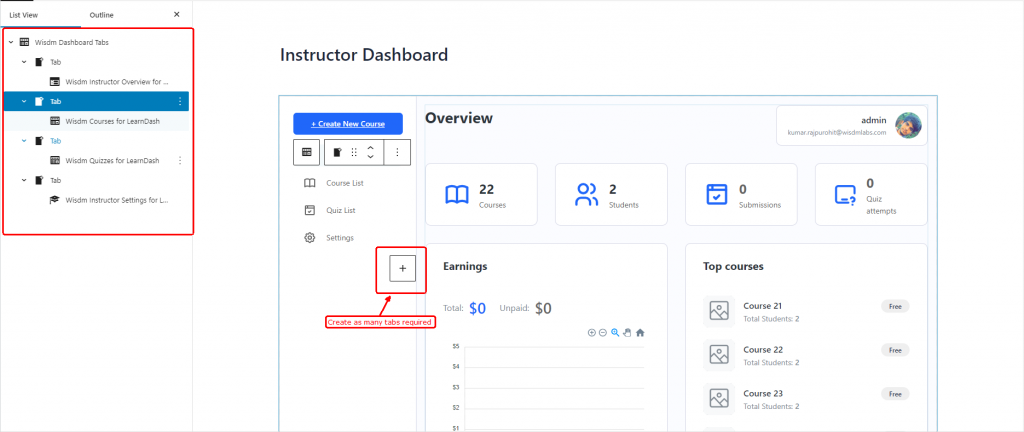
- The Frontend Dashboard is made of Gutenberg blocks. It consist of a dashboard builder block called “Dashbaord Tabs” which creates the dashboard layout and all other instructor dashboard tabs in it are made of a Gutenberg block each
- Rearrange the tabs as required, create as many custom tabs as needed to share relevant content or provide access to any functionalities to the instructors
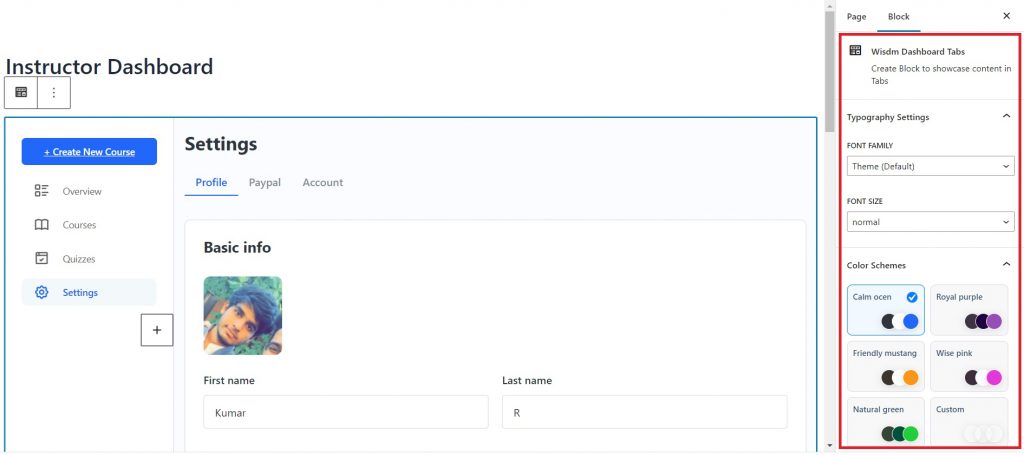
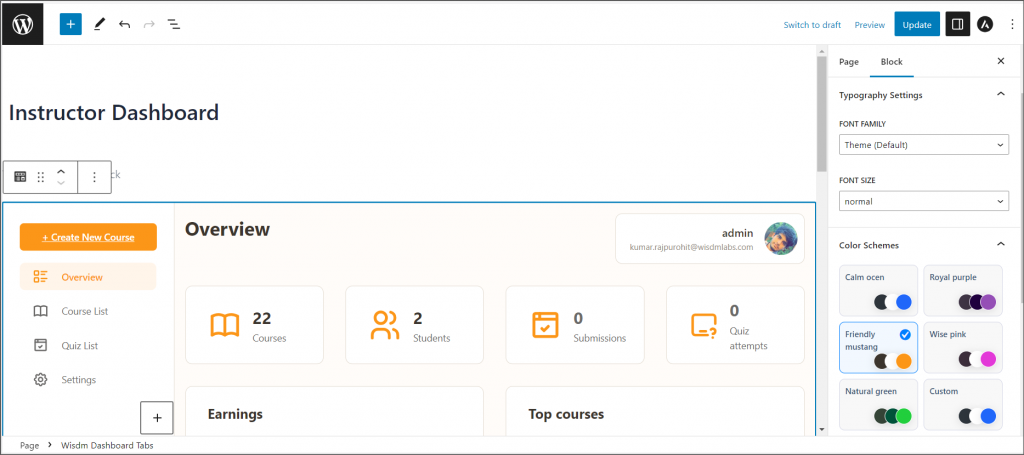
- To change the appearance, explore the typography and color settings under the “Dashboard Tabs” block settings . Choose from a selection of fonts, color preset or create a custom color pattern to achieve your desired look.
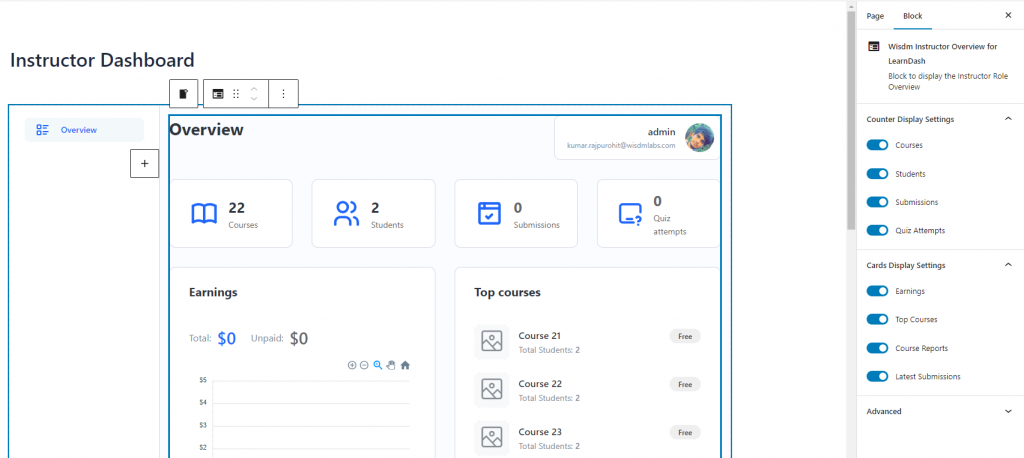
- Go to the Instructors overview tab block and hide any of the section not relevant for your needs
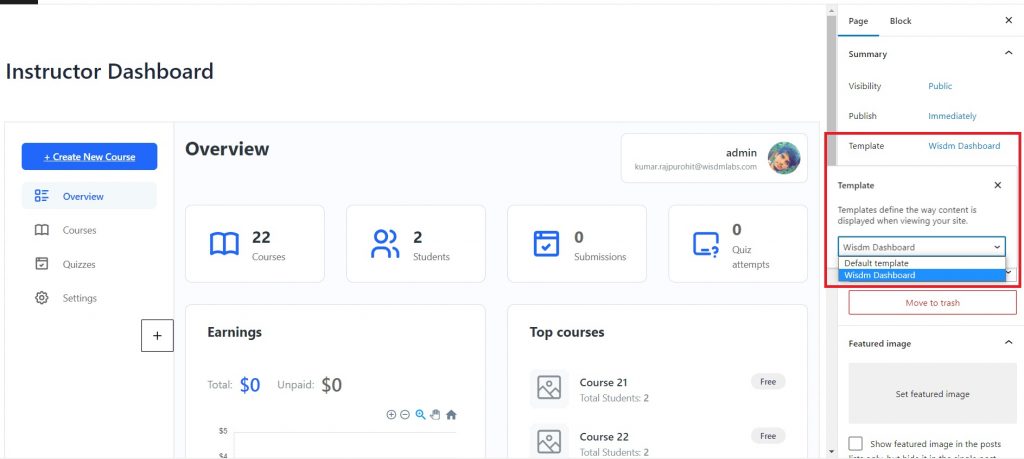
- Set the Page template. By default “Dashboard” template is selected which is specially designed for a dashboard page. But you can choose any other page template provided in your theme
Once you’re satisfied with the changes, click on the “Publish” button to make the frontend dashboard live.
That’s it! After publishing, you will be automatically redirected to your newly created frontend dashboard page. From here, instructors can easily manage their courses and quizzes, providing a seamless and user-friendly experience.
If for some reason your have disabled the Gutenberg Editor you can still customize the dashboard using the Global settings provided here – LearnDash LMS > Instructors > Frontend Dashboard
Global Settings
The global settings are designed for sites that do not utilize the Gutenberg block editor, such as those still using the Classic Editor or add-ons to disable the block editor. By default, the global settings are disabled if your site has Gutenberg Editor enabled.
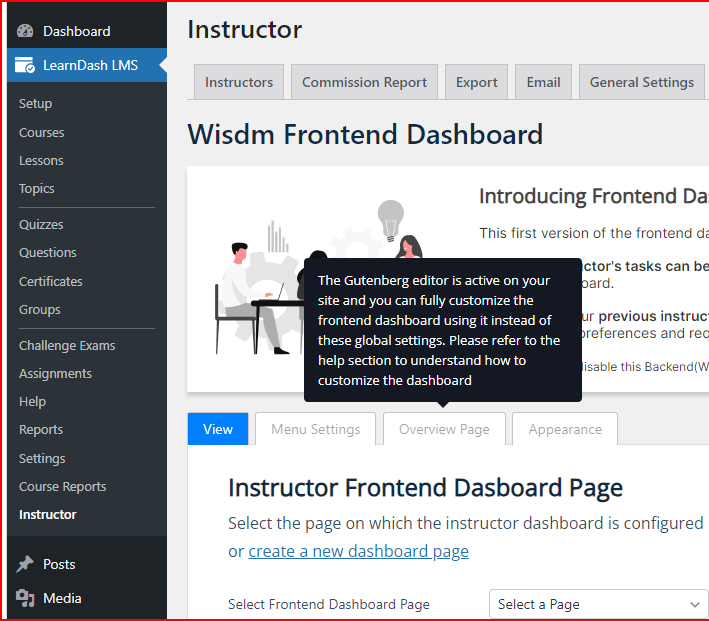
If you have Gutenberg editor disabled on your site, then you can access the Global settings to customize the Dashboard.
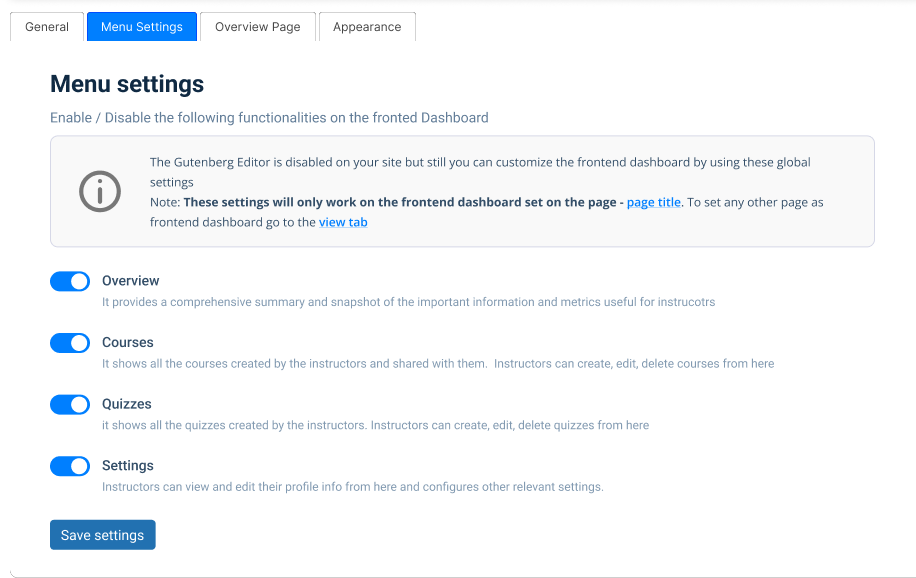
With the Menu settings you can hide any tab on the dashboard thereby restricting instructors access
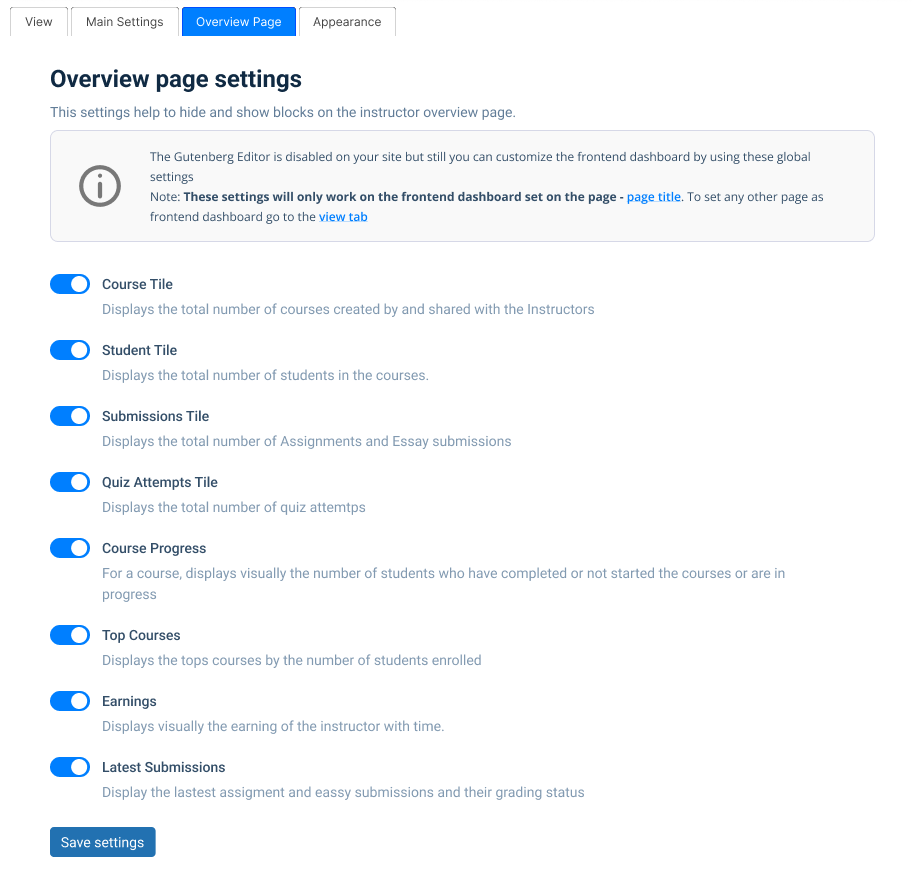
With Overview page settings, you can hide any of the section on the overview page of the dashboard
With appearance settings, you can style the dashboard by selecting from the provided color presets or creating your own custom color palette for the dashboard. You can also set the font and font size for the dashboard
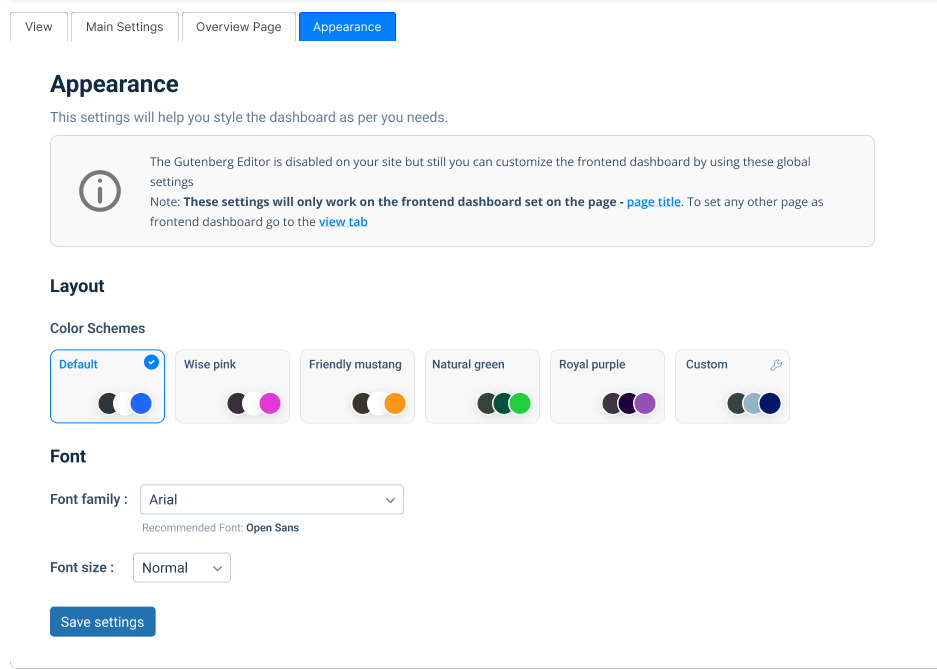
Note: When using global settings, these settings are only applied to the page set as the frontend dashboard page in the Frontend Dashboard Page setting.
Deleting the Frontend Dashboard Page
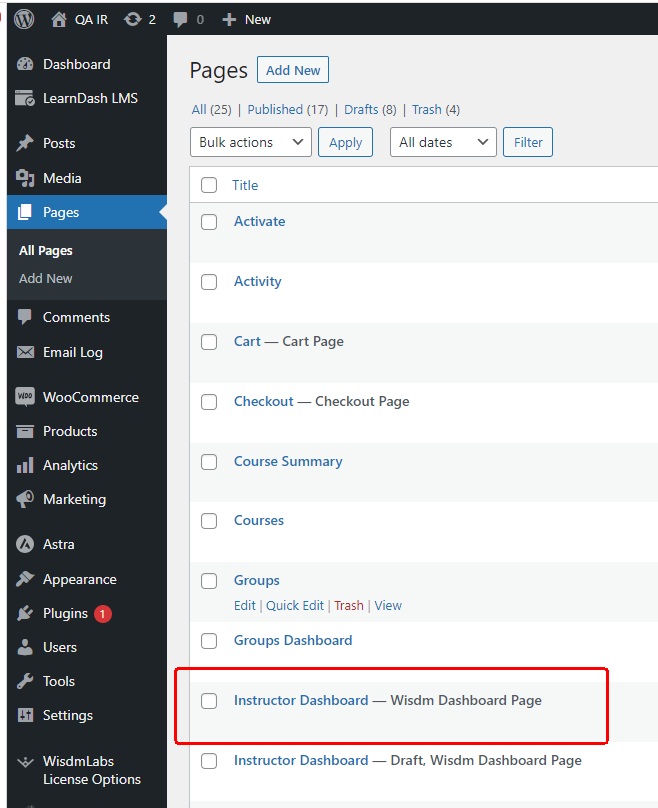
You can find the frontend dashboard page created via the above onboard wizard by going to the WP Dashboard > Pages > Instructor Dashboard. You can delete / edit the page from here
Creating a new Frontend Dashboard page
If you have for some reason deleted the page that was created with the onboarding wizard when you activated or updated the plugin and you want to create a new dashboard page, follow the steps below:
To create a new dashboard page you can the following options
Quick Link: Create a new dashboard page
You can find the quick setup wizard to create a new dashboard page at WP Admin dashboard > LearnDash LMS > Instructors> Frontend dashboard. Click on the link “Create a new Dashboard page”. It will automatically create a new page with the frontend dashboard configured in it and you will be redirected to the page in the edit mode
Along with creating this new page, it will be automatically set as the default Frontend Dashboard page for Instructors and Admin. This is pagewhere all the redirection and global customization settings(if Gutenberg editor is disabled) available in the plugin are applied to.
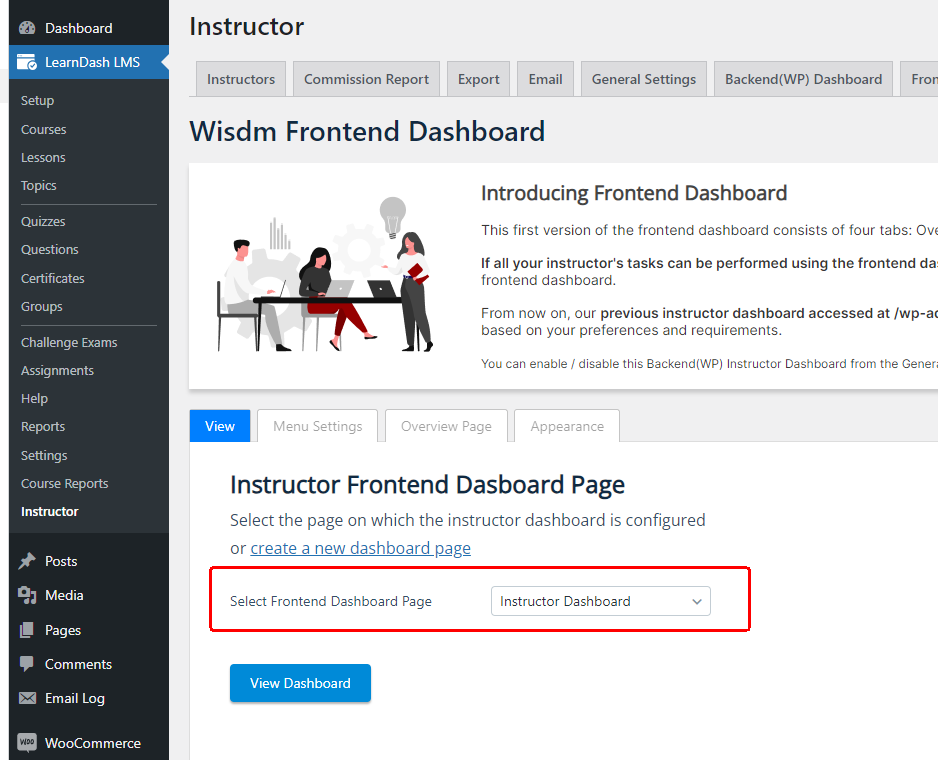
If you have created multiple dashboard pages and wish to keep other dashboard page as default, then select the preferred page in the select frontend dashboard page dropdown. Don’t forget to click on ”Save settings” after all changes are done
Create the Frontend Dashboard page from scratch using Gutenberg Editor
Let’s see how you can create a new dashboard page without using the quick setup wizard discussed above.
Create a new page
- Go to WP Dashboard > Pages
- Click on a add new to create a new page
Add Frontend Dashboard pattern
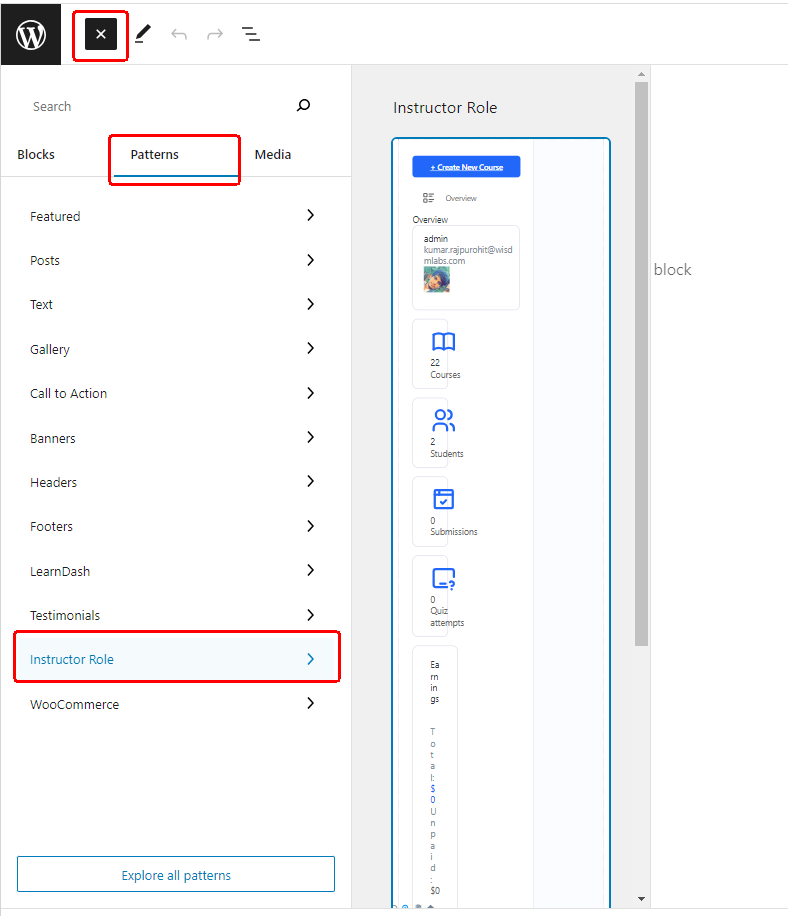
Once you are on the page editing area, click on the “+” in the top right and go to patterns. You will find the Frontend Dashboard pattern under the Instructor Role category. Click on the pattern it will get added to the page
Add Instructor Dashboard Blocks Individually
If you prefer to add the Instructor Dashboard Blocks individually instead of using the dashboard pattern mentioned above, follow the steps below
1.Dashboard Builder block
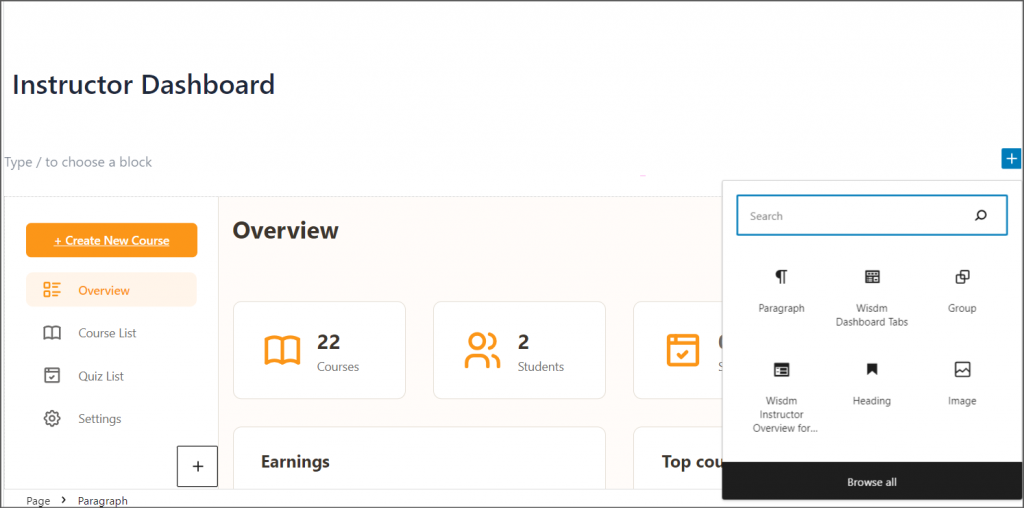
Click on the “+” icon on the top right corner and search for Dashbaord Tabs block and add it to the page. This block helps you build any kind of dashboard.
2.Create Dashboard Tab:
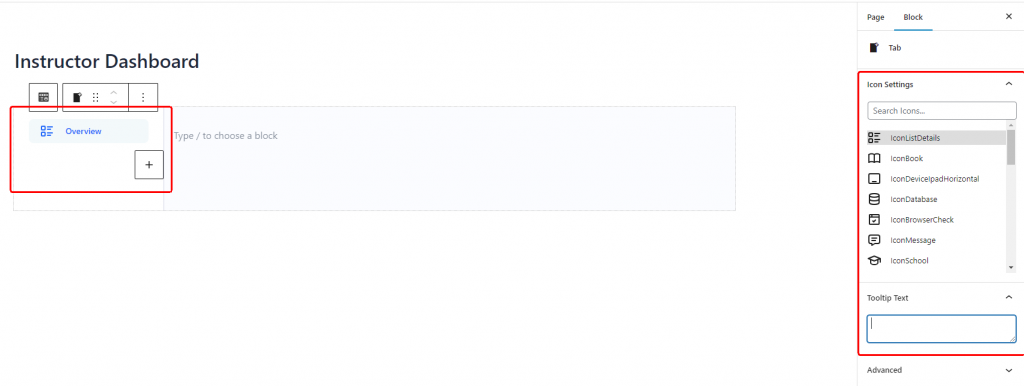
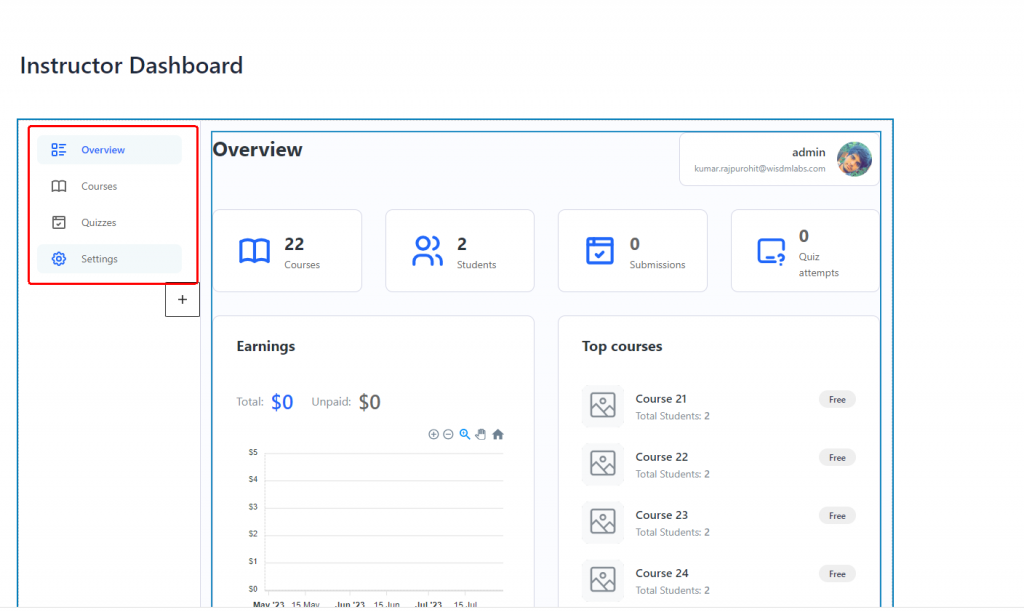
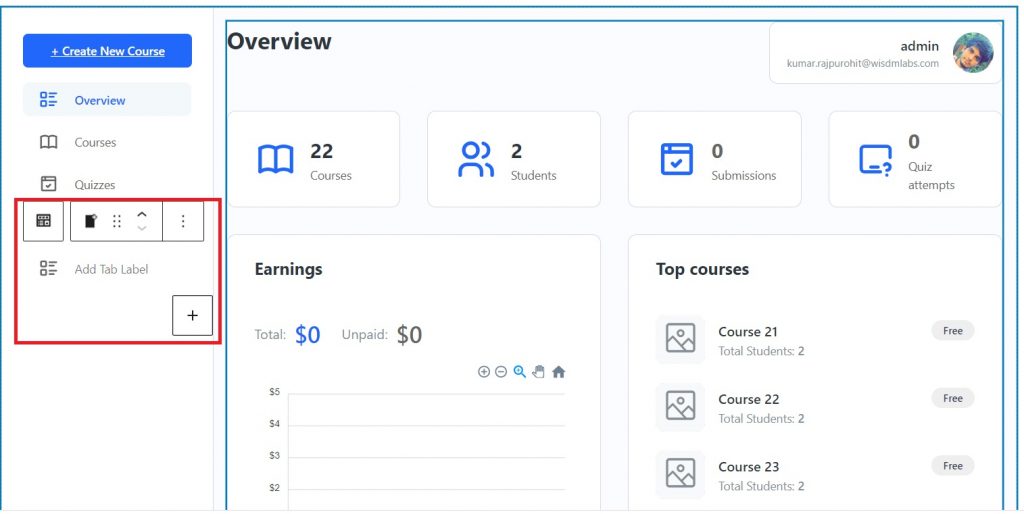
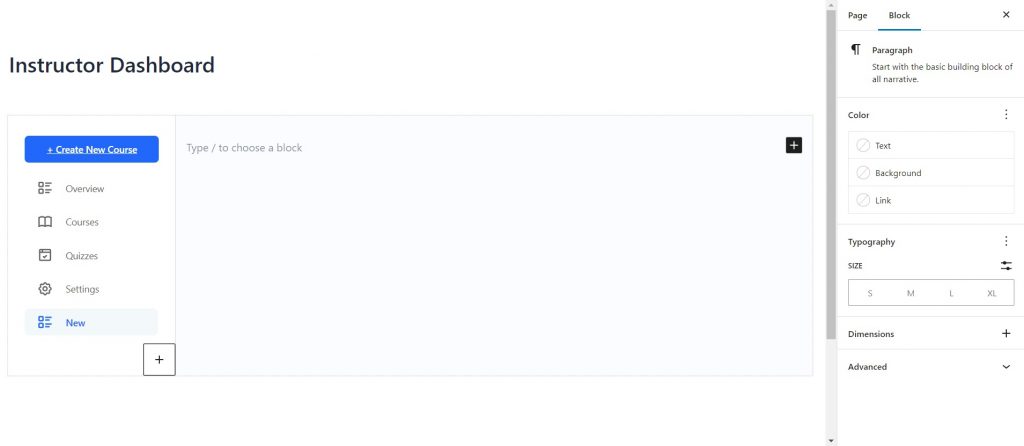
Once you have added the Dashboard tabs block, click on the “+” icon in the block to create dashboard tabs. Give a name to the tab and and select a icon for it.
3. Add Instructor Blocks:
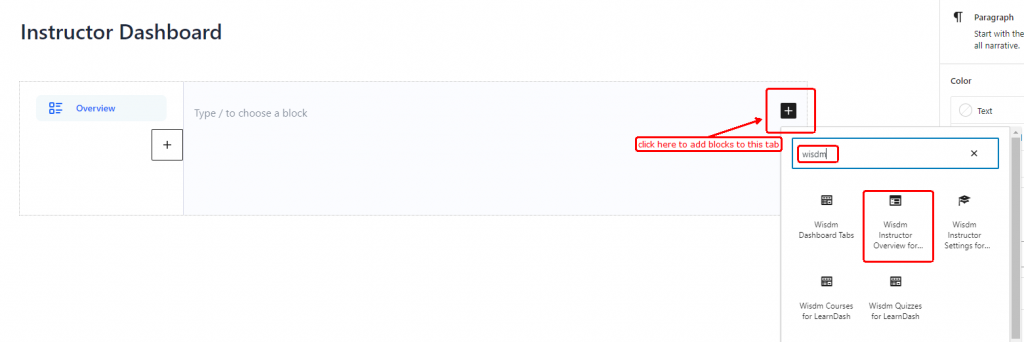
Once you have create a dashboard tab, you can add any kind of content / Gutenberg blocks to it. To create our Instructor dashboard let’s add the Instructor Overview block to the overivew tab we created earlier. Similarly, you can add all other tabs and add the relevant instructor dashboard blocks
Set as default Instructor Frontend Dashboard
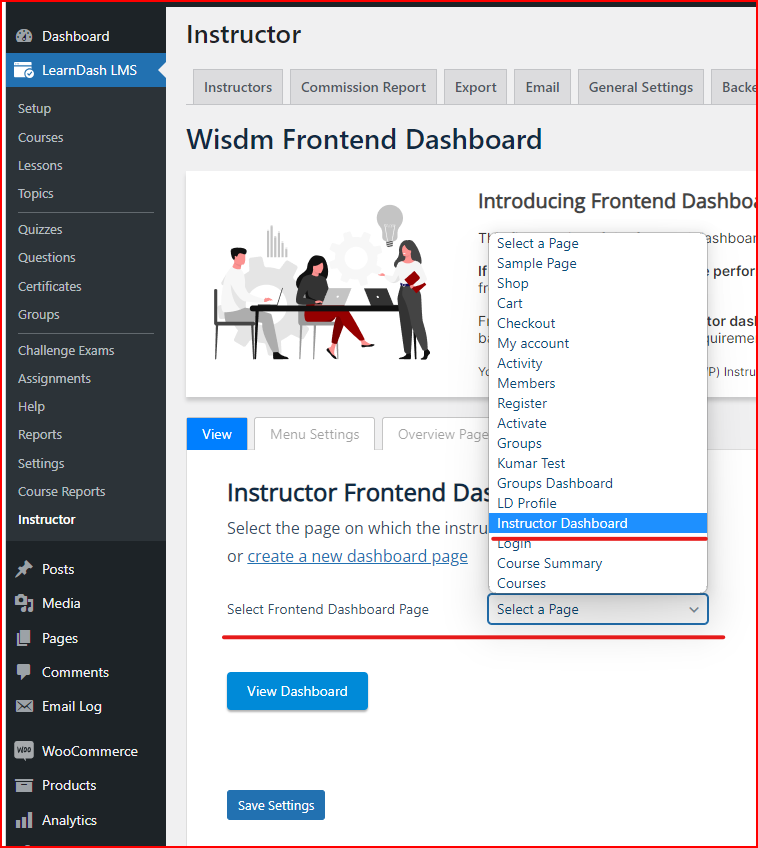
Once you have configured the dashboard click on “publish” to make the page live. Now you need to set this page as your default frontend dashboard for instructors and admin if you want all the redirection settings available in the plugin are applied to it. Navigate to WP Admin dashboard > LearnDash LMS > Instructors> Frontend dashboard.
In the select frontend dashboard page choose the page you have created the dashboard on and click on save settings below
Congratulations! You have successfully installed and set up the Frontend Dashboard plugin. Enjoy the convenience and efficiency of managing your courses and learners directly from the frontend of your website. If you have any further questions or need assistance, please refer to our other documentation or reach out to our support team for help. Happy teaching!
Frontend Dashboard for Instructors: Gutenberg Blocks List
The Frontend Dashboard for Instructors and admin is made up of Gutenberg block making the dashboard fully customizable or extendable. These blocks can be used individually or in combination to create a seamless frontend dashboard for managing courses with ease.
Dashboard Tabs
The Dashboard Tabs block is essentially a versatile dashboard builder that allows you to create custom dashboards for any of your needs or for any kind of users, not just a Frontend Instructors Dashboard. With this block, you can create any kind of dashboard by adding add tabs to your page and add any blocks under each tab. These tabs act as intuitive sections, allowing you to categorize and present information in a structured manner.
How it Works:
Add Tabs: Using the Dashboard Tabs block, you can create tabs that act as headers for different content sections. Each tab title and icon can be customized to suit your needs.
Add Primary action button: You can add a primary action button at the top of the dashboard sidebar tabs menu. By default this button is configured for creating a new course. You can customize this button by changing the button text and button URL.
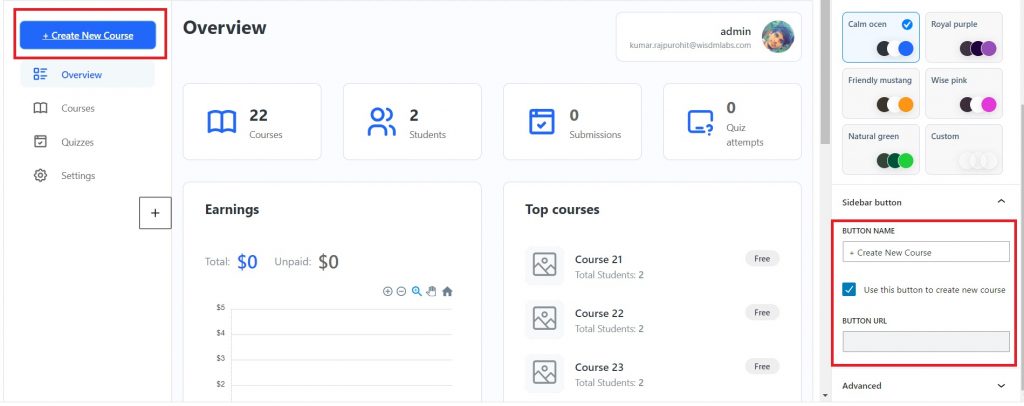
Add content /blocks / Shortcodes: Under each tab you can add and arrange any kind of available blocks. Add blocks such as text, images, videos or provide instructors access to any functionality by adding the relevant blocks or short code. This ensures that related information is neatly grouped together for a seamless reading experience.
Easy Sorting: The tab titles can be easily sorted and rearranged to suit your preferred order, providing flexibility in how you organize your content. Click the tabs to enable rearrange as shown in the picture
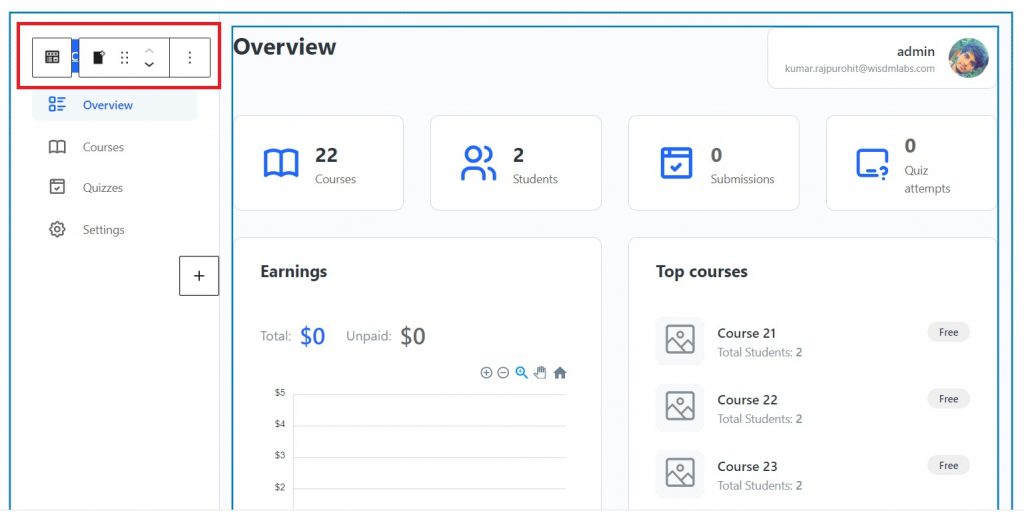
Dashboard page template: When visitors access your page, they will find the tab titles neatly aligned on the left side, while the corresponding content appears on the right-hand side. This user-friendly layout enhances the overall readability of your page.
You can choose between different layouts by changing the page template. By default, the page template selected is the Dashboard template. You can choose any other template provided by your theme also.
Customize the look and feel
Under the Dashboard Tabs Block settings you will find the color and font setting to customize the look and feel of your dashboard
Instructor Overview for LearnDash
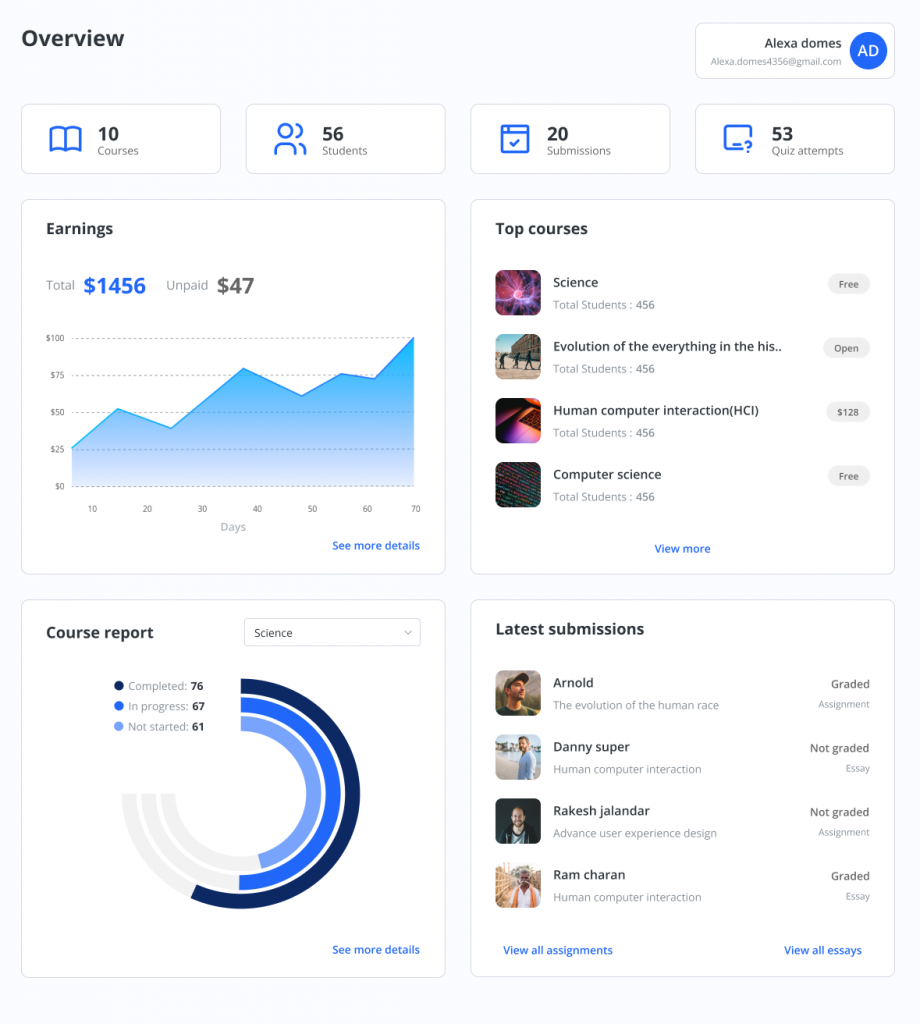
The Instructor Overview for LearnDash block brings the instructor overview page directly to the frontend. This block offers a range of valuable features, including:
- Counts of active courses, enrolled students, assignments or essay submissions, and quiz attempts.
- A list of top courses based on the number of enrolled students.
- Earnings report to track commissions.
- Course progess reports presented as a pie chart, showcasing student progress categorized as not started, in progress, or completed.
- Latest assignment and essay submissions made by students for easy access and review.
Courses for LearnDash
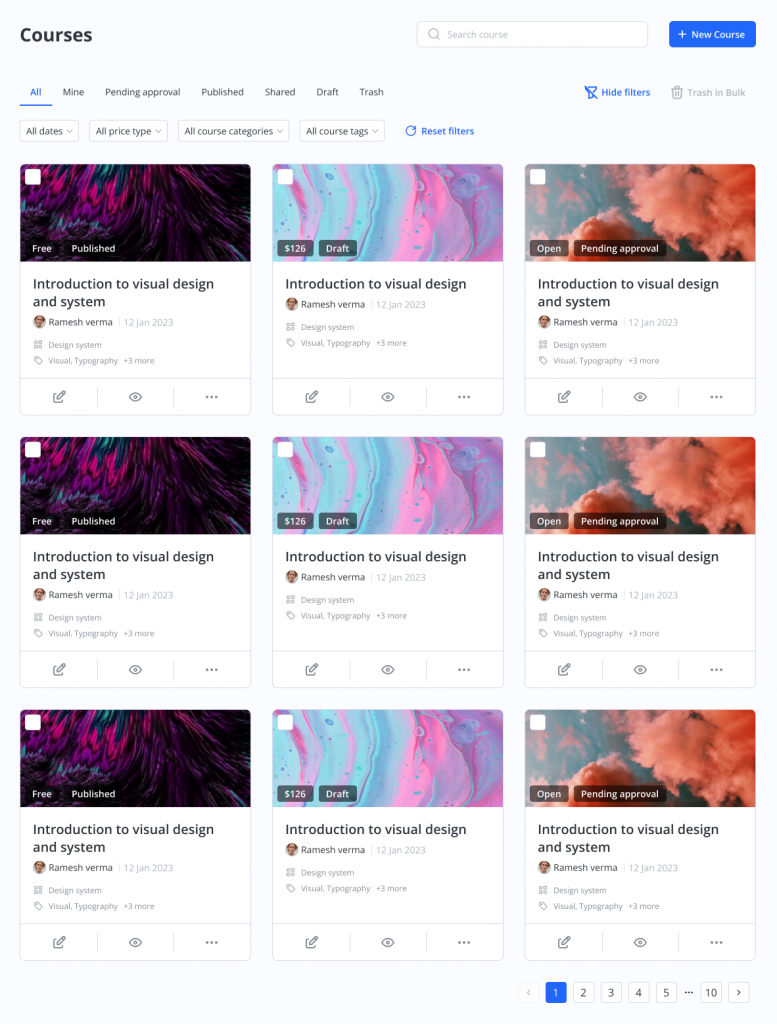
The Courses for LearnDash block enables instructors and administrators to display a dynamic LearnDash course listing page with various features, including:
- Keyword search to filter courses based on specific terms.
- Filters for course status, allowing Instructors to view courses under pending review or shared courses.
- Advanced filters based on date, price types, course categories, and tags.
- The ability to create new courses using the New Course button.
- Trash courses individually or in bulk for efficient management.
Quizzes for LearnDash
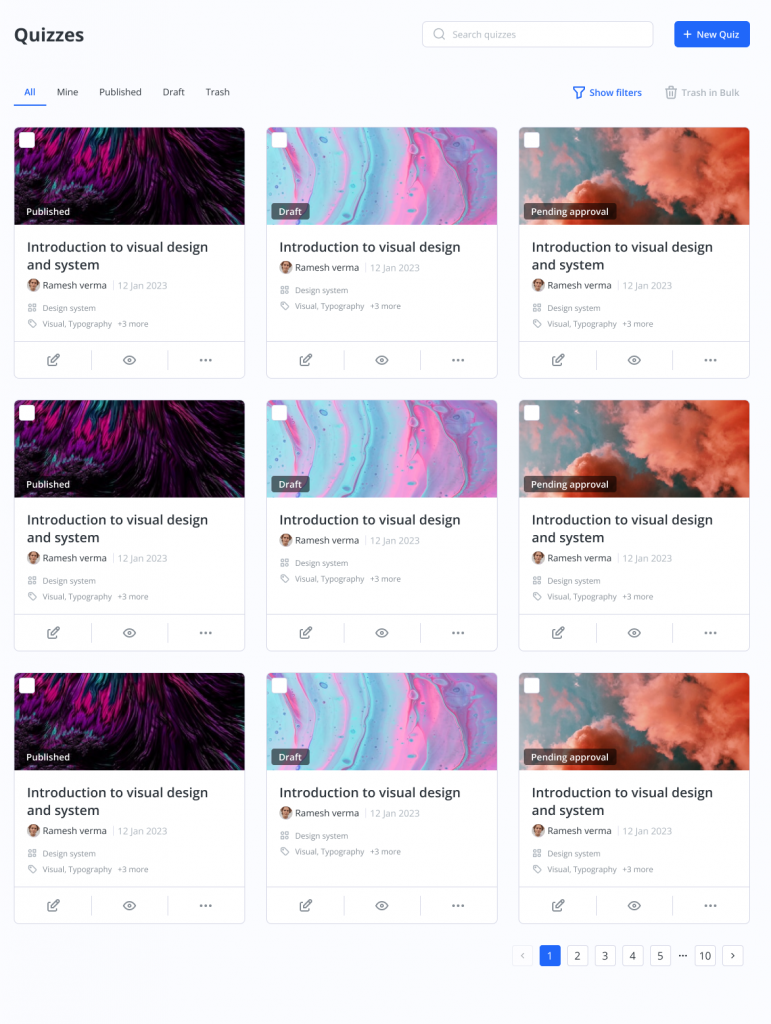
The Quizzes for LearnDash block offers a dynamic LearnDash quiz listing page that simplifies quiz management for instructors and administrators. Key features include:
- Keyword search to filter quizzes based on specific terms.
- Filters based on Quiz status for easy organization.
- Advanced filters to narrow down quizzes based on date, course, lesson, topic, quiz categories, and tags.
- The option to create new quizzes using the New Quiz button.
- Efficiently trash quizzes individually or in bulk.
Instructor Settings for LearnDash
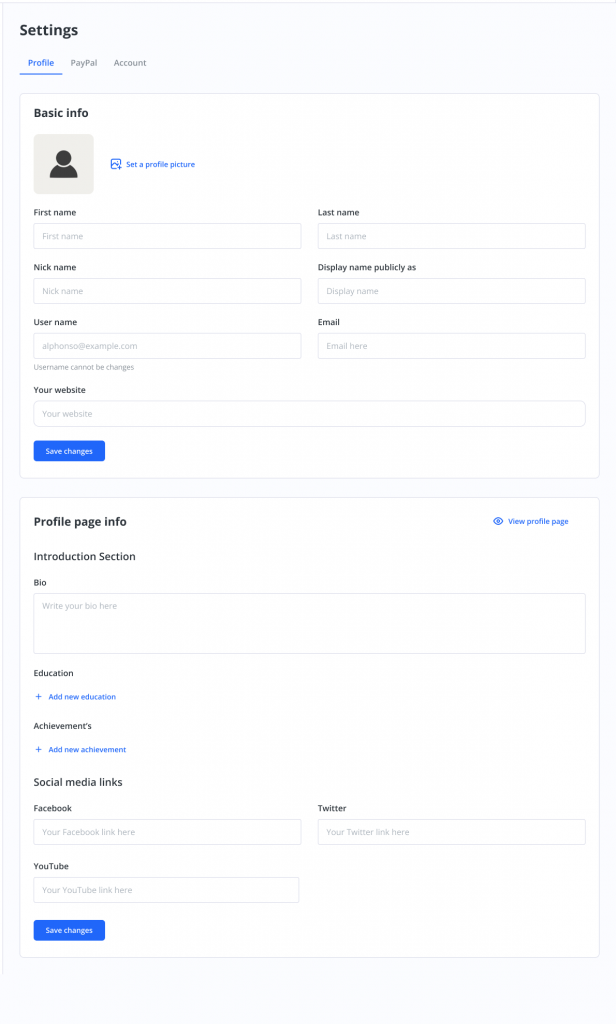
The Settings for LearnDash block provides instructors with a dedicated section to configure common user settings. This includes managing profile details, setting up PayPal payouts email, and managing passwords.
With the Frontend Dashboard Gutenberg blocks, instructors can effortlessly navigate and manage their courses directly from the frontend, enhancing their teaching experience and streamlining their workflows.
Products For LearnDash
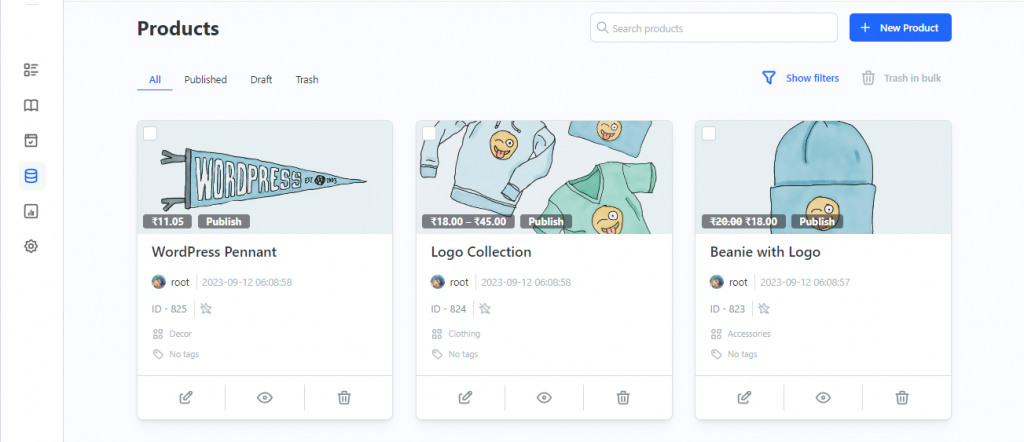
The Products for Instructor Block provides instructors and administrators a new tab view for their Woocommerce Products on the Frontend Dashboard.
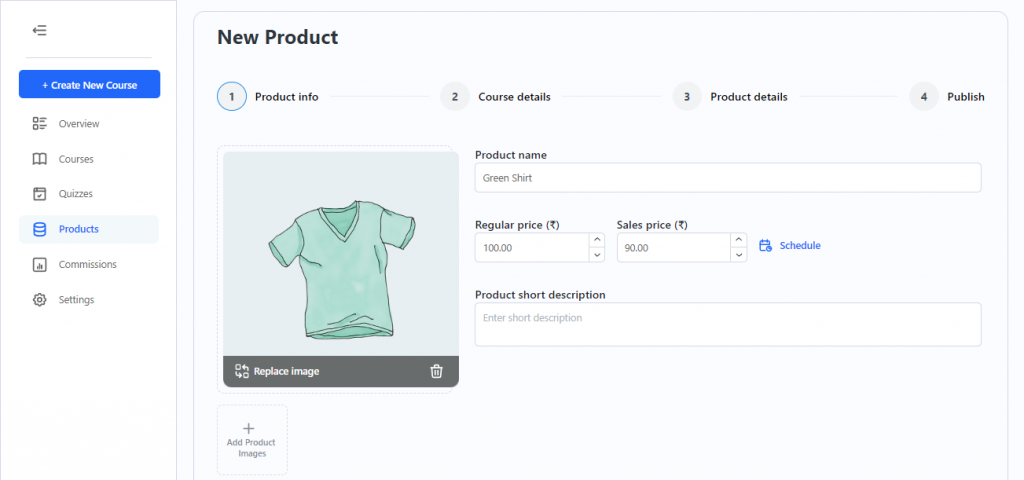
Instructors and Administrators can create new products and/or edit existing products using the products creation and edit screens supported by Gutenberg block.
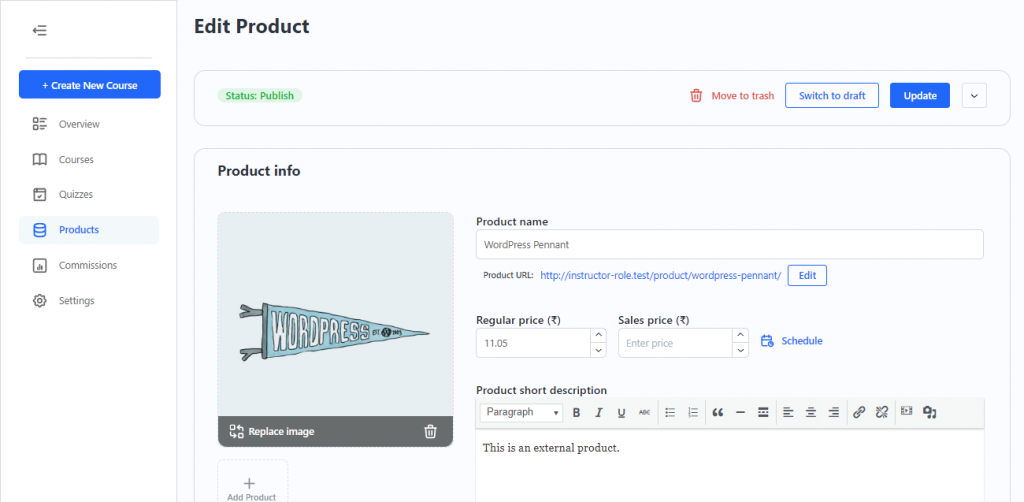
Note: Products created from the Products for Instructors block will be of Course product type.
Commissions For LearnDash
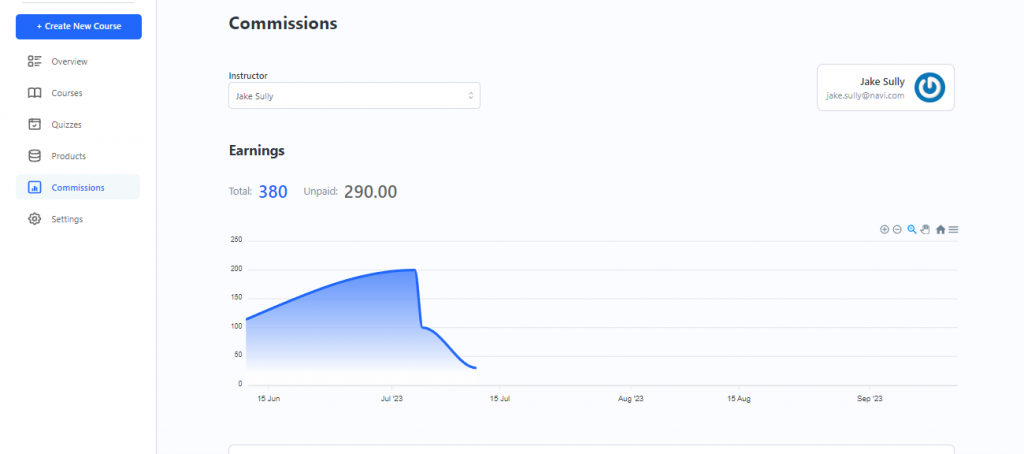
The Commission for Instructor Block gives a detailed view of the instructor commissions and payout logs.
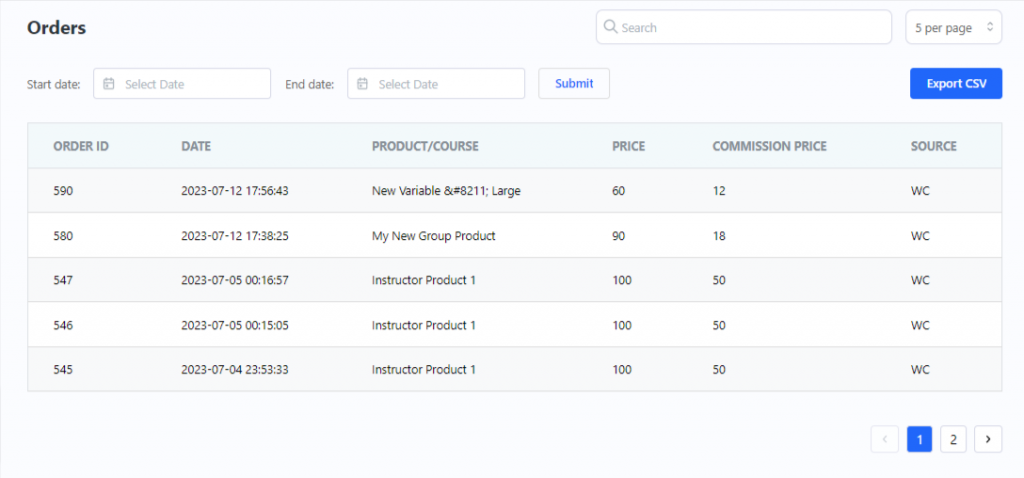
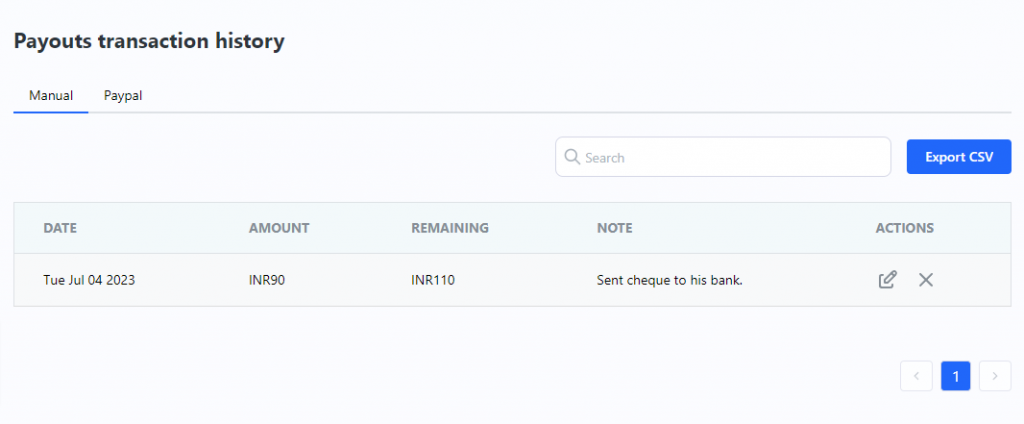
Instructors and Administrators can view the earnings graph, commission orders table and Payout Transaction History table related to the instructor commissions.
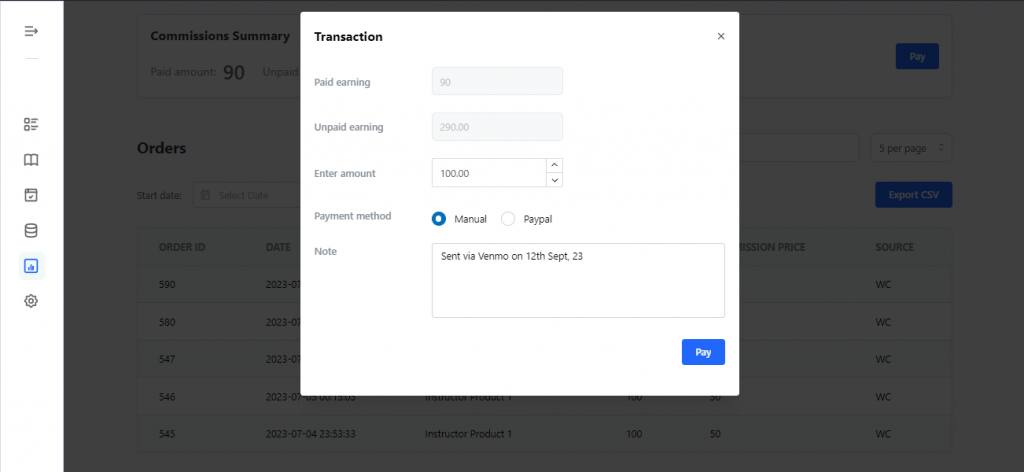
Administrators can use the block to view different instructor commission earnings, make manual/PayPal payouts and update manual payout logs.
Assignments For LearnDash
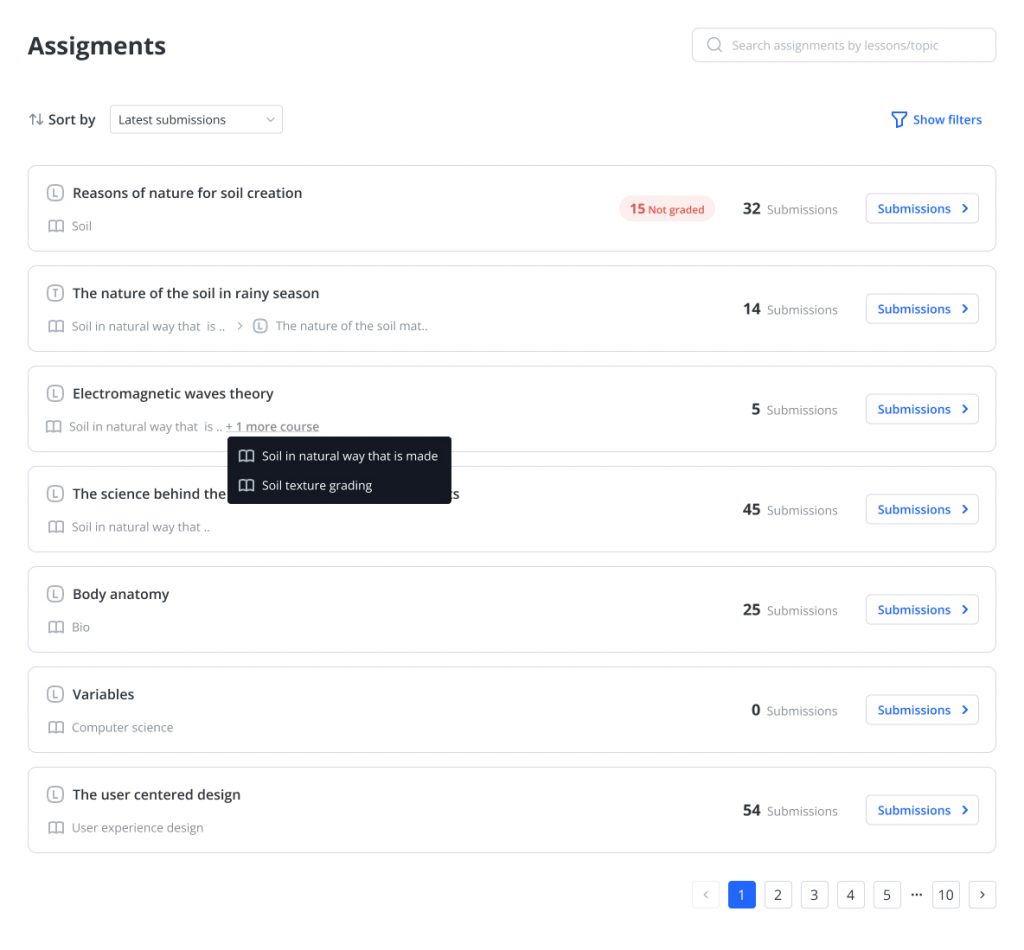
The Assignments for LearnDash provides a different and simpler way to view the various lessons and topics assignment submissions to the admin and instructors.
The first screen shows a list all the lessons and topics related to submitted assignments which makes it easier to view submissions related to specific lessons or topics.
You can also find related course information as well as sort everything by the latest or not graded submissions first.
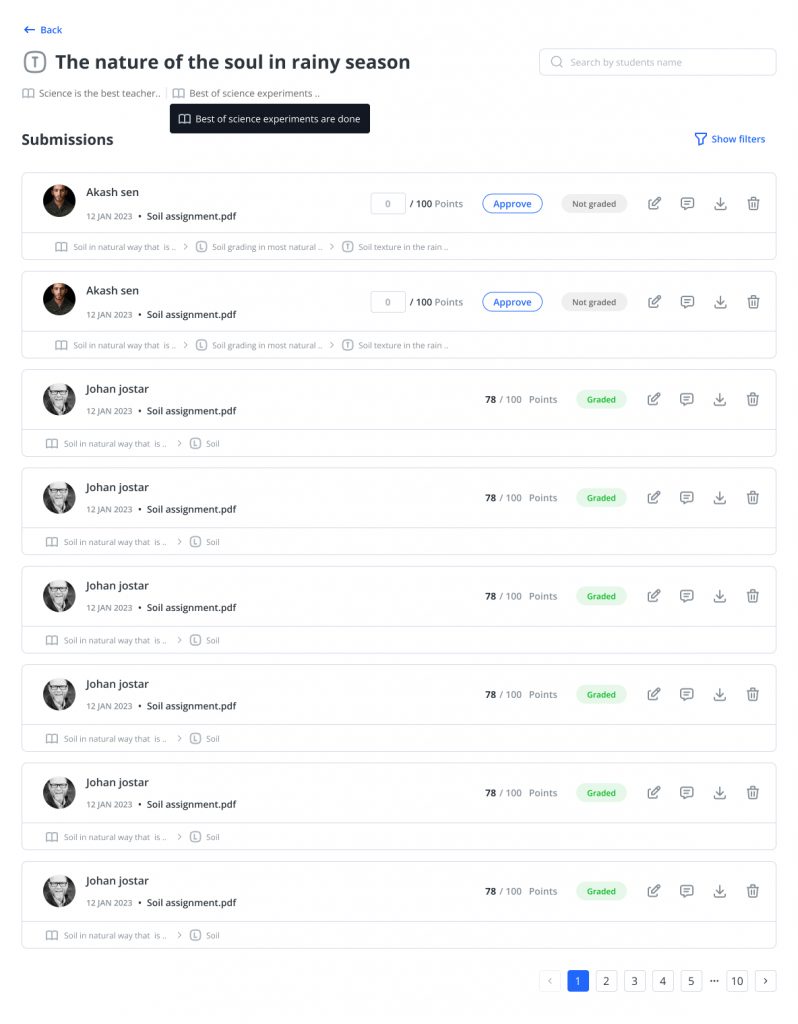
On the next screen you get a list of all user submissions made for that specific lesson or topic.
Filter submissions by student name, dates and even by the assignment approval status.
Perform quick actions such as scoring, grading and downloading assignments.
Find relevant topic, lesson and course information for each submission which is very helpful when the shared step settings are enabled.
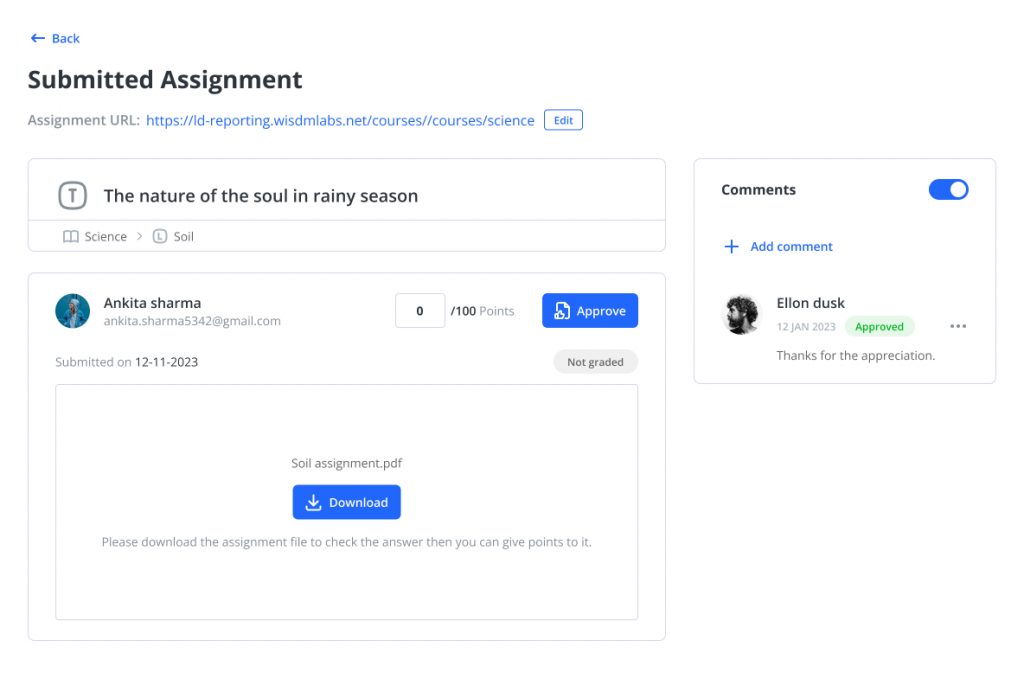
On the final screen view all the single assignment details along with the scoring, grading and options to download.
View comments for that assignment along with other comment actions.
Essays For LearnDash
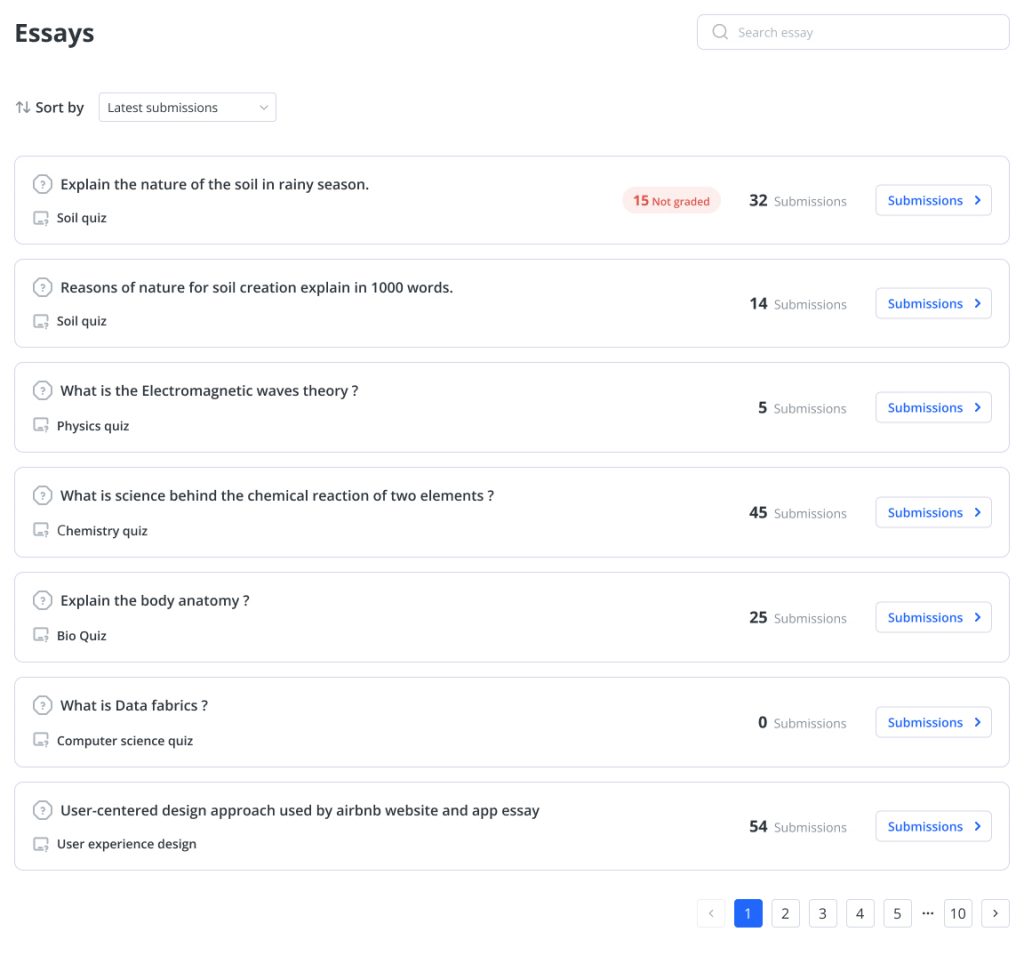
The Essays for LearnDash provides a different and simpler way to view all the student quiz Essay submissions for the admin and instructors.
The first screen shows a list all the essay questions related to submitted essays which makes it easier to view submissions related to specific essay question.
You can find related quiz information as well as sort everything by the latest or not graded submissions first.
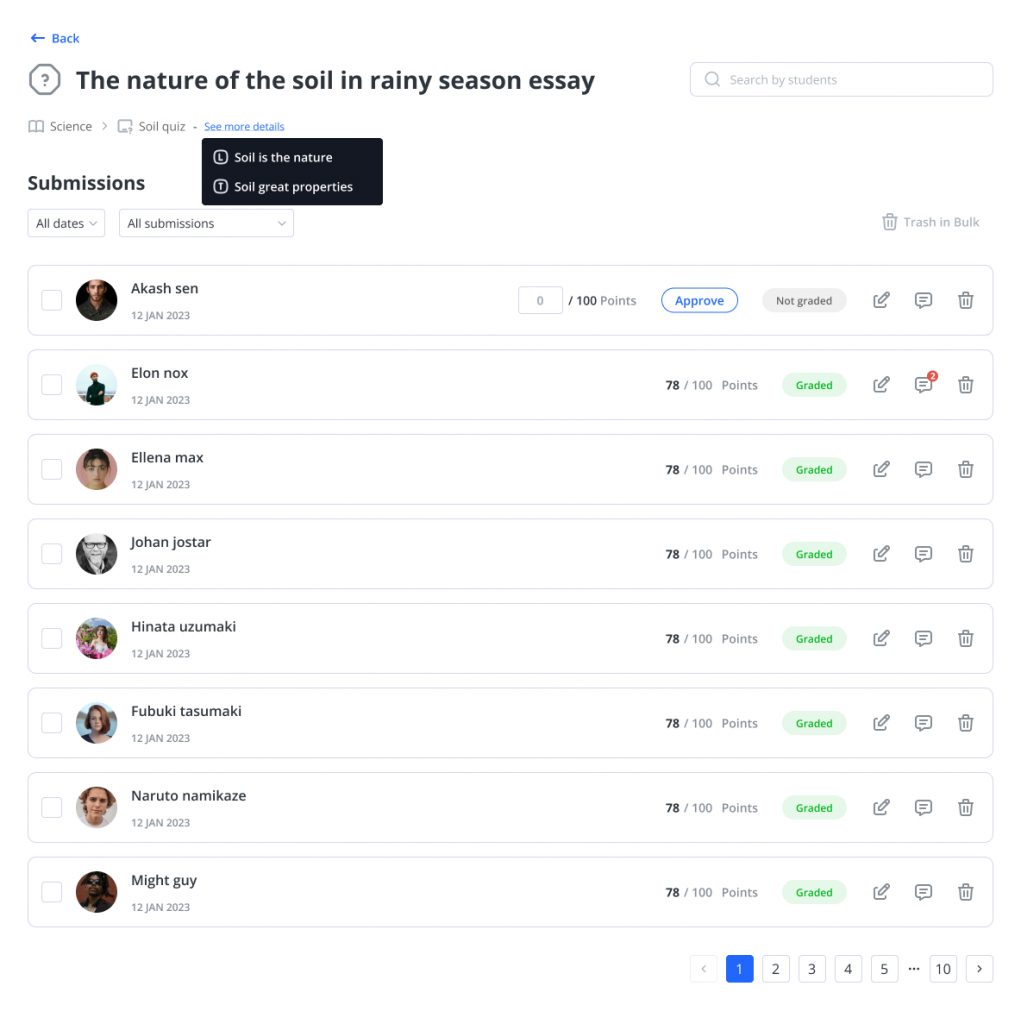
On the next screen you get a list of all user submissions made for that specific essay question.
Filter the submissions by student name, dates and by whether the essay is graded or not.
Perform quick actions such as scoring, grading and downloading essays if there are attachments.
Find relevant quiz and course information for each submission which is very helpful when the shared step settings are enabled.
Comments For Learndash
The Comments Screen is a powerful addition designed to enhance the user experience for administrators and instructors. This feature allows users to efficiently manage and navigate comments across courses, lessons, topics, quizzes, essays, and assignments.
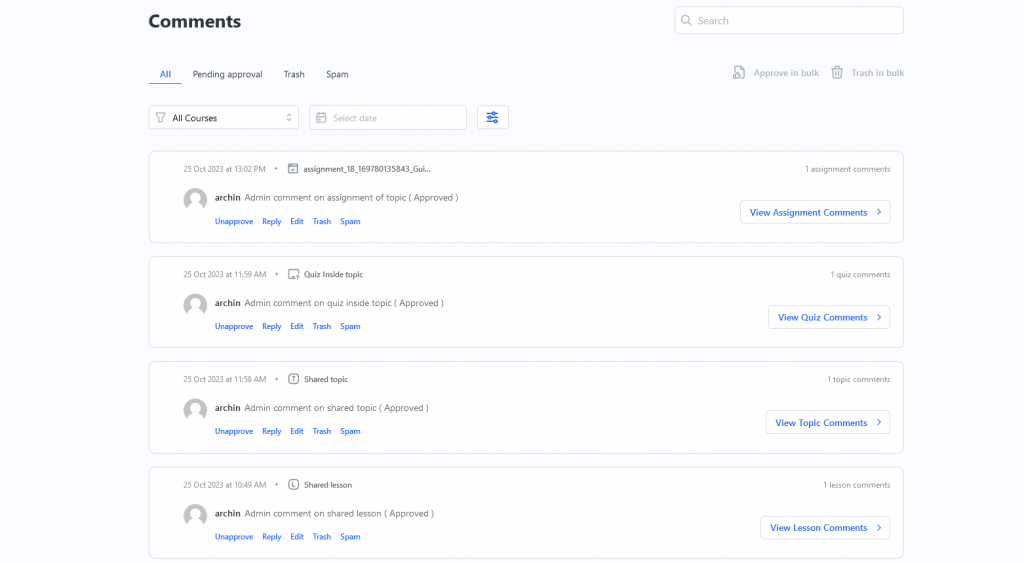
On the main screen, administrators and instructors can filter comments using two primary criteria:
- Filter by Course: Users can select a specific course to view comments associated with that course only.
- Filter by Date: Users can filter comments based on the date they were posted.
At the top of the screen, there are dedicated tabs for spam and trash comments, allowing users to easily access and manage comments flagged as spam or those in the trash.
For each comment listed on the main screen, users can perform various actions:
- Reply: Engage in conversation with users by replying to comments.
- Edit: Modify the content of a comment to correct errors or improve clarity.
- Trash: Move a comment to the trash for temporary removal.
- Spam: Mark a comment as spam.
- Unapprove: Temporarily hide a comment from public view until approved.
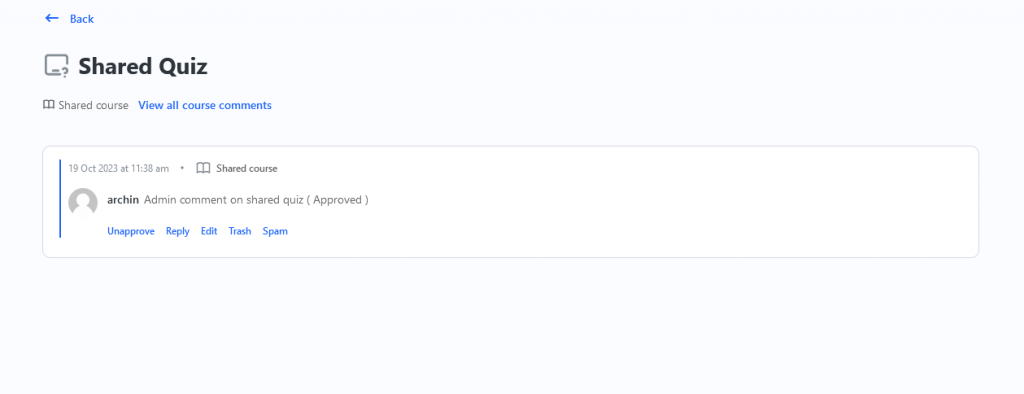
When clicking on a specific comment, users are directed to a detailed view. This view provides comprehensive information about the comment and additional features.
If the comment is associated with a course, a hierarchical tree is displayed. This tree visually represents the steps or components of the associated course, allowing users to navigate through the content efficiently.
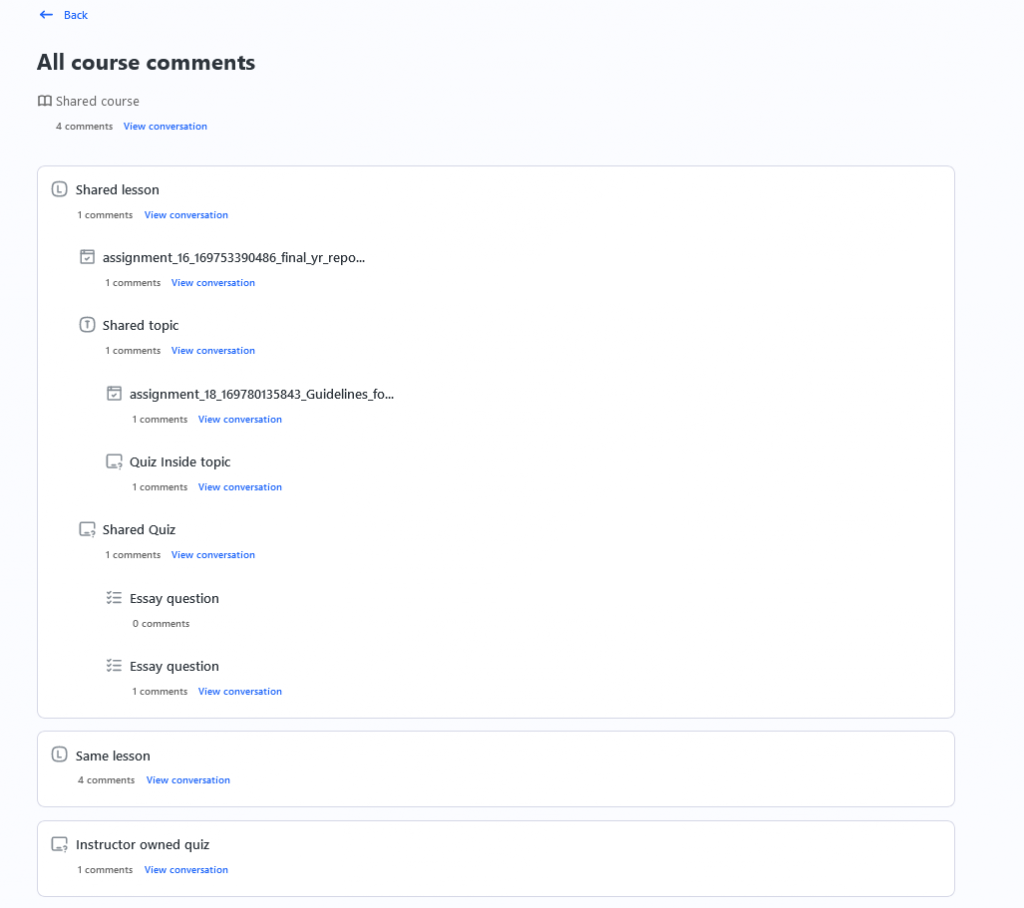
Quiz Attempts For Learndash
Introducing the Quiz Attempts Block to Instructor Role Frontend Dashboard. With this new feature, instructors (or administrators) can easily access and review all student quiz attempts directly. You can filter based on Groups, Courses, Quizzes, or Students, and also refine the results by selecting the desired duration (Ex: Last 7 days, Last 30 days).

Upon choosing a quiz, you’ll not only access detailed user quiz attempts but also review an overview of the quiz, including collective performance insights of all your students attempting that specific quiz.
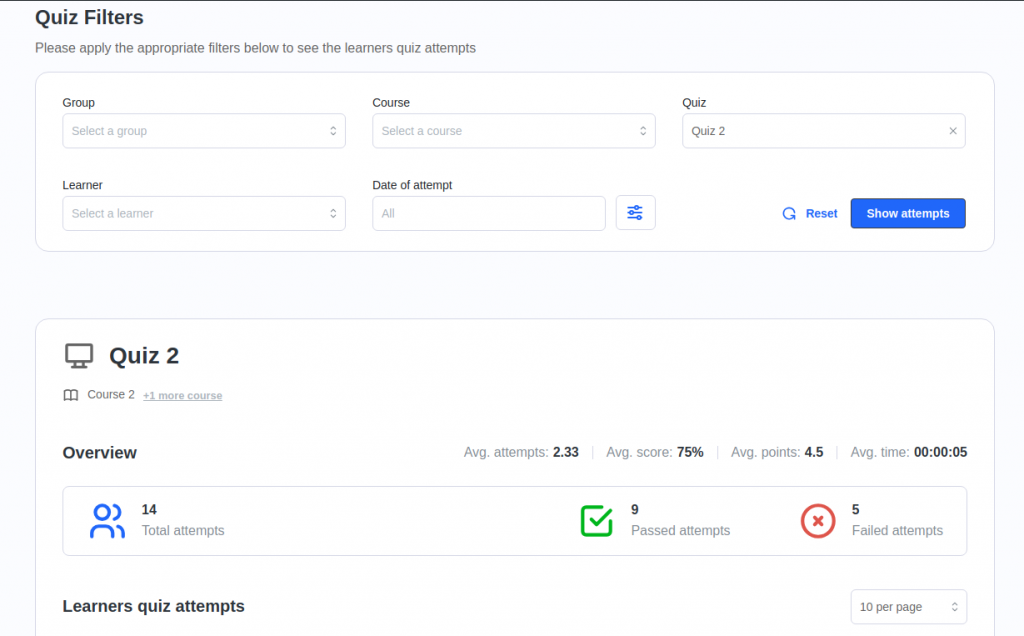
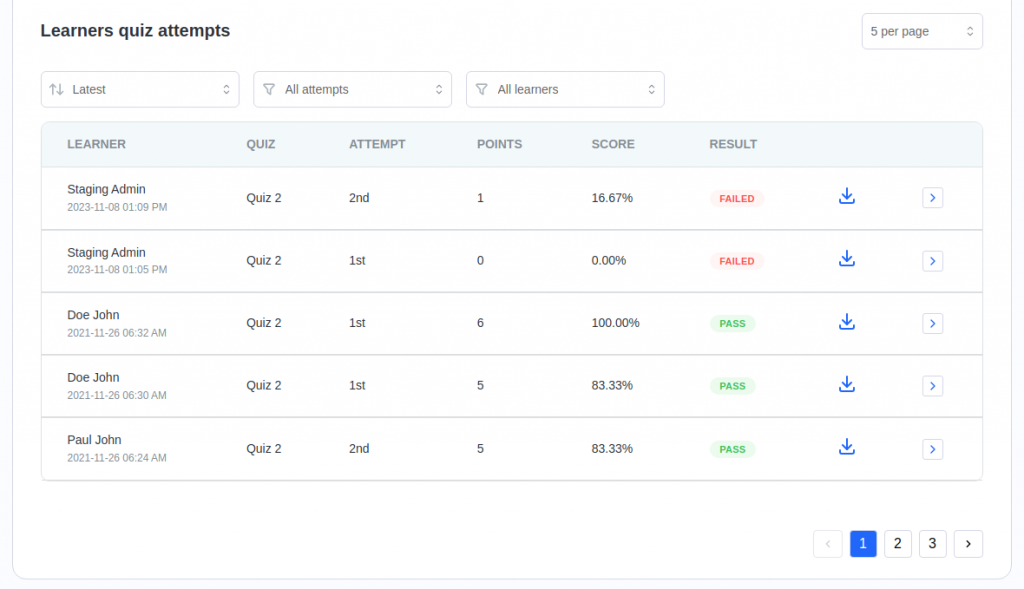
In the image above, you can observe the points earned, learner’s percentage score, the number of attempts made by the user, and their pass/fail status.
You can also sort the results by the date of attempt or by high/low scores. Additionally, you have the option to view only the latest attempt or all attempts by the user. Lastly, you can choose to show or hide anonymous quiz attempts. Clicking on the download icon will download the details of the entire quiz attempt in CSV format.
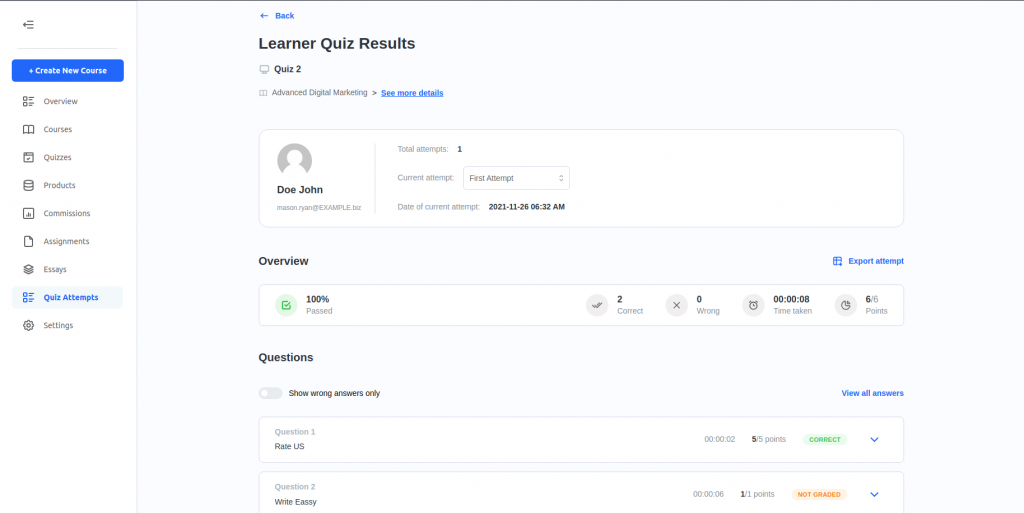
Selecting the arrow icon directs you to a screen displaying the quiz profile information, summarized data for that attempt, and specific details of each answered question by the user.
Course Reports For LearnDash
Using this new feature, administrators and instructors can view course progress reports for all their courses as well as detailed learner specific reports.
Course Reports
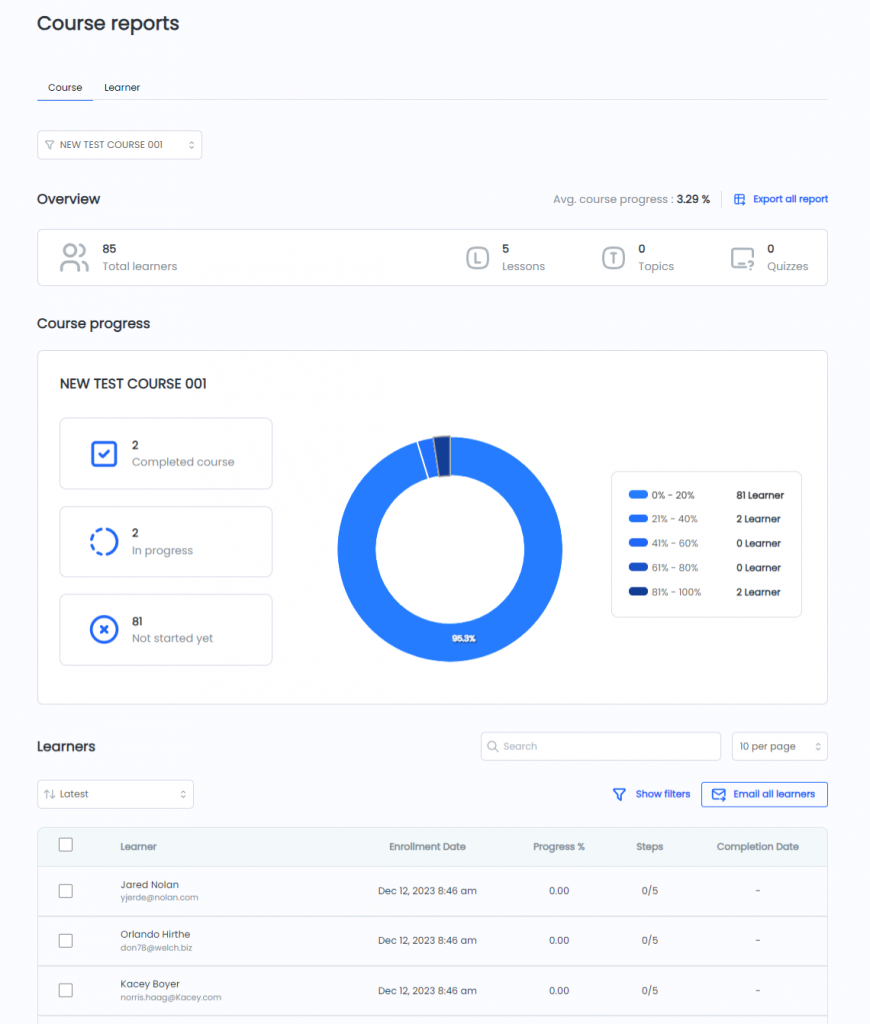
Each course report offers an overview and a learners section.
The overview section gives a high level overview of users enrolled in the course ( either directly or through groups ), course content counts, average course progress information as well as a chart to give a represent the progress of all the students in the course.
The learners section provides detailed information about all the learners enrolled in the course in a table view.
There are also additional options to sort the learners and filter them based on their progress in the course and a date range. One can also filter the data by clicking on the different data tiles in the overview chart section.
Learner Reports
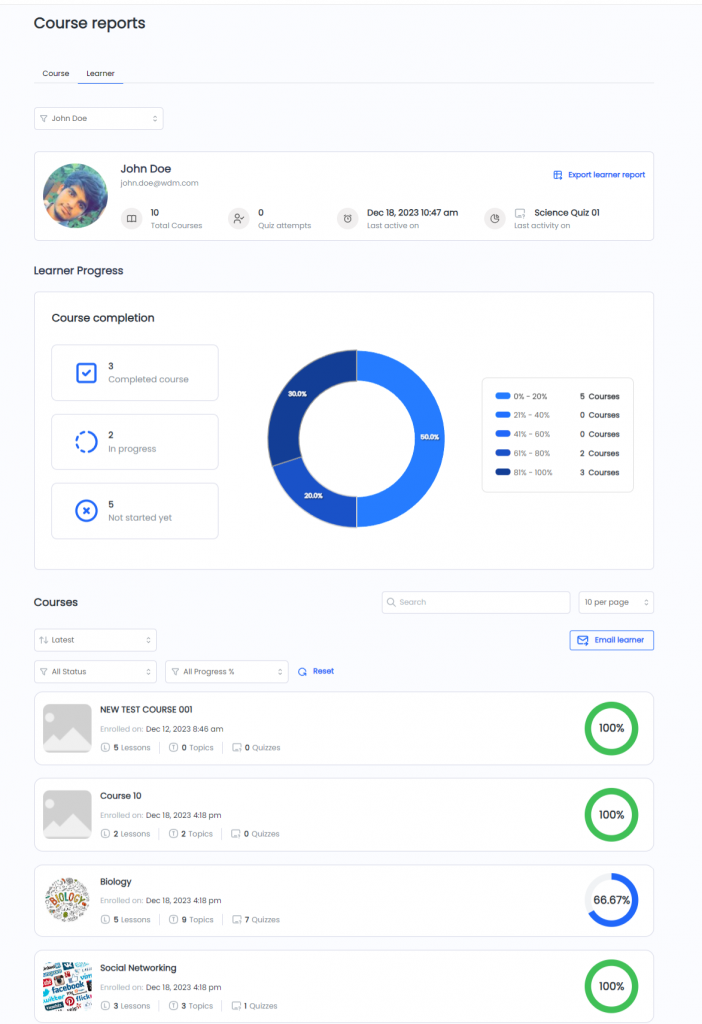
The learner reports provides a complete view of all the courses the learner is enrolled in with their progress. It is divided into the learner progress and course list section.
The learner progress view gives a high level overview of the number of courses the learner is enrolled in along with their latest activity. It also provides a chart to represent the progress of the learner in all the different courses they have enrolled in.
The course list section gives detailed information about the courses the learner is enrolled in as well as their progress along with additional information related to the course.
There are also additional sorting and filtering options to filter the course list based on progress and status of the selected learner in the course.
Groups For LearnDash
Using this new feature, administrators and instructors can view and manage Learndash groups from the frontend dashboard.
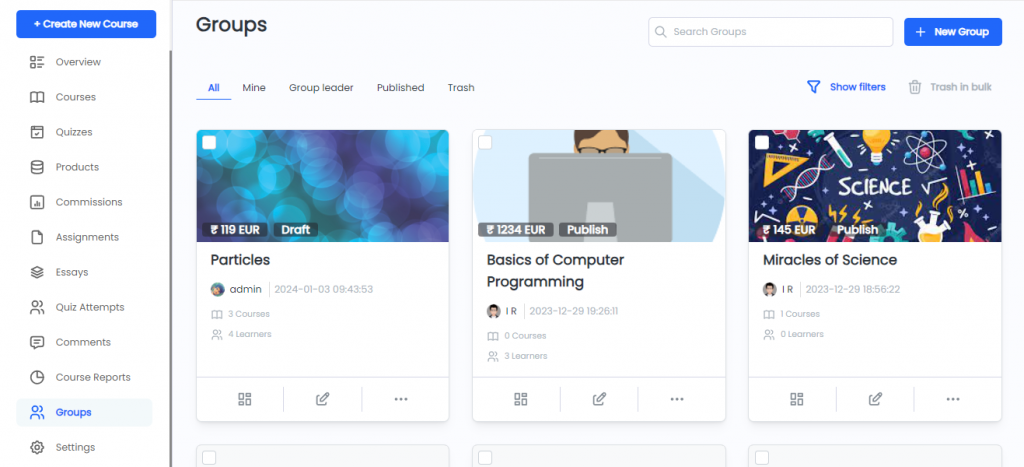
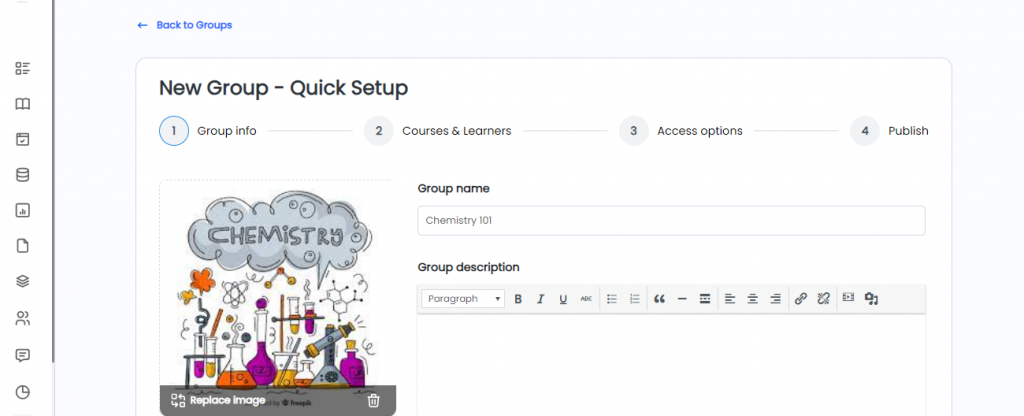
Group Creation and Editing
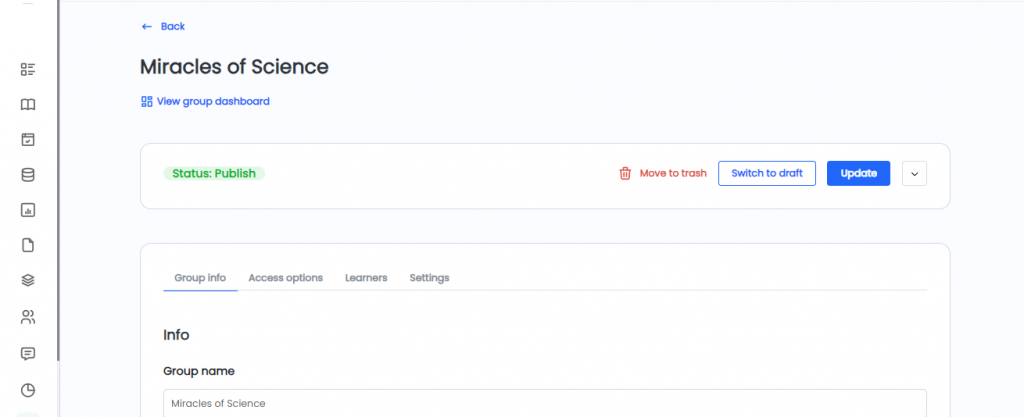
Administrators and instructors can create new groups using our the simple quick setup group creation screen.
Editing the groups is also easier using the edit group screens.
Groups Dashboard
The Groups Dashboard provides an in-depth view of all the users and courses in the group and more.
To access the groups dashboard screen, the admin or instructor user can either click on the view dashboard icon on either the group listing screen or the group edit screen.


The group dashboard provides information related to the courses, users and an overview of the entire group.
Overview

The overview section provides information on the course and user statistics as well as the progress of the users in the group.
The overview section also provides group progress and results export features.
Courses
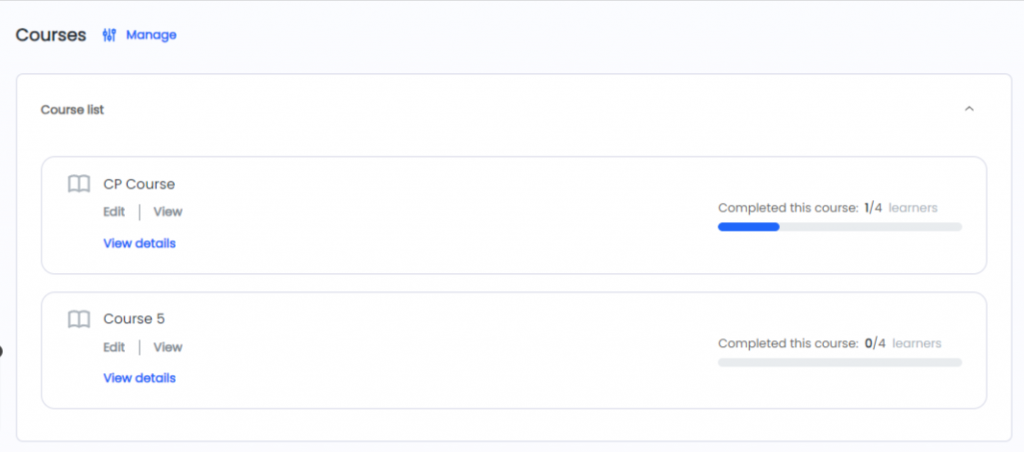
The group course list section gives an overview of all the courses added to the group and the course progress of users in that specific course.
Admins and instructors can also manage the group courses using the manage button.
Learners
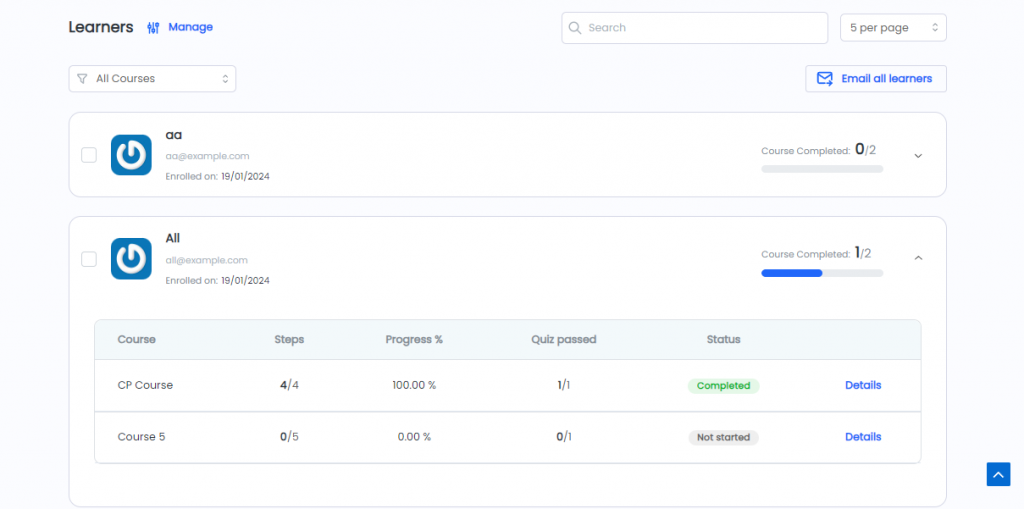
The group learners section displays a list of all the users in the group along with their course progress in different courses of the group.
Admins and instructors can also filter course progress to a specific course using the courses filter.
On opening learner accordion to view the different course progress for a learner, the administrator and instructor can edit the course progress for that specific learner by clicking on the details link.
Course Progress
On clicking the details link for a specific learner course, the course progress screen is displayed.
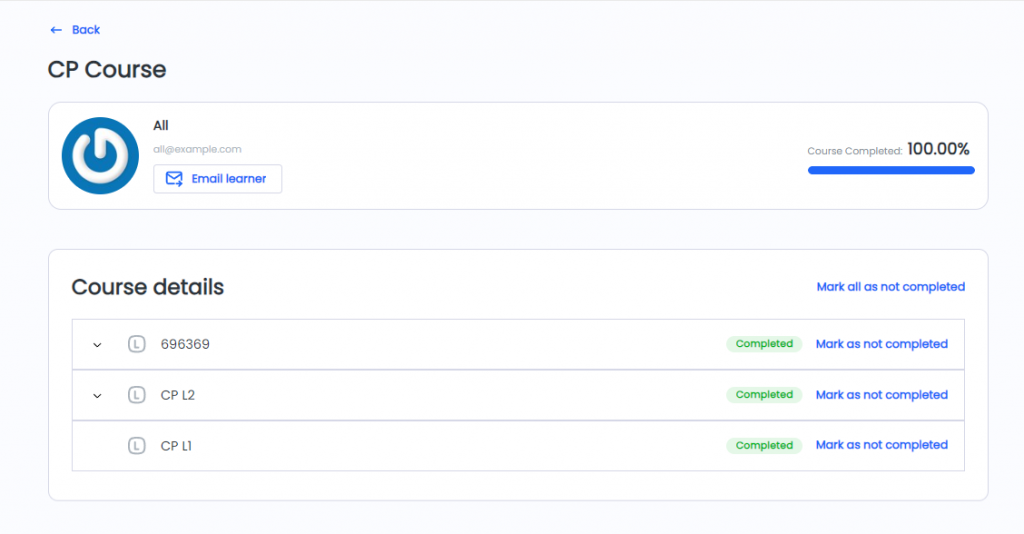
Administrator and instructor can update the user course progress for that user from this screen using the mark complete and not complete links for the different steps in the course.

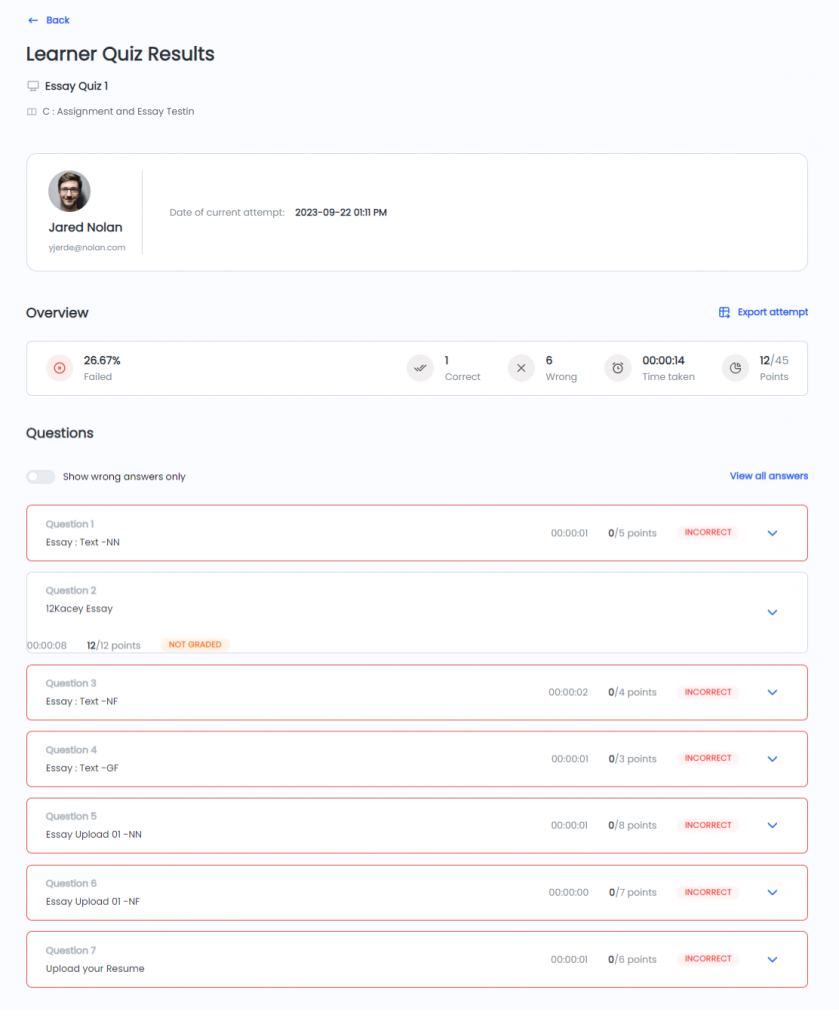
They can also view quiz attempts for that user by clicking on the view quiz attempt button.
Certificates For LearnDash
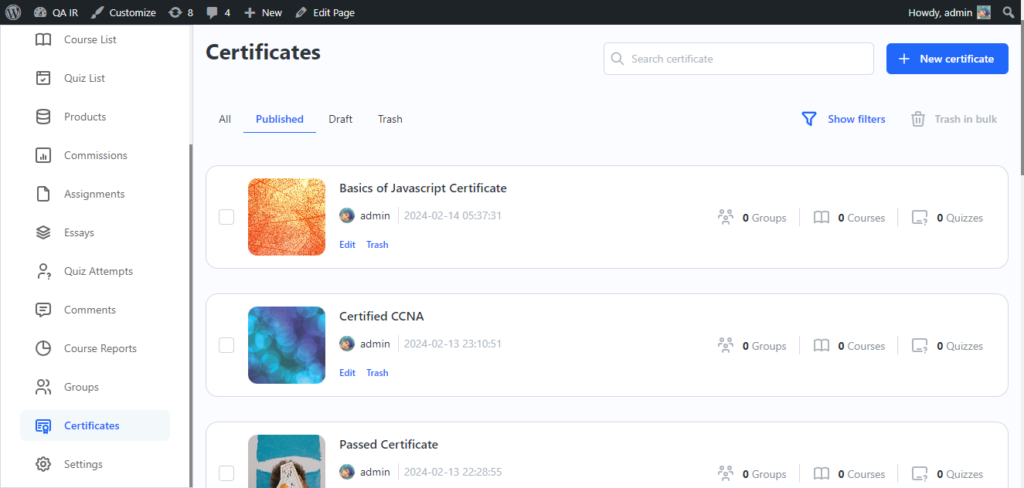
Using this new feature, administrators and instructors can view and manage Learndash certificates from the frontend dashboard.
The listing page offers quick view to see the number of groups, courses and quizzes the certificate is associated with along with additional filters to filter the certificates as per their status and date.
Certificate Builder Integration
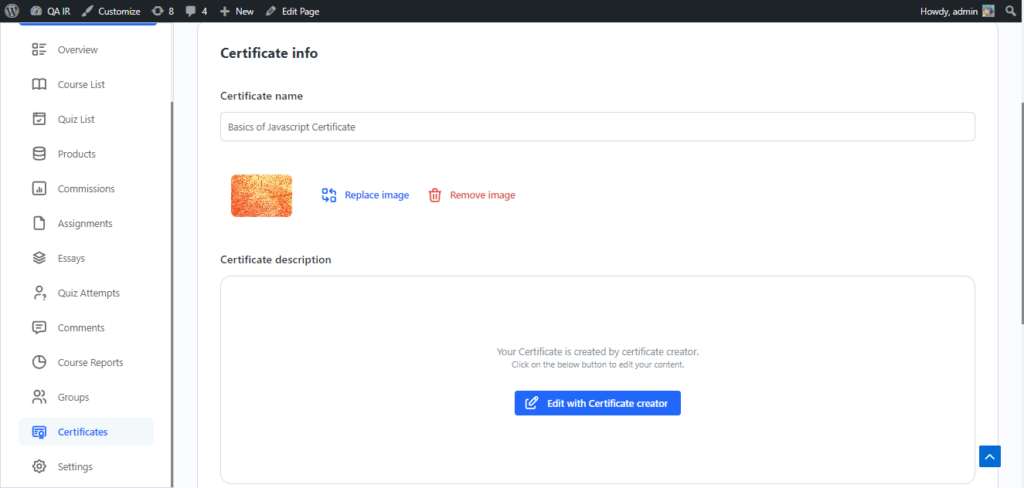
The block also integrates with the LearnDash certificate builder addon allowing instructors and admins to edit their certificates using the certificate builder.
How to Customize the Frontend Dashboard (Gutenberg Editor and Global settings)
The Frontend Dashboard plugin offers a range of simplified settings to help you tailor the dashboard according to your preferences. Let’s dive in and explore how you can make the frontend dashboard truly your own.
Frontend dashboard can be customized through Gutenberg editor, even if the Gutenberg editor is disabled then you can customize the dashboard via global settings, as explained below.
Customize the Frontend Dashboard via Gutenberg Editor
Since the Frontend Dashboard is made up of Gutenberg blocks you have all flexibility and power of the Gutenberg block editor to customize the frontend dashboard page.
The dashboard blocks for instructors consists of a powerful dashboard builder block through which all the content is arranged in dashboard tabs. This block also comes up with settings to style your dashboard as per your need.
In addition to the Dashboard blocks, you can include other content in the dashboard using Gutenberg blocks. This allows you to provide instructors with relevant information to enhance their user experience and productivity on the site. For example, you can create how to guides, dashboard header/ footer banner to keep important information in focus, etc. Furthermore, you have the option to extent the dashboard’s functionality by granting instructors access to various features through Gutenberg blocks or shortcodes.
Page Template Settings
Page template settings help you configure the page layout for the frontend dashboard page.
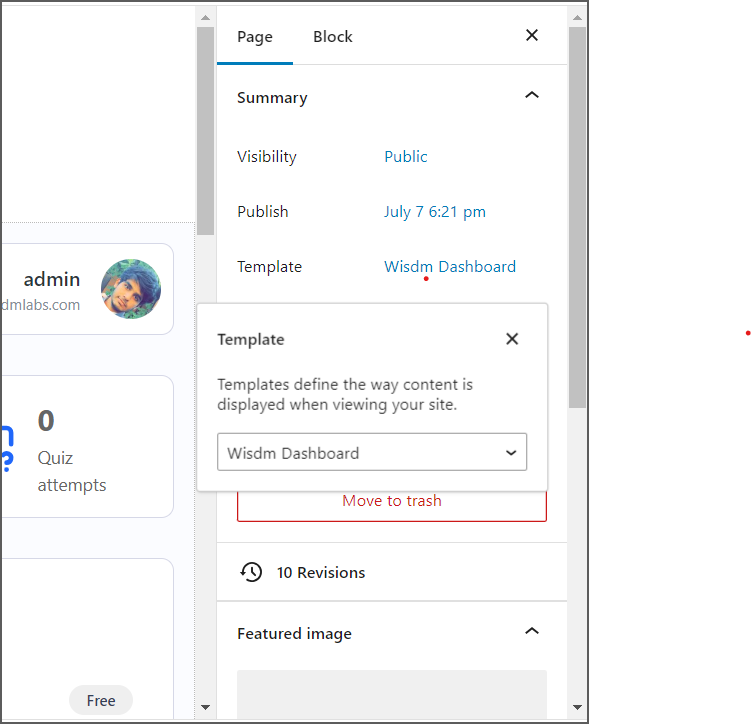
How to configure the page template
- Access the Settings Sidebar: In the Page Settings sidebar on the right-hand side of the page editor, locate the Template section.
- The Dashboard Template: The Dashboard template designed specially for a full width dashboard layout will be set as the default choice. However, if needed, you can easily change the template selection using the available options.
- Select other Templates : Instead of using the Dashboard template you can use your theme’s templates by selecting the relevant one. The Frontend Dashboard is compatible with all the themes specifically with BuddyBoss, eLumine, Astra and Kadence theme used commonly for creating a LearnDash based eLearning site
Dashboard Tab Settings
The Dashboard Tabs block enables you to add / remove / arrange tabs on your dashboard as needed. You can design the content for each tab using any blocks available in your block editor.
Whether it’s adding text, images, videos, or providing instructors access to specific functionalities through blocks or shortcodes, the possibilities are endless. Additionally, you have the option to choose an icon for your dashboard tab to add a visual touch.


Add content above or below the dashboard block
In addition to the adding content in the dashbaord tabs you can add blocks available above and below the dashboard block to further enrich your frontend dashboard.
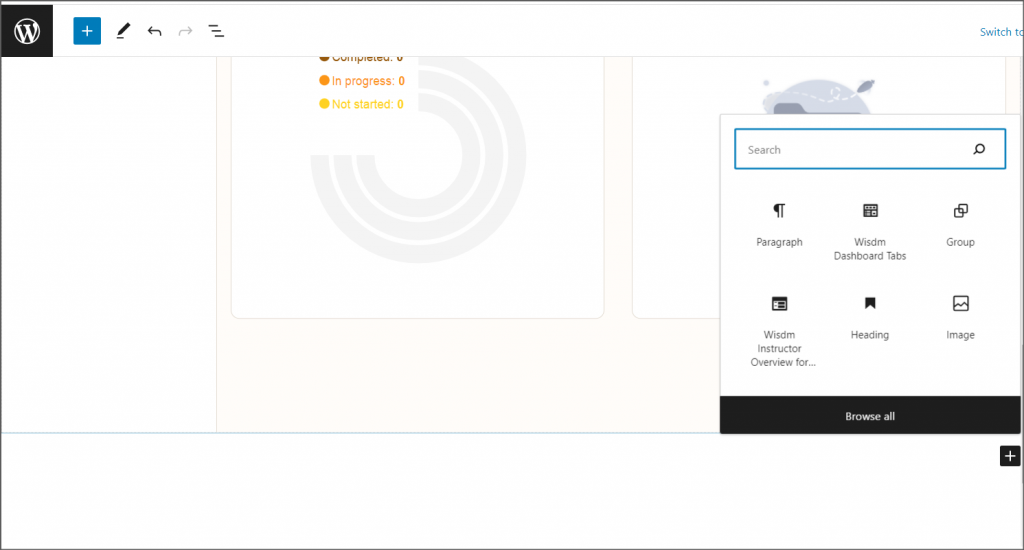
For instance, if you wish to add a footer below the dashboard block, simply click the Plus sign in the bottom right corner of the block. Then, design the content by selecting relevant block from the list of available blocks
Typography and Color Settings
Font Settings:
- To access Font Settings, select the Dashboard Tabs Block on your frontend dashboard.
- Within the block, you’ll find a range of typography settings available for customization.
- By default the theme font is applied to the dashboard. You can choose other font from the options provided
- Manage the font size to achieve the desired look and feel, ranging from small to large font sizes presets.
Color Settings:
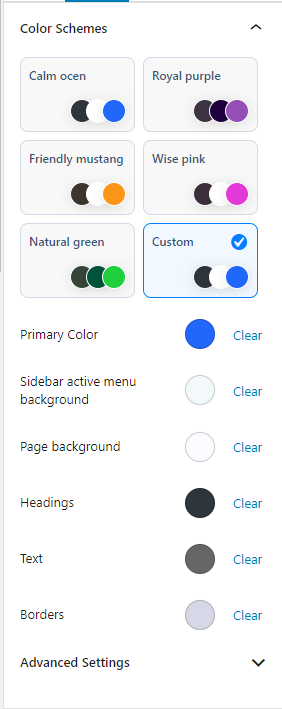
- Within the Dashboard Tabs Block, you’ll also have access to extensive color scheme options for further customization.
- Select from five predefined preset color palettes, each thoughtfully designed to complement various design preferences.
- If you’re seeking a more tailored approach, you can create a custom color palette, allowing you to use colors that perfectly match your brand’s aesthetics.
- Customize the visual appeal of your frontend dashboard by choosing the color scheme that best represents your brand.

Page Speed Settings

- The Page Speed settings is an advanced setting for the frontend dashboard.
- It provides a One-Time Asset Loading feature toggle which when enabled gives the best experience to the user in terms of page load time and performance.
- This feature is only compatible with a dashboard created only using our Blocks.
Primary CTA option
On the left sidebar of the dashboard, you have an option to add a prominent button at the top of the tabs menu. This button serves as a quick way for instructors to perform important and frequent actions.
By default, the button is set as the “Create New Course” button, which can be confirmed by enabling the “Use this button to create a new course” checkbox. However, it can be customized to suit specific requirements by changing its title and URL in the block settings.


Instructor Overview block settings
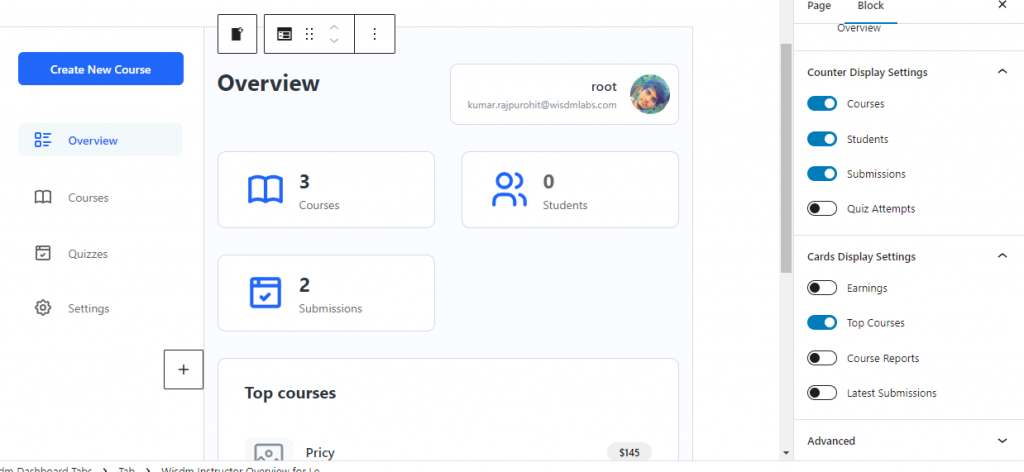
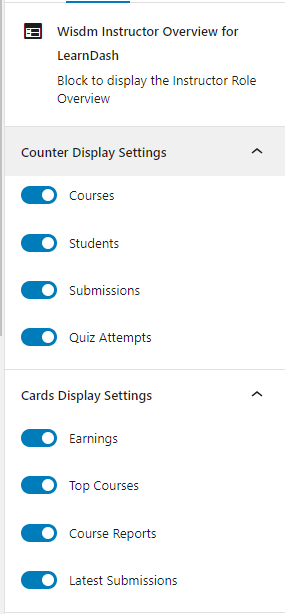
The Instructor Overview block provides a list of settings to control the visibility of sections on the overview page. By toggling the different counter and card display settings, you can choose which sections are visible to instructors on the frontend overview dashboard page.
Global Settings
The global settings are designed for sites that do not utilize the Gutenberg block editor, such as those still using the Classic Editor or add-ons to disable the block editor. By default, the global settings are disabled if your site has Gutenberg Editor enabled.
Important Note: When using global settings, please refrain from directly editing or updating the dashboard page from the edit page screen. Instead, use the provided global settings to make any updates to the frontend dashboard page.
Frontend Dashboard Page Settings
When using global settings, all the different settings are applied to the page configured in the Frontend Dashboard Page setting. You can also create a new frontend dashboard page by clicking on the “Create a New Dashboard Page” link. This will update the selected frontend dashboard page to the newly created one.
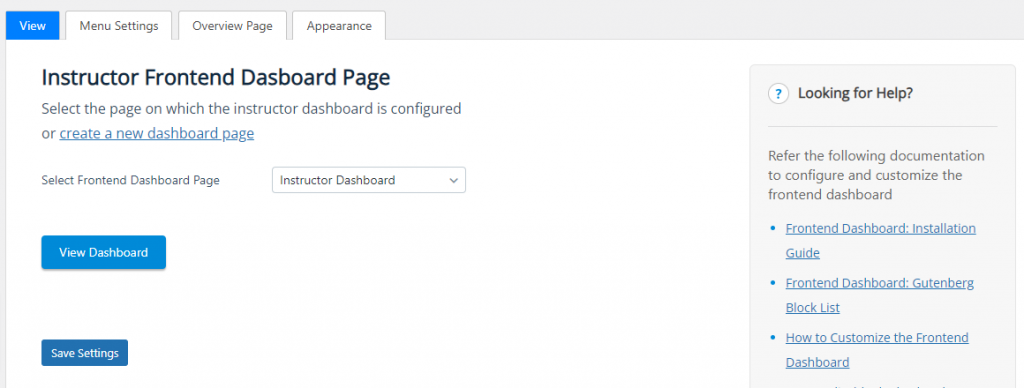
Menu Settings
The menu settings allow you to enable or disable the different tabs and its content displayed on the frontend dashboard. If a tab is disabled, then it would be removed from the frontend dashboard and the instructors won’t have any access to the content or the functionality available in that respective tab page. By default, all tabs are enabled, but you have the flexibility to hide specific tabs by disabling the corresponding toggle and saving the settings.

Overview Page Settings
The overview page settings enable you to enable or disable the counters and card sections displayed on the frontend dashboard’s overview page. By toggling the specific setting toggles, you can control which counters or card sections are visible to instructors.

Appearance Settings
The appearance settings provide options to modify the color and typography settings used on the frontend dashboard. Similar to the Gutenberg editor settings, you have access to predefined preset color palettes and a custom color palette to personalize the colors used on your frontend dashboard.
The font setting offers a selection of fonts for your frontend instructor dashboard. The font size setting allows you to manage the font size, ranging from small to larger, to suit your preferences.


With these powerful customization options, you can truly make the frontend dashboard your own, aligning it with your unique brand identity and preferences. Enjoy the flexibility to create a customized and visually appealing frontend dashboard for an enhanced user experience.
Recreating the Frontend Dashboard
If the frontend dashboard has been accidentally deleted, you can easily recreate it by referring to the frontend dashboard installation documentation.
How to disable the Backend dashboard(WP) for Instructors
The instructor dashboard serves as a dedicated space exclusively designed for instructors on your website. Before introducing the Frontend Dashboard for Instructors, the Instructor dashboard was simply the WP admin dashboard that was simplified and modified to provide a dedicated space for Instructors on your website.
Normally, this Instructor dashboard was accessible in the same way as the default WordPress Admin area at www.your-site-name/wp.admin (may vary based on your site settings and plugins).
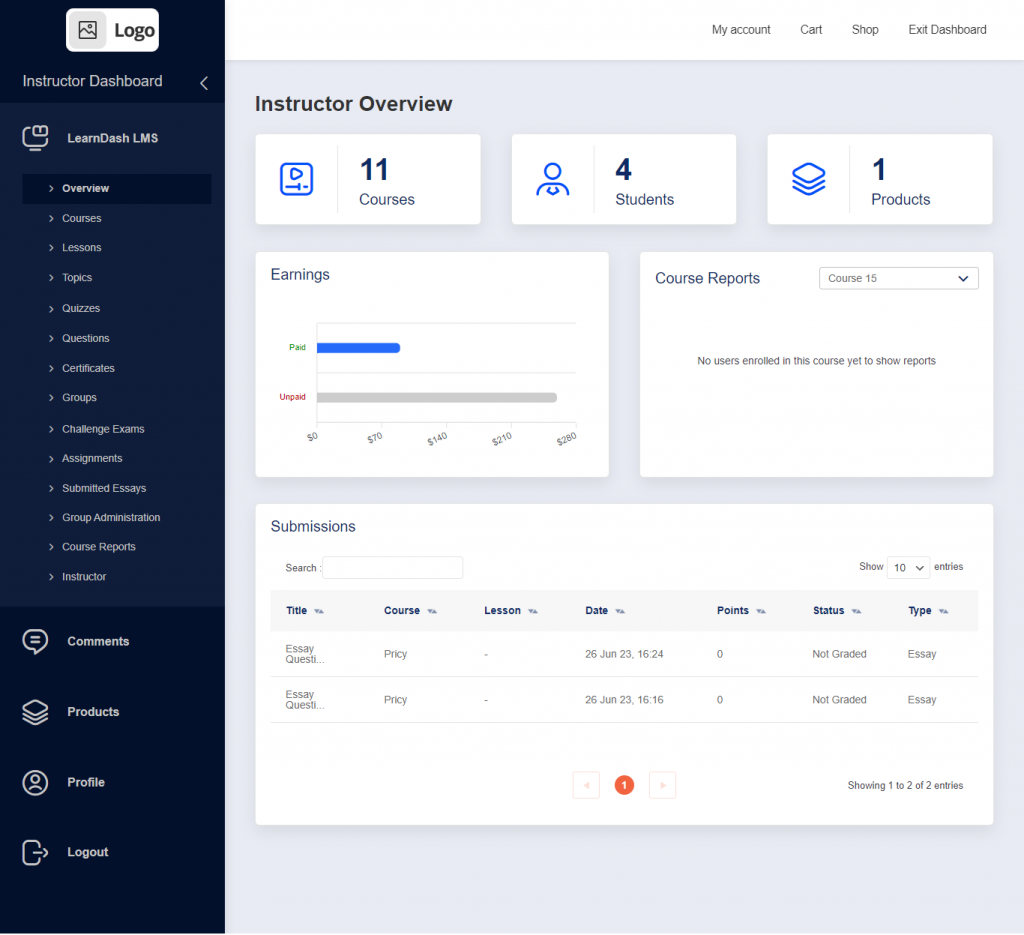
Now, with the introduction of the Frontend Dashboard, you may not need the Backend Instructor Dashboard if the current Frontend Dashboard functionalities (Frontend Dashboard installation guide) completely satisfy your needs.
Follow the steps below to disable the backend dashboard (WP) for Instructors and completely restrict Instructor access to the /wp-admin/ area.
Disabling Backend Access:
Starting from Instructor Role v5.0.0, a new setting has been introduced under the general settings tab called “Disable Backend (WP) Dashboard.” Enabling this setting will effectively disable access to the Instructor Dashboard located in the WordPress administrative area (www.your-site-name.com/wp-admin)
1.As a admin go to WP Dashboard > LearnDash LMS > Instructors > General Settings
2. Select the check box that says “Disable Backend (WP) Dashboard” as shown in the below image.

When an instructor attempts to access the default Instructor Dashboard in the WordPress administrative area, they will automatically be redirected to the frontend of the website. This ensures a smooth transition and provides a seamless experience for instructors.
Instructor Dashboard Link:
If your site has the “Instructor Dashboard Link” setting enabled along with the “Disable Backend Dashboard” option, the Instructor Dashboard menu added to your site’s primary menu will direct users to the frontend dashboard page instead of the default Backend Instructor Dashboard.

By utilizing the “Disable Backend Dashboard” setting, you can effortlessly control instructor access and seamlessly guide them to the frontend dashboard. This user-friendly setup ensures a secure and convenient experience for instructors, streamlining their workflow and promoting efficient course management.
Introducing Frontend Dashboard
Presenting the Frontend Dashboard, exclusively designed for Instructors and Admins! Now your instructors and admin will be able to access LearnDash and other Instructor Role plugin features right from the frontend of your website. Instead of using our access restricted backend(WP) Instructors dashboard – embrace the complete frontend experience.
With a visually appealing interface and an intuitive user experience, the Frontend Dashboard ensures high security and boosts instructors’ productivity. The frontend dashboard is fully customizable and extendable so that you can tailor it to deliver an exceptional Instructor experience that fits your business needs perfectly. Say hello to simplified course management and unlock a world of possibilities!
Frontend Dashboard

The new frontend dashboard is a Gutenberg block-based dashboard that comes with a powerful dashboard builder block making it fully customizable and extendable. Don’t worry even if you have disabled the Gutenberg Editor you can still use our global settings to customize the frontend dashboard.
At present, the frontend dashboard offers eight primary tabs and other remaining Instructor functionalities available in the Instructor role plugin are coming very soon to the frontend dashboard
Instructor Frontend Dashboard Tabs

Overview: Get a comprehensive view of your Courses and Learners, along with their submissions, all at a glance.
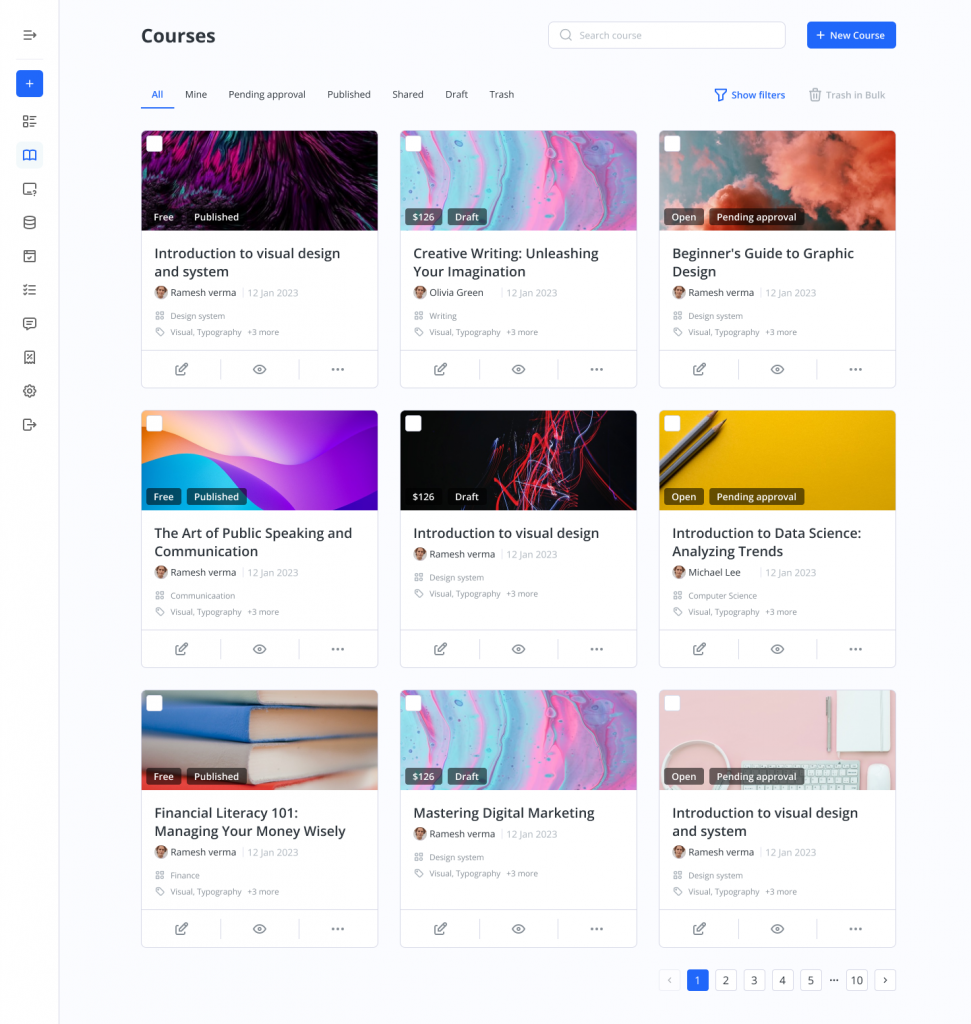
Courses: Explore a user-friendly listing of courses and utilize our Frontend Course Creator to effortlessly create or edit courses.
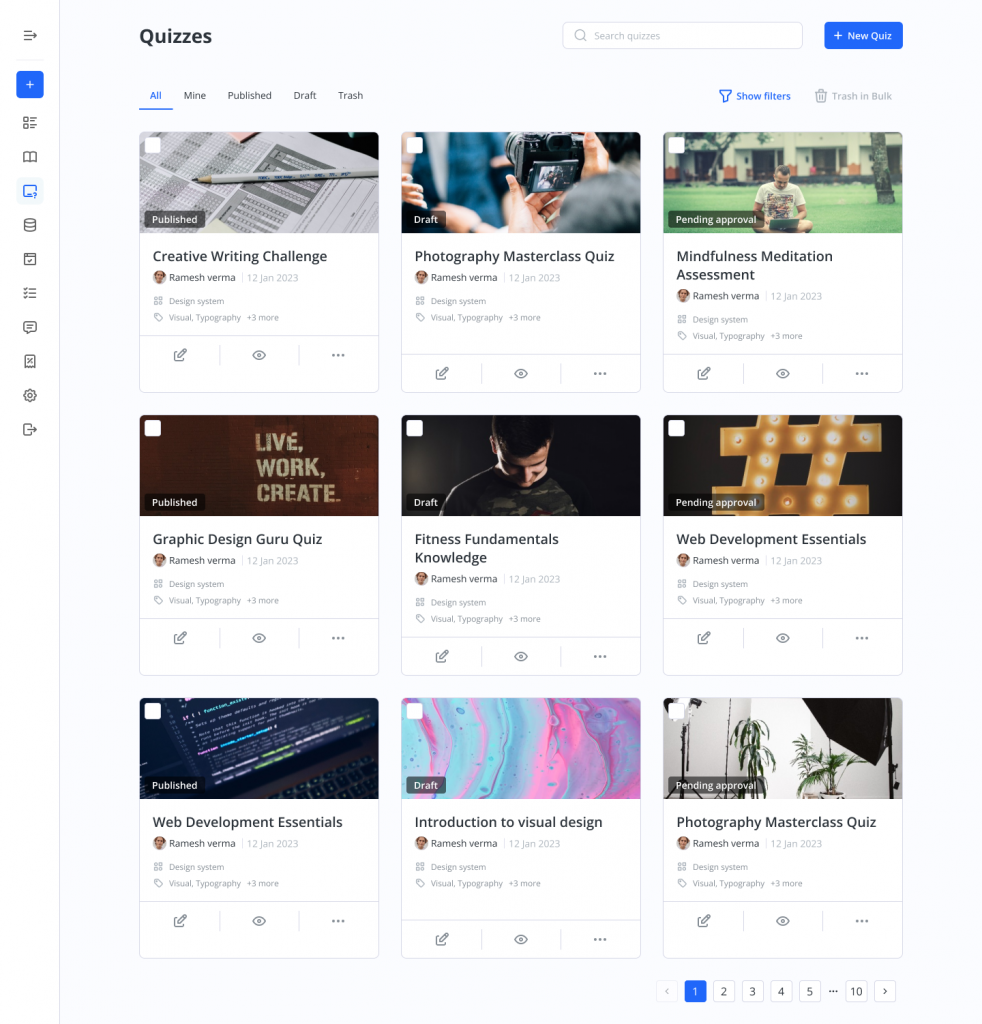
Quizzes: A quizzes listing through which you can create new Quizzes or edit new quizzes using our Frontend Course Creator

Products: The Products tab offers instructors and administrators a fresh tab view for their WooCommerce products within the Frontend Dashboard.

Commissions: The Commissions tab for Instructors gives a detailed view of the instructor commissions and payout logs and their earnings.
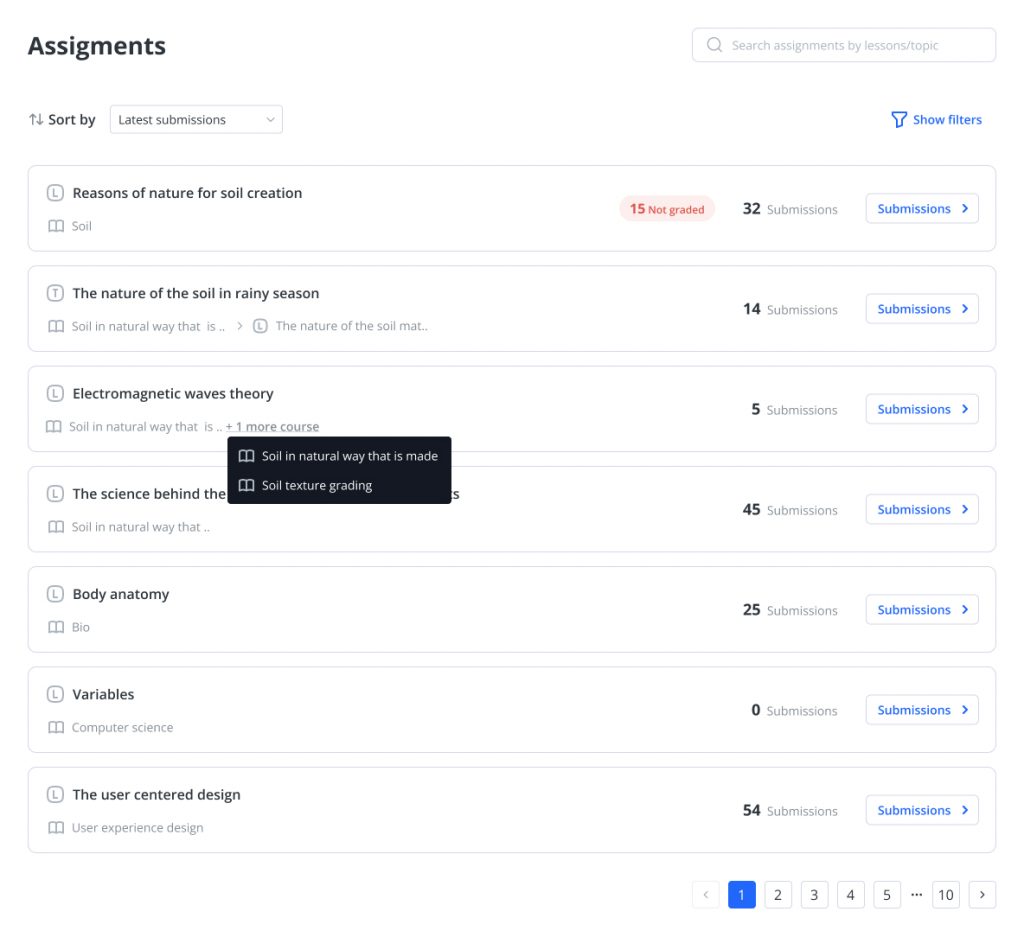
Assignments: The Assignments Block provides a unique and simpler view for your assignment submissions to help you manage them with ease.

Essays: The Essays Block provides a unique and simpler view for your student essay submissions to help the admin and instructor manage essay submissions better.
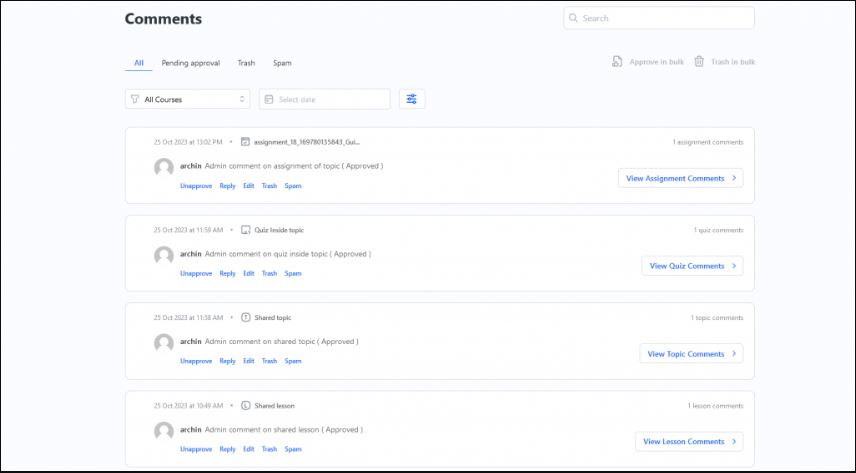
Comments – The Comments block allows users to efficiently manage and navigate comments across courses, lessons, topics, quizzes, essays, and assignments. A
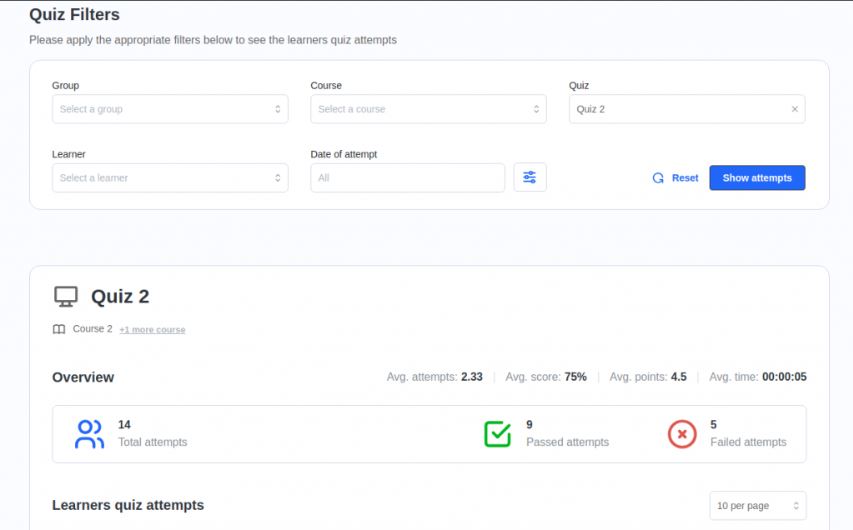
Quiz Attempts – The Quiz Attempts block allows user to
( instructors or administrators) easily access and review all student quiz attempts directly.

Course Reports: Instructors can view course and learner-specific reports for their courses and students.

Groups : Instructors can manage groups and view groups dashboard for their groups and students.
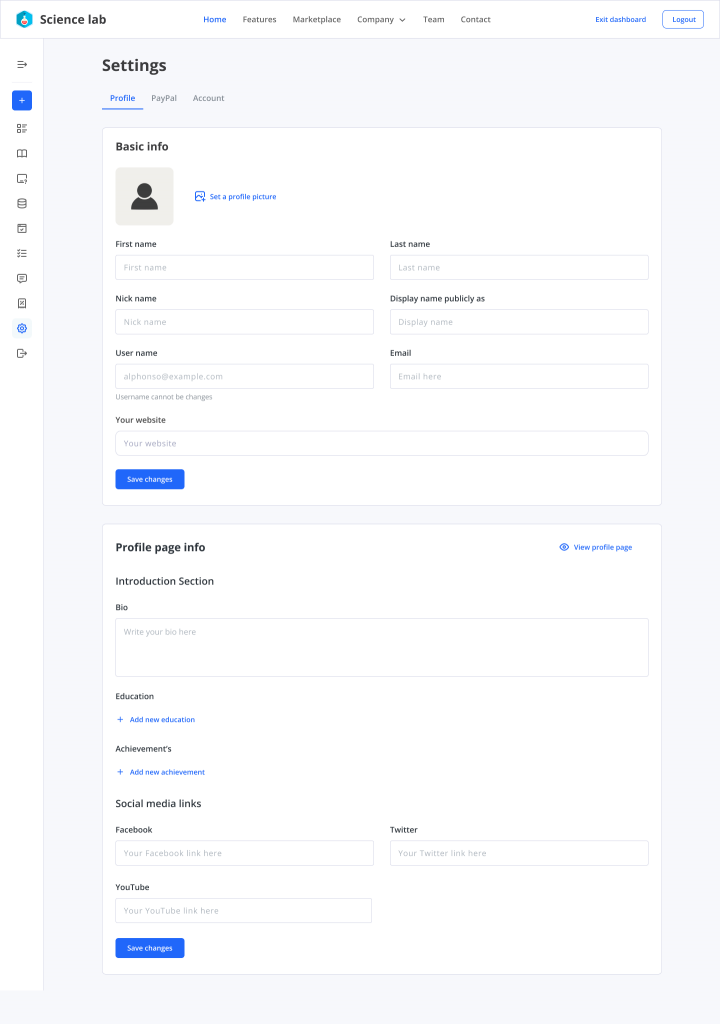
Settings: Instructors can take charge of their profile information, manage email notifications and Paypal details for efficient payouts in this dedicated tab.
All the other LearnDash and Instructor Role functionalities for Instructors are coming soon to the frontend dashboard. We are continually working to enhance the frontend dashboard by adding all other LearnDash and Instructor Role functionalities, ensuring it becomes the go-to solution for course creators. Our goal is to empower you to effortlessly create, maintain, and manage courses and content without having to access the Backend(WP) Instructor dashboard.
Frontend Instructor experience to create and manage courses:
Say farewell to the traditional backend setup and embrace the simplicity and convenience of managing your courses directly from the frontend of your website. With the Frontend Dashboard, Frontend course creator, you can create, edit, and organize your courses effortlessly, without the need to navigate through complicated backend screens. Learn about how to setup the frontend dashboard from here.
Completely block access to the Backend
With the Frontend Dashboard, you can provide instructors with a seamless frontend experience while completely blocking access to the backend “/wp-admin/” area. Instructors can focus on creating and managing their courses without being exposed to the complexities of the backend. This ensures a hassle-free experience for instructors while maintaining the integrity and security of your website. Learn more about how to disable the backend(WP) instructor dashboard and block Instructors backend access from
Personalize the dashboard to match your Brand and Site’s look and feel
Make the Frontend Dashboard your own by customizing its appearance to match your branding and style. With a wide range of customization options, you can easily tailor the layout, color schemes, and typography to create a unique and visually appealing dashboard that reflects your organization’s identity.
Frontend dashboard can be customized through Gutenberg editor, even if Gutenberg editor is disabled then you can customize the dashboard via global settings.


Customize and Extend the Frontend Dashboard to create a dashboard tailored to your business needs
The Frontend Dashboard is a Gutenberg block-based modular dashboard empowering you with all the flexibility to customize and extend the dashboard tailored to your business needs
The Gutenberg editor along with the Dashboard builder block enables you to enhance the dashboard’s capabilities by removing / adding/ rearranging content and features & functionalities. Whether you wish to include additional information, integrate external tools, or improve existing functions, allows your frontend dashboard to evolve with your needs. Learn about how to customize the frontend dashboard.
With the complete frontend experience for instructors offered by the simplified and intuitive Frontend Instructor Dashboard, administrators can confidently let instructors manage and oversee the course on their sites.
The Frontend Dashboard offers unparalleled customization flexibility, granting admins full control over instructor access and the ability to tailor the dashboard to meet unique business needs. With this powerful tool, administrators and business owners can efficiently manage instructors, elevating the overall quality of their e-learning experience. Say goodbye to limitations and embrace a new era of simplified course management and enhanced productivity.
Elementor Compatibility
The Frontend Course Creator with Elementor Support is a powerful feature that allows administrators and instructors to access the Elementor editor directly from the frontend of the course creation platform. This feature provides a seamless and user-friendly way to create, edit, and manage course content while limiting backend access and still providing full Elementor support.
Editing Course Content
“Edit your course content, including topics, quizzes, and lessons easily with this feature. On the Frontend Course Creator page, just click ‘Edit with Elementor,’ and the Elementor editor opens in a new tab, so you can make your edits conveniently.”
Switching Back to Normal WordPress Editor
After creating or editing content with Elementor, you can easily switch back to the normal WordPress editor for further modifications. Follow these steps to switch back:
- Return to the Normal Editor: Click on the Switch to default editor button on the Frontend Course Creator to return back to normal editor.
This flexibility allows you to take advantage of both Elementor’s intuitive visual editor and the traditional WordPress editor.
Table of Contents [hide]
- 0.1Overview
- 0.2Installation, Activation, and Prerequisites
- 0.3Features: Instructor Dashboard
- 0.4Features: Instructor Dashboard Menu
- 0.5Features: Instructor Overview Page
- 0.6Features: Adding Instructors
- 0.7Features: Multiple Instructors
- 0.8Features: Instructor Commissions
- 0.9Features: Selling Courses Through WooCommerce
- 0.9.1How to Create a WooCommerce Product in The Instructor Dashboard
- 0.9.2Features: Set up Paypal Payouts for Instructors
- 0.9.3Prerequisites for using PayPal Payouts
- 0.9.4How to request access to PayPal Payouts
- 0.9.5Activating Payouts
- 0.9.6Creating a new API Application
- 0.9.7Configuring Instructor Payout Settings
- 0.10Pay Instructor Commissions using Payouts
- 0.11Features: Instructor Profile
- 0.12Features: Profile Introduction Sections
- 0.13Features: Create Learning Content And Quizzes
- 0.14Features: Reporting
- 0.15Features: Instructor Notifications
- 0.16Features: Email Settings
- 0.17Features: Review Instructor Course Updates
- 0.18Features: Instructor Groups Access
- 0.19Features: Instructor Comments Access
- 0.20Features: Student Teacher Communication
- 0.21Settings
- 1Features: Student Teacher Communication
- 2Multiple Instructors Shortcode
- 2.1Features: Instructor Dashboard Settings
- 2.2Features: Color Schemes
- 2.3Features: Commission Logs
- 2.4Navigation Settings
- 2.5Overview settings
- 2.6The Frontend Course Creator
- 2.6.1Activating Frontend Course Creator (FCC)
- 2.6.2Settings
- 2.6.3Accessing the Frontend Course Creator
- 2.6.4Using the Frontend Course Creator
- 2.6.5Edit a Course
- 2.6.6The Frontend Builder
- 2.6.7Organizing the course structure
- 2.6.8Adding and Editing Lessons/Topics
- 2.6.9Editing existing lessons and topics
- 2.6.10Course Settings
- 2.6.11Limitations
- 2.7The Frontend Quiz Creator
- 2.8Frontend Dashboard: Installation Guide
- 2.8.1Configuring the Frontend Dashboard using Onboarding Wizard
- 2.8.2Deleting the Frontend Dashboard Page
- 2.8.3Creating a new Frontend Dashboard page
- 2.8.4Create the Frontend Dashboard page from scratch using Gutenberg Editor
- 2.8.5Add Instructor Dashboard Blocks Individually
- 2.8.6Set as default Instructor Frontend Dashboard
- 2.9Frontend Dashboard for Instructors: Gutenberg Blocks List
- 2.10Instructor Overview for LearnDash
- 2.10.1Courses for LearnDash
- 2.10.2Quizzes for LearnDash
- 2.10.3Instructor Settings for LearnDash
- 2.10.4Products For LearnDash
- 2.10.5Commissions For LearnDash
- 2.10.6Assignments For LearnDash
- 2.10.7Essays For LearnDash
- 2.10.8Comments For Learndash
- 2.10.9Quiz Attempts For Learndash
- 2.10.10Course Reports For LearnDash
- 2.10.11Course Reports
- 2.10.12Learner Reports
- 2.10.13Groups For LearnDash
- 2.10.14Group Creation and Editing
- 2.10.15Groups Dashboard
- 2.10.16Certificates For LearnDash
- 2.10.17Certificate Builder Integration
- 2.11How to Customize the Frontend Dashboard (Gutenberg Editor and Global settings)
- 2.12How to disable the Backend dashboard(WP) for Instructors
- 2.13Introducing Frontend Dashboard
- 2.13.1Frontend Dashboard
- 2.13.2Instructor Frontend Dashboard Tabs
- 2.13.3Frontend Instructor experience to create and manage courses:
- 2.13.4Completely block access to the Backend
- 2.13.5Personalize the dashboard to match your Brand and Site’s look and feel
- 2.13.6Customize and Extend the Frontend Dashboard to create a dashboard tailored to your business needs
- 2.14Elementor Compatibility
Overview
The Instructor Role gives you the power to add multiple course authors without compromising site security. Learn how you can leverage this powerful tool by creating roles with restricted back-end access to Course Authors, making content creation and management easier, and your site safer.
Installation, Activation, and Prerequisites
Before getting started with Instructor Role, please ensure you have the LearnDash LMS plugin installed and activated, that your site meets or exceeds our prerequisites, and you have the add-on properly installed and activated.
Features: Instructor Dashboard

The Instructor Dashboard is a dedicated dashboard designed for instructors (Teachers). When logged in, instructors are automatically redirected to this dashboard. Whether creating courses, checking reports, approving assignments or customizing quizzes, instructors can find all the tools they need in one place. Each dashboard is instructor-specific, and will only display the data of the courses that individual has created or shared. The URL to access your Instructor Dashboard is the same as your WP Dashboard URL, but is completely secure and restricted to only allow access to instructor-specific pages.
Features: Instructor Dashboard Menu
The Instructor Dashboard has a top menu similar to the primary menu displayed on the front end of the website. But you may wish to display a different top menu for the instructors on the Instructor Dashboard menu. You can enable different menus by using the Instructor Dashboard Menu setting under the Appearances ➞ Menus section as shown below.

Note
A feature was included in the Instructor Role update v4.2.1 in which the Instructor Dashboard Menu will default to the Primary Menu of your site. This is to make sure the Instructor can still navigate to the other pages of the site from within their dashboard.
To revert back to an older menu or create an entirely new menu for your Instructor Dashboard, navigate to Appearance > Menus > Create New Menu, add the menu items you wish to show on the Instructor Dashboard, and then select the display location as ‘Instructor Dashboard Menu’ as shown in the screenshot above.
Features: Instructor Overview Page

An instructor can see all the basic information about their courses at a glance from the Instructor Overview page.
- Number of Courses created by the instructor
- Number of Students registered for the instructor’s courses
- Earnings calculated based on the commission settings set by the administrator and the courses sold.
- Course-specific report to check student progress.
- Submissions table to check the essay and assignment submissions made by students.
Features: Adding Instructors
Now that you are familiar with the Dashboard, you have the ability as an Admin to add Instructors to your website. You can add instructors to your website in various ways:
1. Creating New Instructors – To create an instructor, Create a new user from the WP Dashboard and set the user’s role as ‘Instructor’, and save.
2. Making an existing user an Instructor – To change an existing user’s role to an instructor, edit the user’s profile and change the user’s role to ‘Instructor’ and save the changes made.
3. Instructor Registration Form – If you wish to register instructors on your website using a form, you can check out this article to learn more about it and it will help you register Instructors using forms on your website.
Features: Multiple Instructors
Collaborate with other instructors to create comprehensive, well-rounded LearnDash courses faster.
Sharing a Course with an Instructor
Are you looking to have more than 1 Instructor managing a course? This will help you collaborate with other instructors in your team to create your LearnDash courses faster and better.

To add Multiple Instructors to your website, you can follow the steps below:
- Edit a course you wish to share or collaborate on, or create a new one.
- On the course edit page, below the content area, look for the Share Course dropdown as shown.
- Once clicked on it, a list of all Instructors on the website will be displayed
- Select the Instructors you wish to collaborate on the course with.
- Once the instructors have been selected, Save the course.

The course can be either shared by an Admin or an Author with all the other Instructors.
Accessing a shared course

Once the course is shared the Instructor can log in and check for the same under their courses tab. The shared courses appear similar to other courses on the listing page, one can differentiate by looking at the author.

Co-instructors can create new or edit existing lessons, topics, quizzes, and questions in a shared course and perform all other actions to configure course settings on the course edit page as the owner instructor can, but they are not allowed to trash the course.
Also, Co-instructors are not allowed to further share a shared course with other instructors.
Features: Instructor Commissions
Instructor Commissions gives you the power to set a percentage of commissions earned for your instructors, along with a robust reporting system to help manage commissions and payments.
Setup Instructor Commissions
To set instructor commissions, head over to LearnDash LMS → Instructor menu. There, you should be able to see a list of all the instructors on your LearnDash e-learning website. You can then set a commission percentage for each instructor and update the changes. An administrator can set a commission percentage for each instructor.

Commission Reports
A report accessible by the Admin to view a list of the commission amount earned by the Instructor for each course sold. Select an instructor and click ‘Submit’. You should be able to view a list of the commission amount earned by the instructor for each course sold. Instructor commission reports provide you with a summary of instructor commissions earned. To view these reports, go to LearnDash LMS → Instructor Commission → Commission Report.

Note: The ‘Pay’ button does not ensure the payment is made. It is just a means to update the data once you have made the payment.
The Paid Earnings are the commission amount, you have paid an instructor. And the Unpaid Earnings provides the pending amount which has to be paid. Once the payment is made to the instructor (through PayPal, or offline), Admin can update the Paid Earnings by clicking on the Pay button, and entering the paid amount.
You can also export commission reports by heading to LearnDash LMS → Instructor Commission → Export.
Disable Commission Reports
There, you should be able to see a list of options, check the Disable Instructor Commission Feature option. To disable Instructor Commissions, head over to LearnDash LMS → Instructor → Settings.
Features: Selling Courses Through WooCommerce
Now since the Instructors can create courses, you can avail Instructors to sell their courses on your website using Woocommerce too. Instructors can sell their courses as products through WooCommerce and earn commissions. To enable instructors to create and sell courses and WooCommerce products, the following plugins are required to be installed and activated.
1. WooCommerce 3.0.x
2. LearnDash WooCommerce Integration
How to Create a WooCommerce Product in The Instructor Dashboard
Follow the steps below to create a product in WooCommerce:
- From the Instructor Dashboard, go to Products → Add New
- Enter the Product Title and the Pricing details.
- Do not forget to add a Course.
- Once all the information has been added and you are ready to make the product live, Publish it.

Communicate with Instructors
Once you have all the settings properly configured, the students will be able to communicate with the course instructors for any course lesson or topic from the lesson or topic page itself.
Sending new Doubts
A user can send a new doubt related to a lesson/topic of a course from the button at the bottom right corner

After clicking on the button, click on the Send your doubts button to send a new doubt.

This will open up a new pop-up box for students to write the subject and description of their query along with the related lesson and topic. The lesson and/or topic will be pre-selected for the current lesson/topic.
Send new doubt modal
Click on Send to send your doubt to the instructor.
Replying to Doubts
Instructors will be able to see all the doubts in the Buddypress private message inbox. They can send replies to user doubts from there.
Buddypress Private Message Inbox
Users can then View the instructor’s reply and continue the conversation from the lesson/topic page itself.
View and reply to instructor doubts from the lesson/topic page
Students can also have multiple doubts about the same lesson/topic. Clicking on the bottom right button will open a list of all threads for the current lesson/topic.
Click on the thread to load the conversation in the pop-up box.

View all Doubts
Users can also see a list of recent doubts across all courses from the header.
Clicking on a thread here will take the user to the Buddypress private message inbox.
Multiple Instructors Shortcode
The multiple instructors shortcode is helpful in displaying all the instructors specific information on the course page.
[all_instructors] : displays a list of all course instructors with their avatar and names along with a link to the author profile page.
[all_instructors display_img=0] : controls whether to display the instructor image or not. If the parameter is not specified it will always display the instructor image.
[all_instructors size=32] : controls the size of the instructor avatar image to be displayed in pixels. If the parameter is not specified it would always display the instructor image of 32×32 pixels
[all_instructors display_name=0] : controls whether to display the instructor name or not. If the parameter is not specified it would always display the instructor name.
[all_instructors visible=3] : controls how many instructors to display on the page. If the parameter is not specified it would always display at most 2 instructor details.
[all_instructors exclude_author=1] : If you only wish to display the names of the shared course instructors then set this parameter value to 1. If the parameter is not specified it will display all course instructor details.
[all_instructors course_id=36] : To use the shortcode on any other pages, make use of the course_id parameter to specify the relevant course
Course Page
Add the below shortcode to the course content to display all its related course instructors on the course page.


Course Grid
If you are using the LearnDash Course Grid add-on then you can make use of the following code snippet to display the instructor list on the course list page.
if ( ! function_exists( 'ir_custom_add_instructor_details' ) ) {
	/**
	 * Add course instructor details in course list
	 *
	 * @param array $data
	 * @param object $post
	 * @param array $shortcode_atts
	 * @param int $user_id
	 *
	 * @return string
	 */
	function ir_custom_add_instructor_details( $data, $post, $shortcode_atts, $user_id ) {
		if ( learndash_get_post_type_slug('course') == $post->post_type ) {
			$instructor_data = '<div style="padding: 10px;">'.do_shortcode( "[all_instructors course_id='{$post->ID}']") . '</div><div class="caption">';
			$data = str_replace( '<div class="caption">', $instructor_data, $data );
		}
		return $data;
	}
	add_filter( 'learndash_course_grid_html_output', 'ir_custom_add_instructor_details', 10, 4 );
}
Features: Instructor Dashboard Settings
After the major release of v4.0.0+, the Admin Customizer has been removed and replaced with a new and improved Instructor Dashboard layout.

Additionally, a new menu setting is available in the Appearance menu for Administrators called the Instructor Dashboard Settings

Admins can use these various settings to customize the Instructor Dashboard view.
Features: Color Schemes

Also, in the Instructor Role v4.1.0+ onwards, the plugin gives you as Administrators a new feature to set color schemes for their Instructor Dashboard too.
The color schemes provide a list of basic presets along with a custom preset giving an option to choose your own colors for certain instructor dashboard areas and elements.
Once you visit the page, you can scroll and Toggle the Color Schemes to enable them

- Select a preset for your instructor dashboard and click on Save.
- Or, Choose your own colors by making use of the custom preset and then set the colors for the different sections and elements on the instructor dashboard.

Header Settings
Configure whether or not to display your logo or some text on the instructor dashboard from the header settings section. You have various options to either set the Logo as an Image or Text.
Setting Image Logo
Select Image as the header type and upload your Logo image


Screenshot for Instructor Dashboard Settings Menu
- Toggle the Color Schemes to enable them

- Select a preset for your instructor dashboard and click on save.
- Choose your own colors by making use of the custom preset and then setting the colors for the different sections and elements on the instructor dashboard.
Screenshot for Custom Preset options
Features: Commission Logs
Commission logs help you as an admin keep track of the payments you have made to your instructors. Along with recording the logs you can also edit, delete and export the commission logs.
How Commission Logs are recorded
An important note first, the commission logs are only recorded and the below actions are only performed on manual commission recorded. Once an admin records a manual commission payment , the payouts transaction history table at the bottom will record the commission payment log in the manual tab.

Now, you can also add notes while recording a commission payment.

The admin will be able to see the notes along with the other details in the manual payouts logs table.
Edit Commission Logs
The admin can edit an existing commission log entry by clicking on the pencil icon in the actions column against the commission log. This will open a modal where you can edit the date, amount and notes for that specific commission log. Following are the restrictions when adding/editing a commission log:
- The amount cannot be more than what the instructor is owed.
- The note length cannot exceed a character limit of 255 characters.
- You cannot choose any future dates.

After updating the fields click on Submit to update the commission log.
Delete Commission Logs
To delete a commission log entry click on the cross mark in the actions column against the commission log. This will open a confirm box. To confirm the deletion of the commission log click on OK or click on Cancel to cancel it.
Navigation Settings
After various updates, we have added a bunch of settings in the Instructor Role Menu that make navigating around the plugin pages easier for both the admin and the Instructor.So, we request you to go through this article below and address the changes the plugin has to offer and how it can benefit each and every one of you.
The URLs to access
-
Instructor Dashboard: {SITE_URL}/instructor/wp-admin/admin.php?page=ir_instructor_overview
Example: https://instructorrole.wisdmlabs.com/wp-admin/admin.php?page=ir_instructor_overview
-
Instructor Profile: {SITE_URL}/instructor/{user_display_name}
Example: https://instructorrole.wisdmlabs.com/instructor/emma/
Instructor Dashboard Menu
The Instructor Dashboard Menu can be set up from here. After the plugin is installed for the first time, the Instructor Role plugin, the Instructor Dashboard Menu, and the Primary Menu of the site will be synchronized and the Instructors will see the Primary Menu of your site on the Instructor Dashboard. This synchronization will take place for the themes listed below:
- Kadence
- BuddyBoss Theme
- Twentwentyone
- Twentytwenty
Instructor Login Redirect
The administrator may now choose where the instructor will land after logging in successfully.
This Setting allows the Admin to select any page on the site where the Instructor will be redirected post login.When the plugin is first activated and installed, this setting is “checked” on by default and it will redirect the Instructors automatically to the Dashboard by default.And, If you are handling redirections from another third-party plugin or want the default WordPress login behavior to be followed, you can simply disable the Setting from ‘LearnDash LMS’ > ‘Instructor’ > ‘Settings’ > ‘Instructor Login Redirect’.
Add the Instructor dashboard link to the primary menu
The above image also displays a Setting, “Add the Instructor Dashboard Link to the Header Menu”.This will display the “Instructor Dashboard” link on the Primary Header Menu of your site and will be visible only to your Instructors.
The following themes that support this feature are:
- Kadence
- BuddyBoss Theme
- Twentwentyone
- Twentwenty
- eLumine
The Admin can also Preview the Instructor’s Dashboards and Profiles right from the WordPress Dashboard. Navigate to ‘LearnDash LMS’ > ‘Instructor’ > Instructors Tab and for each Instructor, you will see the 2 links
- View Instructor’s Profile: This will open the respective Instructor’s Profile in a new tab. So, make sure you switch on the ‘Instructor Profile’ Setting from the Profile Tab in the same area to make sure the admin can easily preview the Instructor’s Profile.
-
View Instructor’s Dashboard: This will allow Admin to temporarily log in as the Instructor and you can then visit the respective Instructor’s Dashboard to preview it and check how things are set up.
The Admin can also switch back by clicking on the “Switch to Admin” Link while on the Instructor Dashboard as shown below.
Profile links
The link to the Profile Page of an Instructor is displayed in multiple locations that makes it convenient for both the admin and Instructor to visit the Profile Page.
As an Admin:
The admin can also view the profile of an Instructor from the Edit User Page under ‘Users’ > ‘All Users’ > ‘Edit User’ (for a user who is an Instructor) on the WordPress dashboard and as shown below the admin can visit both – the dashboard and profile’ of that respective Instructor.
As an Instructor
The Instructors on your site can also visit their own Profile by clicking on on the “Profile Tab” on their Instructor Dashboard and link to View their own Profile will be displayed there as shown below.
Overview settings
- Course block
- Student block
- Products block
- Earnings block
- Course Reports block
- Submissions block
All Block Hidden Message settings
What we see below is the default message that is shown when all the blocks are disabled. We provide functionality to edit this default message

Reset settings
The default behaviour permits all overview blocks to be active/on, and the default dashboard input message is empty (‘no content to display’ in the overview settings).
Default settings

The Frontend Course Creator
The Frontend Course Creator allows the Administrators and Instructors to create and edit a LearnDash course on the frontend of the website.
Activating Frontend Course Creator (FCC)
- Admin can activate/deactivate FCC from WP dashboard → LearnDash LMS → Instructors → Frontend Course Creator
- Frontend Course Creator Setting Tab

Important: In order for the Frontend Course Creator to function, your permalink structure must be set to pretty permalinks (i.e anything except plain permalink structure), and you must save the permalink settings again after enabling the Frontend Course Creator.
Settings
Enable Frontend Course Creator

Enabling this setting will add an “Edit via Frontend Course Creator” option in the course edit menu (Image below) and add a button “Add new via Frontend Course Creator” beside the LearnDash’s Add New button

Disable LearnDash’s Backend Course Creator for Instructors

- Enabling this setting will Remove the Edit and Add New option for the default LearnDash Course Builder and Rename the Frontend Course Creator actions as Edit and Add New
- This setting will appear and be enabled by default when the primary setting (Enable Frontend Course Creator) is enabled.
Appearance Settings

- The Sync Button is a powerful new feature in our product that allows you to synchronize your frontend dashboard’s color themes, font size, and font family with the Frontend Course Creator (FCC) color theme.
- This feature ensures a consistent look and feel for your dashboard, and if enabled, it will automatically apply the synchronization whenever the frontend dashboard is updated or you save your settings on the Frontend Course Creator Setting’s page.
- When the Sync Button is turned ON, any Color or Font updates made to your Frontend dashboard will trigger automatic synchronization with the Frontend Course Creator’s color theme, font size, and font family. This ensures that your dashboard’s color theme remains compliant with Frontend Course Creator without manual changing it.
- This setting will appear and be enabled by default when the primary setting (Enable Frontend Course Creator) is enabled.
Accessing the Frontend Course Creator
As per the above-configured settings, the Instructors /Admins can create/edit a course from
- The instructor can go to the Instructor Dashboard → Courses → Edit Via Frontend Builder / Add new via Frontend Builder
- The administrator can go to WP Dashboard → Course →Edit Via Frontend Builder / Add new via Frontend Builder
Using the Frontend Course Creator
Create a Course

- You can create a new course by clicking the Add new via Frontend Course Creator Button
- This will make a draft course and take you to the frontend course creator to add all the content and configure the settings to create the course.
-
Frontend Course Creator is now Elementor Compatible,
that allows administrators and instructors to access the Elementor editor directly from the frontend of your course creation platform. This feature provides a seamless and user-friendly way to create, edit, and manage course content while limiting backend access and still providing full Elementor support.
Edit a Course

To edit a course using the Frontend Course Creator you can click the Edit via Frontend Course Creator Link by hovering over the course title on the course listing page.
The Frontend Builder
The Frontend Builder allows
- Organizing the course structure
- Adding new lessons and topics or using existing lessons and topics to create a course
- Adding existing quizzes to the course.
- Note: Currently, new quizzes cannot be created directly from the frontend course creator. You will have to create a course using LearnDash’s backend Quiz builder and add those later in the course from here
Organizing the course structure

Adding and Editing Lessons/Topics

Editing existing lessons and topics

Course Settings
All the LearnDash course settings for configuring a course are available in the Frontend Course Creator. To know more about the setting refer here

Limitations
All the following limitations will be resolved in the upcoming release soon!
- New quizzes and questions cannot be created directly from the frontend course creator, only existing quizzes can be added to the course via the frontend course creator. You will have to first create a Quiz from Learndash’s Quiz builder to add it to the course via the frontend course creator
- For Courses, Lessons, and Topics new categories and tags cannot be directly created by the frontend course creator. You can create the course tags and categories from the Courses listing page > Actions
- Multiple Instructors: If the admin is not the course author then they cannot assign multiple instructors for the course via the frontend course creator, only the course authors – be it an admin or the instructor who create the course – will be able to do it.
The Frontend Quiz Creator
The Frontend Quiz Creator allows the Administrators and Instructors to create and edit LearnDash quizzes on the frontend of the website.
Activating Frontend Quiz Creator
- The Frontend Quiz Creator depends on the Frontend Course Creation (FCC) setting.
- Admin can activate/deactivate FCC from WP dashboard → LearnDash LMS → Instructors → Frontend Course Creator

Important: In order for the Frontend Course and Quiz Creator to function, your permalink structure must be set to pretty permalinks (i.e anything except plain permalink structure), and you must save the permalink settings again after enabling the Frontend Course Creator.
- In case you already had the Frontend Course Creator settings enabled, you may still have to save your permalinks again after the Frontend Quiz Creator update.
Settings
Enable Frontend Course Creator

Enabling this setting will add an “Edit via Frontend Quiz Creator” option in the quiz edit menu (Image below) and add a button “Add new via Frontend Quiz Creator” beside LearnDash’s Add New button

Accessing the Frontend Quiz Creator
As per the above-configured settings, the Instructors /Admins can create/edit a quiz
- From the Quiz Listing page
- The instructor can go to the Instructor Dashboard → Quizzes → Edit Via Frontend Quiz Creator / Add new via Frontend Quiz Creator
- The administrator can go to WP Dashboard → Quizzes →Edit Via Frontend Quiz Creator / Add new via Frontend Quiz Creator
- From the Frontend Course Creator while creating/editing a course
- Go to the builder tab in the Course creator and click on Add New Quiz or edit existing quizzes added to the course content
Using the Frontend Quiz Creator
Create a Quiz

- To create a new quiz click on the Add new via Frontend Quiz Creator Button on the Quizzes listing page
- This will make a draft quiz and take you to the frontend quiz creator to add all the content and configure the settings to create the quiz.
- As shown below you can also create a new quiz from the Frontend Course Creator while creating/editing a course by clicking on the Add New Quiz Button

- On clicking the button, a new modal will open to enter the name of the Quiz.

-
After clicking on Add, a new quiz will be added to the builder, and the frontend Quiz Creator will open in a new tab
to edit the new quiz.
Edit a Quiz

To edit a quiz using the Frontend Quiz Creator you can click the Edit via Frontend Quiz Creator Link by hovering over the quiz title on the quiz listing page.
Quiz Builder
The quiz builder allows
- Organizing the quiz questions
- Adding new questions or using existing questions to create a quiz
Note: Currently, Single choice,Multiplechoice, Fill in the blank, Assessment (survey), and Essay (open-answer) question types can be created and edited from the Frontend Quiz Builder. All other types of existing questions can be added via the Question library but such questions cannot be created/edited via the Frontend quiz creator as of now. In the upcoming releases support for all question types will be added soon
Organizing the Quiz questions

You can manage questions from the Quiz Builder Tab and perform the following actions
Create New Question or Edit the Question


- You can create a new question by clicking on Add New Question button.
- A modal opens up to configure the Question and Answer settings.
Frontend Dashboard: Installation Guide
The frontend dashboard is a newly launched dashboard for Instructors and Admins to access LearnDash and other functionalities in our plugin from the frontend of the site without the need of providing instructors any backend access. This dashboard serves as an alternative to the current Instructor dashboard which is a simplified and access restricted version of the WP Dashboard in the backend
The frontend dashboard is Gutenberg block based dashboard that comes with a powerful dashboard builder block making it fully customizable and extendable. Don’t worry even if you have disabled the Gutenberg Editor you can still use our global settings (link to the global settings in this doc) to customize the frontend dashboard. The frontend Dashboard comes with four tabs:
- Overview – A quick snapshot of your Courses and Learners and their submissions
- Courses – A courses listing through which you can create a new course or edit a course using our Frontend Course Creator
- Quizzes – A quizzes listing through which you can create new Quizzes or edit new quizzes using our Frontend Course Creator
- Products – A products tab for instructors and administrators gives a fresh tab view for their WooCommerce products.
- Commissions – A Commission tab for Instructor gives a detailed view of the instructor commissions and payout logs.
- Assignments: The Assignments Block provides a unique and simpler view for your assignment submissions to help you manage them with ease.
- Essays: The Essays Block provides a unique and simpler view for your student essay submissions to help the admin and instructor manage essay submissions better.
- Comments – The Comments block allows users to efficiently manage and navigate comments across courses, lessons, topics, quizzes, essays, and assignments.
-
Quiz Attempts – The Quiz Attempts block allows user to
( instructors or administrators) easily access and review all student quiz attempts directly.
- Settings – A settings tab for instructors to configure their profile info and Paypal info for payouts
All the other LearnDash and Instructor Role functionalities for Instructors are coming soon to the frontend dashboard. Currently, the frontend dashboard seems like a best option – instead of the Backend(WP) Instructor dashboard. Let’s see below how you can configure and setup a frontend dashboard for the instructors and admin
Configuring the Frontend Dashboard using Onboarding Wizard
Let’s get started with the installation process after you have installed or updated your Instructor Role for LearnDash plugin
1. Welcome Screen
Upon installation or updating the plugin, you will be greeted with dashboard onboarding pop-up to set up your frontend dashboard. Click on the “Configure” button to proceed.

Even if you close the welcome pop-up, you can configure Frontend Dashboard by going to LearnDash LMS > Instructors > Frontend Dashboard

2. Frontend Dashboard Configuration
You will be directed to the Frontend Dashboard Configuration page.

Here, you can configure various settings related to the Frontend Dashboard, including:
- Enabling Frontend Course and Quiz Creation – This will allow the instructors and admin use the Frontend Course Creator and Quiz creator via the frontend dashboard. If this is disabled the Instructors and Admins won’t be able to create/edit courses and quizzes from the frontend
- Adding a link to the frontend dashboard in the primary menu for instructors – A link titled “Instructor Dashboard” will be added to the header of your site. It will redirect users to the frontend dashboard if the Backend (WP) Instructor Dashboard (refer below) is disabled, or else it will redirect the users to the Backend (WP) Instructor Dashboard
- Setting up a redirect to the frontend dashboard upon login – Seamlessly guide instructors to their frontend dashboard upon login, eliminating the need for backend access and ensuring a focused and user-friendly experience
- Disabling the Backend (WP) Instructor Dashboard – This will completely restrict the access of the Instructors to the backend of your site. The Instructor will not be able to access their Backend (WP) Instructor dashboard and will be redirected to the homepage of the site if they tried to access their backend dashboard at www.your-site-name .com/wp-admin.
Don’t worry even if you want to change any of these settings later, you can do so by going to the General setting tab or the Frontend Course Creator tab under LearnDash LMS > Instructors > General Settings
Take your time to configure these settings according to your preferences. Once you’re done, click on the “Create Dashboard” button to create a new page for the frontend dashboard. A new page will be created automatically and saved in your draft.
3. Customize Frontend Dashboard and publish the page
You will be taken to the next step depending on the whether Gutenberg editor is disabled on your site.
If you have not disabled Gutenberg editor on your site then you can take advantage of the powerful page builder to edit the dashboard page along with accessing all the customization settings provided with our frontend dashboard
Once you click on “Create Dashboard”, you will be directed to the new dashboard edit page. Here, you will find a default preset Frontend Dashboard Gutenberg Blocks pattern already added to the page

Feel free to customize the frontend dashboard Gutenberg blocks (Refer here to learn about how to Customize the dashboard in detail) as per your requirements. Below is a quick overview of different customization settings

- The Frontend Dashboard is made of Gutenberg blocks. It consist of a dashboard builder block called “Dashbaord Tabs” which creates the dashboard layout and all other instructor dashboard tabs in it are made of a Gutenberg block each
- Rearrange the tabs as required, create as many custom tabs as needed to share relevant content or provide access to any functionalities to the instructors
- To change the appearance, explore the typography and color settings under the “Dashboard Tabs” block settings . Choose from a selection of fonts, color preset or create a custom color pattern to achieve your desired look.
- Go to the Instructors overview tab block and hide any of the section not relevant for your needs
- Set the Page template. By default “Dashboard” template is selected which is specially designed for a dashboard page. But you can choose any other page template provided in your theme
Once you’re satisfied with the changes, click on the “Publish” button to make the frontend dashboard live.
That’s it! After publishing, you will be automatically redirected to your newly created frontend dashboard page. From here, instructors can easily manage their courses and quizzes, providing a seamless and user-friendly experience.
If for some reason your have disabled the Gutenberg Editor you can still customize the dashboard using the Global settings provided here – LearnDash LMS > Instructors > Frontend Dashboard
Global Settings
The global settings are designed for sites that do not utilize the Gutenberg block editor, such as those still using the Classic Editor or add-ons to disable the block editor. By default, the global settings are disabled if your site has Gutenberg Editor enabled.

If you have Gutenberg editor disabled on your site, then you can access the Global settings to customize the Dashboard.
With the Menu settings you can hide any tab on the dashboard thereby restricting instructors access

With Overview page settings, you can hide any of the section on the overview page of the dashboard

With appearance settings, you can style the dashboard by selecting from the provided color presets or creating your own custom color palette for the dashboard. You can also set the font and font size for the dashboard

Note: When using global settings, these settings are only applied to the page set as the frontend dashboard page in the Frontend Dashboard Page setting.

Deleting the Frontend Dashboard Page
You can find the frontend dashboard page created via the above onboard wizard by going to the WP Dashboard > Pages > Instructor Dashboard. You can delete / edit the page from here

Creating a new Frontend Dashboard page
If you have for some reason deleted the page that was created with the onboarding wizard when you activated or updated the plugin and you want to create a new dashboard page, follow the steps below:
To create a new dashboard page you can the following options
Quick Link: Create a new dashboard page
You can find the quick setup wizard to create a new dashboard page at WP Admin dashboard > LearnDash LMS > Instructors> Frontend dashboard. Click on the link “Create a new Dashboard page”. It will automatically create a new page with the frontend dashboard configured in it and you will be redirected to the page in the edit mode
Along with creating this new page, it will be automatically set as the default Frontend Dashboard page for Instructors and Admin. This is pagewhere all the redirection and global customization settings(if Gutenberg editor is disabled) available in the plugin are applied to.
If you have created multiple dashboard pages and wish to keep other dashboard page as default, then select the preferred page in the select frontend dashboard page dropdown. Don’t forget to click on ”Save settings” after all changes are done
Create the Frontend Dashboard page from scratch using Gutenberg Editor
Let’s see how you can create a new dashboard page without using the quick setup wizard discussed above.
Create a new page
- Go to WP Dashboard > Pages
- Click on a add new to create a new page
Add Frontend Dashboard pattern
Once you are on the page editing area, click on the “+” in the top right and go to patterns. You will find the Frontend Dashboard pattern under the Instructor Role category. Click on the pattern it will get added to the page

Add Instructor Dashboard Blocks Individually
If you prefer to add the Instructor Dashboard Blocks individually instead of using the dashboard pattern mentioned above, follow the steps below
1.Dashboard Builder block
Click on the “+” icon on the top right corner and search for Dashbaord Tabs block and add it to the page. This block helps you build any kind of dashboard.
2.Create Dashboard Tab:
Once you have added the Dashboard tabs block, click on the “+” icon in the block to create dashboard tabs. Give a name to the tab and and select a icon for it.
3. Add Instructor Blocks:
Once you have create a dashboard tab, you can add any kind of content / Gutenberg blocks to it. To create our Instructor dashboard let’s add the Instructor Overview block to the overivew tab we created earlier. Similarly, you can add all other tabs and add the relevant instructor dashboard blocks
Set as default Instructor Frontend Dashboard
Once you have configured the dashboard click on “publish” to make the page live. Now you need to set this page as your default frontend dashboard for instructors and admin if you want all the redirection settings available in the plugin are applied to it. Navigate to WP Admin dashboard > LearnDash LMS > Instructors> Frontend dashboard.
In the select frontend dashboard page choose the page you have created the dashboard on and click on save settings below

Congratulations! You have successfully installed and set up the Frontend Dashboard plugin. Enjoy the convenience and efficiency of managing your courses and learners directly from the frontend of your website. If you have any further questions or need assistance, please refer to our other documentation or reach out to our support team for help. Happy teaching!
Frontend Dashboard for Instructors: Gutenberg Blocks List
The Frontend Dashboard for Instructors and admin is made up of Gutenberg block making the dashboard fully customizable or extendable. These blocks can be used individually or in combination to create a seamless frontend dashboard for managing courses with ease.
Dashboard Tabs
The Dashboard Tabs block is essentially a versatile dashboard builder that allows you to create custom dashboards for any of your needs or for any kind of users, not just a Frontend Instructors Dashboard. With this block, you can create any kind of dashboard by adding add tabs to your page and add any blocks under each tab. These tabs act as intuitive sections, allowing you to categorize and present information in a structured manner.
How it Works:
Add Tabs: Using the Dashboard Tabs block, you can create tabs that act as headers for different content sections. Each tab title and icon can be customized to suit your needs.
Add Primary action button: You can add a primary action button at the top of the dashboard sidebar tabs menu. By default this button is configured for creating a new course. You can customize this button by changing the button text and button URL.

Add content /blocks / Shortcodes: Under each tab you can add and arrange any kind of available blocks. Add blocks such as text, images, videos or provide instructors access to any functionality by adding the relevant blocks or short code. This ensures that related information is neatly grouped together for a seamless reading experience.
Easy Sorting: The tab titles can be easily sorted and rearranged to suit your preferred order, providing flexibility in how you organize your content. Click the tabs to enable rearrange as shown in the picture

Dashboard page template: When visitors access your page, they will find the tab titles neatly aligned on the left side, while the corresponding content appears on the right-hand side. This user-friendly layout enhances the overall readability of your page.
You can choose between different layouts by changing the page template. By default, the page template selected is the Dashboard template. You can choose any other template provided by your theme also.
Customize the look and feel
Under the Dashboard Tabs Block settings you will find the color and font setting to customize the look and feel of your dashboard
Instructor Overview for LearnDash
The Instructor Overview for LearnDash block brings the instructor overview page directly to the frontend. This block offers a range of valuable features, including:
- Counts of active courses, enrolled students, assignments or essay submissions, and quiz attempts.
- A list of top courses based on the number of enrolled students.
- Earnings report to track commissions.
- Course progess reports presented as a pie chart, showcasing student progress categorized as not started, in progress, or completed.
- Latest assignment and essay submissions made by students for easy access and review.
Courses for LearnDash

The Courses for LearnDash block enables instructors and administrators to display a dynamic LearnDash course listing page with various features, including:
- Keyword search to filter courses based on specific terms.
- Filters for course status, allowing Instructors to view courses under pending review or shared courses.
- Advanced filters based on date, price types, course categories, and tags.
- The ability to create new courses using the New Course button.
- Trash courses individually or in bulk for efficient management.
Quizzes for LearnDash
The Quizzes for LearnDash block offers a dynamic LearnDash quiz listing page that simplifies quiz management for instructors and administrators. Key features include:
- Keyword search to filter quizzes based on specific terms.
- Filters based on Quiz status for easy organization.
- Advanced filters to narrow down quizzes based on date, course, lesson, topic, quiz categories, and tags.
- The option to create new quizzes using the New Quiz button.
- Efficiently trash quizzes individually or in bulk.
Instructor Settings for LearnDash

The Settings for LearnDash block provides instructors with a dedicated section to configure common user settings. This includes managing profile details, setting up PayPal payouts email, and managing passwords.
With the Frontend Dashboard Gutenberg blocks, instructors can effortlessly navigate and manage their courses directly from the frontend, enhancing their teaching experience and streamlining their workflows.
Products For LearnDash

The Products for Instructor Block provides instructors and administrators a new tab view for their Woocommerce Products on the Frontend Dashboard.

Instructors and Administrators can create new products and/or edit existing products using the products creation and edit screens supported by Gutenberg block.

Note: Products created from the Products for Instructors block will be of Course product type.
Commissions For LearnDash

The Commission for Instructor Block gives a detailed view of the instructor commissions and payout logs.


Instructors and Administrators can view the earnings graph, commission orders table and Payout Transaction History table related to the instructor commissions.

Administrators can use the block to view different instructor commission earnings, make manual/PayPal payouts and update manual payout logs.
Assignments For LearnDash

The Assignments for LearnDash provides a different and simpler way to view the various lessons and topics assignment submissions to the admin and instructors.
The first screen shows a list all the lessons and topics related to submitted assignments which makes it easier to view submissions related to specific lessons or topics.
You can also find related course information as well as sort everything by the latest or not graded submissions first.

On the next screen you get a list of all user submissions made for that specific lesson or topic.
Filter submissions by student name, dates and even by the assignment approval status.
Perform quick actions such as scoring, grading and downloading assignments.
Find relevant topic, lesson and course information for each submission which is very helpful when the shared step settings are enabled.

On the final screen view all the single assignment details along with the scoring, grading and options to download.
View comments for that assignment along with other comment actions.
Essays For LearnDash

The Essays for LearnDash provides a different and simpler way to view all the student quiz Essay submissions for the admin and instructors.
The first screen shows a list all the essay questions related to submitted essays which makes it easier to view submissions related to specific essay question.
You can find related quiz information as well as sort everything by the latest or not graded submissions first.

On the next screen you get a list of all user submissions made for that specific essay question.
Filter the submissions by student name, dates and by whether the essay is graded or not.
Perform quick actions such as scoring, grading and downloading essays if there are attachments.
Find relevant quiz and course information for each submission which is very helpful when the shared step settings are enabled.
Comments For Learndash
The Comments Screen is a powerful addition designed to enhance the user experience for administrators and instructors. This feature allows users to efficiently manage and navigate comments across courses, lessons, topics, quizzes, essays, and assignments.

On the main screen, administrators and instructors can filter comments using two primary criteria:
- Filter by Course: Users can select a specific course to view comments associated with that course only.
- Filter by Date: Users can filter comments based on the date they were posted.
At the top of the screen, there are dedicated tabs for spam and trash comments, allowing users to easily access and manage comments flagged as spam or those in the trash.
For each comment listed on the main screen, users can perform various actions:
- Reply: Engage in conversation with users by replying to comments.
- Edit: Modify the content of a comment to correct errors or improve clarity.
- Trash: Move a comment to the trash for temporary removal.
- Spam: Mark a comment as spam.
- Unapprove: Temporarily hide a comment from public view until approved.

When clicking on a specific comment, users are directed to a detailed view. This view provides comprehensive information about the comment and additional features.
If the comment is associated with a course, a hierarchical tree is displayed. This tree visually represents the steps or components of the associated course, allowing users to navigate through the content efficiently.

Quiz Attempts For Learndash
Introducing the Quiz Attempts Block to Instructor Role Frontend Dashboard. With this new feature, instructors (or administrators) can easily access and review all student quiz attempts directly. You can filter based on Groups, Courses, Quizzes, or Students, and also refine the results by selecting the desired duration (Ex: Last 7 days, Last 30 days).

Upon choosing a quiz, you’ll not only access detailed user quiz attempts but also review an overview of the quiz, including collective performance insights of all your students attempting that specific quiz.


In the image above, you can observe the points earned, learner’s percentage score, the number of attempts made by the user, and their pass/fail status.
You can also sort the results by the date of attempt or by high/low scores. Additionally, you have the option to view only the latest attempt or all attempts by the user. Lastly, you can choose to show or hide anonymous quiz attempts. Clicking on the download icon will download the details of the entire quiz attempt in CSV format.
Selecting the arrow icon directs you to a screen displaying the quiz profile information, summarized data for that attempt, and specific details of each answered question by the user.

Course Reports For LearnDash
Using this new feature, administrators and instructors can view course progress reports for all their courses as well as detailed learner specific reports.

Course Reports
Each course report offers an overview and a learners section.
The overview section gives a high level overview of users enrolled in the course ( either directly or through groups ), course content counts, average course progress information as well as a chart to give a represent the progress of all the students in the course.
The learners section provides detailed information about all the learners enrolled in the course in a table view.
There are also additional options to sort the learners and filter them based on their progress in the course and a date range. One can also filter the data by clicking on the different data tiles in the overview chart section.
Learner Reports

The learner reports provides a complete view of all the courses the learner is enrolled in with their progress. It is divided into the learner progress and course list section.
The learner progress view gives a high level overview of the number of courses the learner is enrolled in along with their latest activity. It also provides a chart to represent the progress of the learner in all the different courses they have enrolled in.
The course list section gives detailed information about the courses the learner is enrolled in as well as their progress along with additional information related to the course.
There are also additional sorting and filtering options to filter the course list based on progress and status of the selected learner in the course.
Groups For LearnDash
Using this new feature, administrators and instructors can view and manage Learndash groups from the frontend dashboard.

Group Creation and Editing
Administrators and instructors can create new groups using our the simple quick setup group creation screen.

Editing the groups is also easier using the edit group screens.

Groups Dashboard
The Groups Dashboard provides an in-depth view of all the users and courses in the group and more.
To access the groups dashboard screen, the admin or instructor user can either click on the view dashboard icon on either the group listing screen or the group edit screen.


The group dashboard provides information related to the courses, users and an overview of the entire group.
Overview

The overview section provides information on the course and user statistics as well as the progress of the users in the group.
The overview section also provides group progress and results export features.
Courses

The group course list section gives an overview of all the courses added to the group and the course progress of users in that specific course.
Admins and instructors can also manage the group courses using the manage button.
Learners

The group learners section displays a list of all the users in the group along with their course progress in different courses of the group.
Admins and instructors can also filter course progress to a specific course using the courses filter.
On opening learner accordion to view the different course progress for a learner, the administrator and instructor can edit the course progress for that specific learner by clicking on the details link.
Course Progress
On clicking the details link for a specific learner course, the course progress screen is displayed.

Administrator and instructor can update the user course progress for that user from this screen using the mark complete and not complete links for the different steps in the course.

They can also view quiz attempts for that user by clicking on the view quiz attempt button.

Certificates For LearnDash

Using this new feature, administrators and instructors can view and manage Learndash certificates from the frontend dashboard.
The listing page offers quick view to see the number of groups, courses and quizzes the certificate is associated with along with additional filters to filter the certificates as per their status and date.
Certificate Builder Integration

The block also integrates with the LearnDash certificate builder addon allowing instructors and admins to edit their certificates using the certificate builder.
How to Customize the Frontend Dashboard (Gutenberg Editor and Global settings)
The Frontend Dashboard plugin offers a range of simplified settings to help you tailor the dashboard according to your preferences. Let’s dive in and explore how you can make the frontend dashboard truly your own.
Frontend dashboard can be customized through Gutenberg editor, even if the Gutenberg editor is disabled then you can customize the dashboard via global settings, as explained below.
Customize the Frontend Dashboard via Gutenberg Editor
Since the Frontend Dashboard is made up of Gutenberg blocks you have all flexibility and power of the Gutenberg block editor to customize the frontend dashboard page.
The dashboard blocks for instructors consists of a powerful dashboard builder block through which all the content is arranged in dashboard tabs. This block also comes up with settings to style your dashboard as per your need.
In addition to the Dashboard blocks, you can include other content in the dashboard using Gutenberg blocks. This allows you to provide instructors with relevant information to enhance their user experience and productivity on the site. For example, you can create how to guides, dashboard header/ footer banner to keep important information in focus, etc. Furthermore, you have the option to extent the dashboard’s functionality by granting instructors access to various features through Gutenberg blocks or shortcodes.
Page Template Settings
Page template settings help you configure the page layout for the frontend dashboard page.

How to configure the page template
- Access the Settings Sidebar: In the Page Settings sidebar on the right-hand side of the page editor, locate the Template section.
- The Dashboard Template: The Dashboard template designed specially for a full width dashboard layout will be set as the default choice. However, if needed, you can easily change the template selection using the available options.
- Select other Templates : Instead of using the Dashboard template you can use your theme’s templates by selecting the relevant one. The Frontend Dashboard is compatible with all the themes specifically with BuddyBoss, eLumine, Astra and Kadence theme used commonly for creating a LearnDash based eLearning site
Dashboard Tab Settings
The Dashboard Tabs block enables you to add / remove / arrange tabs on your dashboard as needed. You can design the content for each tab using any blocks available in your block editor.
Whether it’s adding text, images, videos, or providing instructors access to specific functionalities through blocks or shortcodes, the possibilities are endless. Additionally, you have the option to choose an icon for your dashboard tab to add a visual touch.


Add content above or below the dashboard block
In addition to the adding content in the dashbaord tabs you can add blocks available above and below the dashboard block to further enrich your frontend dashboard.
For instance, if you wish to add a footer below the dashboard block, simply click the Plus sign in the bottom right corner of the block. Then, design the content by selecting relevant block from the list of available blocks
Typography and Color Settings
Font Settings:
- To access Font Settings, select the Dashboard Tabs Block on your frontend dashboard.
- Within the block, you’ll find a range of typography settings available for customization.
- By default the theme font is applied to the dashboard. You can choose other font from the options provided
- Manage the font size to achieve the desired look and feel, ranging from small to large font sizes presets.
Color Settings:
- Within the Dashboard Tabs Block, you’ll also have access to extensive color scheme options for further customization.
- Select from five predefined preset color palettes, each thoughtfully designed to complement various design preferences.
- If you’re seeking a more tailored approach, you can create a custom color palette, allowing you to use colors that perfectly match your brand’s aesthetics.
- Customize the visual appeal of your frontend dashboard by choosing the color scheme that best represents your brand.

Page Speed Settings

- The Page Speed settings is an advanced setting for the frontend dashboard.
- It provides a One-Time Asset Loading feature toggle which when enabled gives the best experience to the user in terms of page load time and performance.
- This feature is only compatible with a dashboard created only using our Blocks.
Primary CTA option
On the left sidebar of the dashboard, you have an option to add a prominent button at the top of the tabs menu. This button serves as a quick way for instructors to perform important and frequent actions.
By default, the button is set as the “Create New Course” button, which can be confirmed by enabling the “Use this button to create a new course” checkbox. However, it can be customized to suit specific requirements by changing its title and URL in the block settings.


Instructor Overview block settings

The Instructor Overview block provides a list of settings to control the visibility of sections on the overview page. By toggling the different counter and card display settings, you can choose which sections are visible to instructors on the frontend overview dashboard page.
Global Settings
The global settings are designed for sites that do not utilize the Gutenberg block editor, such as those still using the Classic Editor or add-ons to disable the block editor. By default, the global settings are disabled if your site has Gutenberg Editor enabled.
Important Note: When using global settings, please refrain from directly editing or updating the dashboard page from the edit page screen. Instead, use the provided global settings to make any updates to the frontend dashboard page.
Frontend Dashboard Page Settings
When using global settings, all the different settings are applied to the page configured in the Frontend Dashboard Page setting. You can also create a new frontend dashboard page by clicking on the “Create a New Dashboard Page” link. This will update the selected frontend dashboard page to the newly created one.

Menu Settings
The menu settings allow you to enable or disable the different tabs and its content displayed on the frontend dashboard. If a tab is disabled, then it would be removed from the frontend dashboard and the instructors won’t have any access to the content or the functionality available in that respective tab page. By default, all tabs are enabled, but you have the flexibility to hide specific tabs by disabling the corresponding toggle and saving the settings.

Overview Page Settings
The overview page settings enable you to enable or disable the counters and card sections displayed on the frontend dashboard’s overview page. By toggling the specific setting toggles, you can control which counters or card sections are visible to instructors.

Appearance Settings
The appearance settings provide options to modify the color and typography settings used on the frontend dashboard. Similar to the Gutenberg editor settings, you have access to predefined preset color palettes and a custom color palette to personalize the colors used on your frontend dashboard.
The font setting offers a selection of fonts for your frontend instructor dashboard. The font size setting allows you to manage the font size, ranging from small to larger, to suit your preferences.


With these powerful customization options, you can truly make the frontend dashboard your own, aligning it with your unique brand identity and preferences. Enjoy the flexibility to create a customized and visually appealing frontend dashboard for an enhanced user experience.
Recreating the Frontend Dashboard
If the frontend dashboard has been accidentally deleted, you can easily recreate it by referring to the frontend dashboard installation documentation.
How to disable the Backend dashboard(WP) for Instructors
The instructor dashboard serves as a dedicated space exclusively designed for instructors on your website. Before introducing the Frontend Dashboard for Instructors, the Instructor dashboard was simply the WP admin dashboard that was simplified and modified to provide a dedicated space for Instructors on your website.
Normally, this Instructor dashboard was accessible in the same way as the default WordPress Admin area at www.your-site-name/wp.admin (may vary based on your site settings and plugins).

Now, with the introduction of the Frontend Dashboard, you may not need the Backend Instructor Dashboard if the current Frontend Dashboard functionalities (Frontend Dashboard installation guide) completely satisfy your needs.
Follow the steps below to disable the backend dashboard (WP) for Instructors and completely restrict Instructor access to the /wp-admin/ area.
Disabling Backend Access:
Starting from Instructor Role v5.0.0, a new setting has been introduced under the general settings tab called “Disable Backend (WP) Dashboard.” Enabling this setting will effectively disable access to the Instructor Dashboard located in the WordPress administrative area (www.your-site-name.com/wp-admin)
1.As a admin go to WP Dashboard > LearnDash LMS > Instructors > General Settings
2. Select the check box that says “Disable Backend (WP) Dashboard” as shown in the below image.

When an instructor attempts to access the default Instructor Dashboard in the WordPress administrative area, they will automatically be redirected to the frontend of the website. This ensures a smooth transition and provides a seamless experience for instructors.
Instructor Dashboard Link:
If your site has the “Instructor Dashboard Link” setting enabled along with the “Disable Backend Dashboard” option, the Instructor Dashboard menu added to your site’s primary menu will direct users to the frontend dashboard page instead of the default Backend Instructor Dashboard.

By utilizing the “Disable Backend Dashboard” setting, you can effortlessly control instructor access and seamlessly guide them to the frontend dashboard. This user-friendly setup ensures a secure and convenient experience for instructors, streamlining their workflow and promoting efficient course management.
Introducing Frontend Dashboard
Presenting the Frontend Dashboard, exclusively designed for Instructors and Admins! Now your instructors and admin will be able to access LearnDash and other Instructor Role plugin features right from the frontend of your website. Instead of using our access restricted backend(WP) Instructors dashboard – embrace the complete frontend experience.
With a visually appealing interface and an intuitive user experience, the Frontend Dashboard ensures high security and boosts instructors’ productivity. The frontend dashboard is fully customizable and extendable so that you can tailor it to deliver an exceptional Instructor experience that fits your business needs perfectly. Say hello to simplified course management and unlock a world of possibilities!
Frontend Dashboard

The new frontend dashboard is a Gutenberg block-based dashboard that comes with a powerful dashboard builder block making it fully customizable and extendable. Don’t worry even if you have disabled the Gutenberg Editor you can still use our global settings to customize the frontend dashboard.
At present, the frontend dashboard offers eight primary tabs and other remaining Instructor functionalities available in the Instructor role plugin are coming very soon to the frontend dashboard
Instructor Frontend Dashboard Tabs

Overview: Get a comprehensive view of your Courses and Learners, along with their submissions, all at a glance.

Courses: Explore a user-friendly listing of courses and utilize our Frontend Course Creator to effortlessly create or edit courses.

Quizzes: A quizzes listing through which you can create new Quizzes or edit new quizzes using our Frontend Course Creator

Products: The Products tab offers instructors and administrators a fresh tab view for their WooCommerce products within the Frontend Dashboard.

Commissions: The Commissions tab for Instructors gives a detailed view of the instructor commissions and payout logs and their earnings.

Assignments: The Assignments Block provides a unique and simpler view for your assignment submissions to help you manage them with ease.

Essays: The Essays Block provides a unique and simpler view for your student essay submissions to help the admin and instructor manage essay submissions better.

Comments – The Comments block allows users to efficiently manage and navigate comments across courses, lessons, topics, quizzes, essays, and assignments. A

Quiz Attempts – The Quiz Attempts block allows user to
( instructors or administrators) easily access and review all student quiz attempts directly.

Course Reports: Instructors can view course and learner-specific reports for their courses and students.

Groups : Instructors can manage groups and view groups dashboard for their groups and students.

Settings: Instructors can take charge of their profile information, manage email notifications and Paypal details for efficient payouts in this dedicated tab.
All the other LearnDash and Instructor Role functionalities for Instructors are coming soon to the frontend dashboard. We are continually working to enhance the frontend dashboard by adding all other LearnDash and Instructor Role functionalities, ensuring it becomes the go-to solution for course creators. Our goal is to empower you to effortlessly create, maintain, and manage courses and content without having to access the Backend(WP) Instructor dashboard.
Frontend Instructor experience to create and manage courses:
Say farewell to the traditional backend setup and embrace the simplicity and convenience of managing your courses directly from the frontend of your website. With the Frontend Dashboard, Frontend course creator, you can create, edit, and organize your courses effortlessly, without the need to navigate through complicated backend screens. Learn about how to setup the frontend dashboard from here.
Completely block access to the Backend
With the Frontend Dashboard, you can provide instructors with a seamless frontend experience while completely blocking access to the backend “/wp-admin/” area. Instructors can focus on creating and managing their courses without being exposed to the complexities of the backend. This ensures a hassle-free experience for instructors while maintaining the integrity and security of your website. Learn more about how to disable the backend(WP) instructor dashboard and block Instructors backend access from
Personalize the dashboard to match your Brand and Site’s look and feel
Make the Frontend Dashboard your own by customizing its appearance to match your branding and style. With a wide range of customization options, you can easily tailor the layout, color schemes, and typography to create a unique and visually appealing dashboard that reflects your organization’s identity.
Frontend dashboard can be customized through Gutenberg editor, even if Gutenberg editor is disabled then you can customize the dashboard via global settings.


Customize and Extend the Frontend Dashboard to create a dashboard tailored to your business needs
The Frontend Dashboard is a Gutenberg block-based modular dashboard empowering you with all the flexibility to customize and extend the dashboard tailored to your business needs
The Gutenberg editor along with the Dashboard builder block enables you to enhance the dashboard’s capabilities by removing / adding/ rearranging content and features & functionalities. Whether you wish to include additional information, integrate external tools, or improve existing functions, allows your frontend dashboard to evolve with your needs. Learn about how to customize the frontend dashboard.
With the complete frontend experience for instructors offered by the simplified and intuitive Frontend Instructor Dashboard, administrators can confidently let instructors manage and oversee the course on their sites.
The Frontend Dashboard offers unparalleled customization flexibility, granting admins full control over instructor access and the ability to tailor the dashboard to meet unique business needs. With this powerful tool, administrators and business owners can efficiently manage instructors, elevating the overall quality of their e-learning experience. Say goodbye to limitations and embrace a new era of simplified course management and enhanced productivity.
Elementor Compatibility
The Frontend Course Creator with Elementor Support is a powerful feature that allows administrators and instructors to access the Elementor editor directly from the frontend of the course creation platform. This feature provides a seamless and user-friendly way to create, edit, and manage course content while limiting backend access and still providing full Elementor support.
Editing Course Content
“Edit your course content, including topics, quizzes, and lessons easily with this feature. On the Frontend Course Creator page, just click ‘Edit with Elementor,’ and the Elementor editor opens in a new tab, so you can make your edits conveniently.”
Switching Back to Normal WordPress Editor
After creating or editing content with Elementor, you can easily switch back to the normal WordPress editor for further modifications. Follow these steps to switch back:
- Return to the Normal Editor: Click on the Switch to default editor button on the Frontend Course Creator to return back to normal editor.
This flexibility allows you to take advantage of both Elementor’s intuitive visual editor and the traditional WordPress editor.


